Warm-up phase:
- A minimum of 10 minutes (more if your horse comes straight from the stall) must be allowed to warm up the muscles and joints with lunge clipped into the halter or cavesson, just in case you get some exuberant bucks. Don’t let your horse run though… if he needs to burn off steam in a dramatic way this should happen at liberty. He should experience lunging on the circle from the start as a disciplined activity for schooling purposes! After a few rounds with some voltes included, put him into an active working trot and give with your hand, if he stretches. Do some hand-changes. Watch for a good natural rhythm, “happy” ears (no wind-sucking noises in geldings) and relaxed snorting.
Schooling Phase:
- Here begins the True Dialogue: Now you may attach fairly long running reins and the lunge line to the bit of the bridle.
- Send the horse onto a large circle, first on the easy side (right if your horse is hollow to the right or vice versa) and in walk. Keep him “out!” so that the lunge is slightly taut, pointing the whip to his shoulder. To get his attention include some large voltes and bring him to a halt several times. Also walk with him, give gentle half halts on the lunge, whenever it is taut enough so the horse feels it. As soon as the horse reacts by mobilizing his jaw, i.e. he starts to chew or play with the bit, instantly relax your fingers as well. Relaxation of the mouth will lead to general relaxation.
- You aim to achieve that your horse plays with the bit pretty constantly – plays with it or “swallows” it – not hectic champing!! You will most likely not achieve this right away, but don’t despair. In case of doubt – GIVE ! You will certainly never teach your horse to seek the bit (and therefore the dialogue with you) by pulling, just because it is so difficult to keep the lunge line taut.
- Often this is easier in trot. Give gentle half halts, change the gait frequently. Define to yourself at each and every moment, just WHAT you want to achieve.
- Remember the ten laws of shaping (re-read the H.E.M. Blogs again!): your horse can only understand and learn if you work on one aspect at the time only. So either you work on achieving the chewing action, or a regular circle or gait – but at the beginning NOT both !!
- If you cannot get your horse to chew at all, you must now go to the very helpful video of M. Philippe Karl “The School of Légèreté” Part 1. Especially if you suspect that your horse has bad memories, being pulled on and rolled in and hurt in the mouth, this is the way to cure and convince him of your good intentions.
- If all goes well, eventually your horse will drop his head, seek the bit and snort contentedly, but should not go to sleep! Keep the walk active and rhythmic. Keep playing with his mouth so the dialogue keeps going.
Your signals:
- Your half-halt means: “Hey, I’m talking to you! Anyone home?”
- If he now starts to pull against your hand, your aid was too strong. Your horse has bad memories with hard hands – pull creates counter-pull!
- If there is no answer, i.e. the horse ignores you either the respect is not established sufficiently (you often allow him to ignore you, to push into your space or to relax his attention) – back to respect-building exercises in the book “From Leading to Liberty”!
- or your horse does not want to talk to you – why?
- Are you chatting with someone else and not giving him full attention? (Unfair of you!)
- Is he too distracted? (no stallion will pay attention to you, when a mare in heat is calling outside) – try to remove the distraction.
- Is he too busy with other things? (health concerns, biting flies, rubbing surcingle) – fix the problem.
- He has bad memories of “hard hands”. Here only patience and The School of Légèreté helps.
- If your aid was not clear enough – he might be just tentative (has his ears on you but gives no response) because he is insecure of what you want. (Re-assure him, try again)
- Remember to combine your lunge-aids with all other aids you have in your quiver: use voice and body language (including the handling of the whip) to help him understand.
- Try to achieve the same soft mouth (chewing) in trot. Train on both hands. Be patient!
- Adjust the running reins to get a bit more elevation. During schooling you will stop and do this often, depending on the reaction you get, or wish to get (see earlier Blogs). In all cases the horse’s nose must remain clearly in front of the vertical, otherwise the auxiliary reins are too short.
- Change hands frequently and get a soft responsive mouth from your horse! Soft hands!
- From here on repeat all the patterns we played before, always concentrating on having a relaxed and attentive horse! Take them from easy to more complex and take a step back to easier every time when the horse becomes fast, nervous, or shows signs of unhappiness.
- Stop your work phase before the horse’s cooperation dwindles. At the end ask for an easy exercise, which you know he will perform gloriously. This is the high note to stop on! Praise…
The cool down phase:
- Detach the running reins. What you do in the cool-down and how long it will be depends on the state of the horse. If he is tired, let him walk and change hands a few times. Still talk to him on the bit, but do not demand any “performance”. If he is quite hot, relax him in gentle trot and walk, then throw a light blanket over him. If he is not tired and still very motivated, we include some favourite games such as the Spanish Step – on voice also on the lunge line! I always end the session by a little walk along the road with a bit of grazing – your horse will agree for sure. This is the best way to get a normally nervous horse used to roads and traffic! He is satisfied and slightly tired, he moves parallel with you and grazes, and thus fulfills all his natural desires!
- The main thing is that the horse breathes calmly at the end and is content, relaxed and cool.
The end goal of your schooling:
- In the very end you want a horse who goes in self-carriage, calm, relaxed and collected. Please keep in mind that people who tell the beginner how to collect a horse simply on the lunge line are not telling the truth. This is impossible for a layman and in most cases is achieved only under an experienced rider.
- If you pull on your horse and “drive him into the bit” from behind, you will certainly never achieve collection! It cannot be clear to your horse to step onto the breaks and the gas at the same time – be reasonable! You would only confuse him, loose his trust and make him avoid the famous “dialogue on the bit” as much as possible. Being on side reins (which many lungers then make too short in order to achieve the looks of collection!) he will roll himself in, get behind the bit to avoid the pain and damage his cramped back as a consequence.
- Remember that to achieve extension we don’t work the horse exclusively long and deep: the gymnastic training effect is reached only through the frequent interchange of tension and relaxation, therefore of extension and elevation (later collection).
- It is your job as a horseman or horsewoman to help your horse to achieve the end goal. You keep in mind that a horse does not do something wrong on purpose – it is not possible for him to scheme like that! He always chooses a solution which seems the best answer to a certain situation at that time – and if that answer is not what you wanted, your demand was not clear enough.
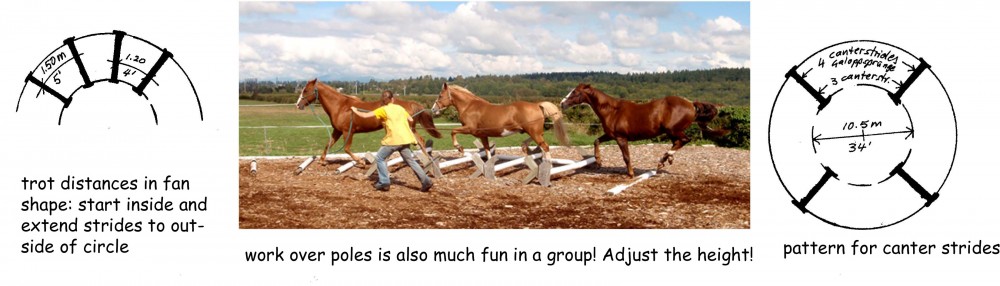
Work over poles:
- If your horse is relaxed rather than frightened he will always try to do your bidding. As he becomes more confident you can include some work over poles in your work phase. This makes the horse look down (conducive to relaxation) and watch out for his feet. If you played the Game “Leg counting machine” (From Leading to Liberty page 136) your horse will have no problem with this!
- Set your poles at the correct distance for walk or trot (ask someone who knows if you don’t, as the distance depends on the size of the horse), and adjust them if the horse hits rather than clears them. As they are fanned out on the circle you can attempt to lengthen the horse’s stride by taking him more to the outside of the “fan”, so your distances can vary from 4 to 5 feet for example. Watch for the swinging back and regular rhythm. (click on picture for enlargement)
|
|
Lösungsphase:
- Ein Minimum von 10 Minuten (mehr falls Ihr Pferd stracks aus der Box kommt) ist nötig, um die Muskeln und Gelenke anzuwärmen, mit Longe ins Halfter oder den Kappzaum verschnallt für den Fall, daß es noch ein paar übermütige Bocker gibt. Lassen Sie Ihr Pferd nicht rennen… wenn es in dramatischer Weise Dampf ablassen muß, soll das in Freiheit geschehen. Es soll die Arbeit an der Longe und auf dem Zirkel von vorn herein als disziplinierte Aktivität zur Ausbildung erfahren! Nach ein paar Runden mit einigen Volten dazwischen verlangen Sie einen aktiven Arbeitstrab und geben nach, wenn es sich dehnt. Machen Sie einige Handwechsel. Sie wollen einen guten natürlichen Rhythmus und “glückliche” Ohren (keine Schlauchgeräusche bei Wallachen) und ein Abschnauben erreichen.
Arbeitsphase:
- Hier fängt der Dialog an. Jetzt schnallen Sie die noch ziemlich langen Hilfszügel und die Longe ins Gebiß der Trense.
- Schicken sie das Pferd im Schritt auf den Zirkel, erst auf der leichteren Seite (rechts, wenn das Pferd rechts hohl ist, ansonsten umgekehrt). “Hinaus!”, so daß die Longe ansteht, mit Peitsche auf die Schulter zeigend. Machen Sie ab und zu eine Volte oder verlangen ein Anhalten, damit das Pferd aufmerksam ist. Laufen Sie auch mit und geben Sie sachte halbe Paraden, wenn die Longe genug ansteht, so daß es das fühlen kann. Sobald das Pferd mit einer Kaubewegung reagiert, relaxieren Sie auch sofort Ihre Hand. Entspannen des Mauls führt zu genereller Entspannung.
- Sie wollen erreichen, daß Ihr Pferd ziemlich ständig mit dem Gebiß spielt – nicht hektisches Zähneklappern!! Das wird vermutlich nicht gleich gelingen – Geduld! Im Zweifelsfall immer nachgeben! Sie würden Ihrem Pferd sicherlich nie beibringen den Kontakt am Gebiß (und damit den Dialog mit Ihnen) zu suchen, indem Sie ziehen, bloß weil es so schwierig ist die Longe straff zu halten.
- Oft ist dies im Trab leichter. Geben Sie leichte halbe Paraden und wechseln Sie oft die Gangart. Sie müssen jeden Moment genau wissen, WAS Sie erreichen wollen!
- Erinnern Sie sich an die 10 Gebote des Formens (lesen Sie die H.E.M. Blogs noch einmal!): Ihr Pferd kann nur verstehen und lernen, wenn Sie immer nur an einem Aspekt gleichzeitig arbeiten. D.h., entweder wollen Sie das Kauen, oder einen regelmäßigen Zirkel oder eine Gangart – aber anfangs nicht beides!!
- Wenn Ihr Pferd gar nicht abkaut müssen Sie nun zu den hilfreichen Videos von H. Philippe Karl “Die Schule der Légèreté” Teil 1 gehen. Vor allem, wenn Sie vermuten, daß Ihr Pferd schlechte Erinnerungen hat, einer Rollkur unterworfen war und im Maul geschädigt ist, ist dies nun der Weg ihm zu helfen und es von Ihren guten Absichten zu überzeugen.
- Wenn alles gut läuft, wird Ihr Pferd nach einer Weile seinen Kopf senken, mit dem Gebiß spielen und abschnauben – dabei sollte es aber nicht einschlafen! Halten Sie den Schritt fleißig und im Takt. Achten Sie immer darauf, daß es mit Ihnen am Gebiß “spricht”.
Ihre Signale:
- Halbe Parade bedeutet: “Ich rede mit dir! Hörst du mich?”
- Wenn es jetzt gegen Ihre Hand zieht war die Parade zu grob. Das Pferd hat schlechte Erinnerungen mit einer harten Hand – Zug schafft Gegenzug!
- Wenn keine Antwort erfolgt, d.h. das Pferd Sie ignoriert:
- hier fehlt entweder der Respekt (Sie erlauben ihm oft Sie zu ignorieren und in Ihre Privatspäre einzudringen) – zurück zum Buch “From Leading to Liberty”mit Respektsspielen!
- oder das Pferd will nicht mit Ihnen sprechen – warum?
- plaudern Sie mit jemandem und geben ihm nicht Ihre volle Aufmerksamkeit? (unfair!)
- Ist es zu abgelenkt? (kein Hengst hört auf Sie wenn draußen eine rossige Stute ruft) – versuchen Sie die Ablenkung zu beseitigen.
- Ist es mit anderen Dingen beschäftigt? (Gesundheitsprobleme, Fliegen, ein drückender Gurt) – lösen Sie das Problem.
- Das Pferd hat schlechte Erfahrungen mit harten Händen. Hier hilft nur Geduld und die “Schule der Légèreté”.
- Falls Ihre Hilfen nicht klar genug waren, ist das Pferd vielleicht nur zögerlich (es hat die Ohren auf Sie gerichtet, aber reagiert nicht), weil es unsicher ist, was Sie wollen. Beruhigen Sie es, versuchen Sie nochmal.
- Vergessen Sie nicht Ihre Longenhilfen mit allen anderen Hilfen zu kombinieren: Stimme und Körpersprache (inklusive Bewegungen mit der Peitsche).
- Versuchen sie das Abkauen im Trab zu erreichen. Üben Sie auf beiden Seiten – üben Sie Geduld!
- Nun stellen Sie die Hilfszügel für ein bißchen mehr Aufrichtung ein. Während des Trainings justieren Sie die Zügel oft, je nach Reaktion des Pferdes (siehe frühere Blogs). Immer jedoch muß die Nase des Pferdes vor der Senkrechten bleiben, sonst sind die Hilfszügel zu kurz.
- Machen Sie öfter Handwechsel, achten Sie auf das Abkauen! Üben Sie Ihre weiche Hand!
- Ab hier durchlaufen Sie alle Muster, die wir vorher geübt haben, immer mit Konzentration auf ein entspanntes und aufmerksames Pferd! Üben Sie von leichteren zu komplexeren Mustern und nehmen Sie einen Schritt zurück zu Leichterem jedesmal, wenn das Pferd schneller oder nervös wird oder andre Zeichen von Beunruhigung zeigt.
- Beenden Sie die Arbeitsphase bevor das Pferd unkooperativ wird. Am Schluß verlangen Sie etwas Leichtes, das das Pferd gern und glorios zeigt. Das ist die “high note”! Loben…
Entspannungsphase:
- Machen Sie die Hilfszügel ab. Wie lange diese Phase andauert hängt vom Zustand des Pferdes ab. Wenn es müde ist, lassen Sie es im Schritt laufen, mit ein paar Handwechseln. Halten Sie immer noch Kontakt am Gebiß, aber verlangen Sie keine Leistung mehr. Wenn das Pferd schwitzt, lassen Sie es im entspannten Trab und Schritt gehen und werfen Sie eine leichte Decke über. Wenn es nicht müde und noch sehr motiviert ist schalten wir beliebte Spiele ein, wie z.B. den spanischen Schritt – auf Stimme auch an der Longe! Wir beenden die Arbeit immer mit einem kleinen Spaziergang zum Grasen – Ihr Pferd macht sicher gern mit. Das ist die beste Art ein sonst nervöses Pferd an Straßen und Verkehr zu gewöhnen! Es ist zufrieden und leicht müde, es läuft parallel zu Ihnen und grast, es erfüllt so alle seine natürlichen Bedürfnisse. Hauptsache ist, daß das Pferd am Ende ruhig atmet und zufrieden, entspannt und kühl ist.
Endziel der Ausbildung:
- Zu guter Letzt wollen sie ein Pferd, das in Selbsthaltung geht, ruhig, entspannt und versammelt. Aber Leute, die einem Anfänger sagen, wie man ein Pferd nur an der Longe versammelt, sagen nicht die Wahrheit. Für einen Laien ist das nicht möglich, und wird meistens sowieso nur unter einem erfahrenen Reiter erreicht.
- Wenn Sie vorn am Pferd ziehen und ihn “von hinten ans Gebiß treiben”, werden Sie an der Longe sicher nie Versammlung erreichen! Es kann doch einem Pferd nicht klar sein was Sie wollen, wenn Sie zugleich auf Gas und Bremse stehen! Sie würden es nur verwirren, sein Vertrauen verlieren, und es lehren, den famösen “Dialog am Gebiß” soweit wie möglich zu vermeiden. Da es ausgebunden ist (und in dieser Situation der Longeur oft die Ausbinder zu kurz macht, um den Look der Versammlung zu erreichen!), wird es sich nun einrollen, hinter das Gebiß kommen, um den Schmerz zu umgehen, und seinen Rücken verkrampfen.
- Sie erinnern sich, daß die Dehnungshaltung nicht ausschliesslich lang und tief erarbeitet wird: der gymnastische Trainingseffekt kann nur durch die Abwechslung von Anspannung und Entspannung, also Dehnung und Aufrichtung (später Versammlung) erreicht werden.
- Es ist Ihr Job als Pferdemensch dem Pferd zu helfen das Endziel zu erreichen. Vergessen Sie nicht, daß ein Pferd nie absichtlich etwas falsch macht – so kann es gar nicht denken! Es wählt immer eine Lösung, die ihm in einer gewissen Situation die beste scheint – und wenn das nicht die ist, die Sie wollten, dann waren Ihre Hilfen nicht klar genug.
Arbeit über Stangen:
- Wenn Ihr Pferd entspannt ist anstatt ängstlich, wird es immer versuchen Ihre Wünsche zu erfüllen. Sowie es Vertrauen hat können Sie auch Arbeit über Stangen in die Arbeitsphase einfügen. Es verleitet das Pferd dazu hinunter zu schauen (was gut zum Entspannen ist) und auf seine Füße zu achten. Wenn Sie vorher das Spiel “Beinzählmaschine” (From Leading to Liberty Seite 136) gespielt haben, hat es damit gar keine Schwierigkeiten!
- Legen Sie die Stangen im richtigen Abstand für Schritt oder Trab (wenn das neu für Sie ist, fragen Sie jemanden, da es von der Größe Ihres Pferdes abhängt) und passen Sie sie an, wenn das Pferd immer anstößt. Da die Stangen im Kreis gefächert gelegt sind, hat man so die Möglichkeit die Schritte des Pferdes zu verlängern, indem man es weiter außen longiert, da die Abstände z.B. von 1.20 m bis 1.50 m variieren. Achten Sie auf einen schwingenden Rücken und regelmäßigen Takt. (Klicken Sie auf das Bild zum Vergrößern)
|