Work on the long-reins – Part 04
|
|
Arbeit am langen Zügel – Teil 04
|
- In the last Blog we practised how to bend the horse and get him through the corner cleanly. When the horse faces the wall at the corner, he will naturally understand the bend better, even if your rein aids are not totally clear yet, because he will not voluntarily hit the wall. This time we want to attempt circles, which are actually round. So now we must fine-tune our aids and balance the outside rein aid and the inside one very accurately, so the horse gets directions for both “stay out on the circle track” as well as “bend slightly to the inside”.
- Last time we also did a hand-change through the diagonal, during which we learned to keep the horse straight by giving exactly the same rein aid on both reins. This is easiest at first by walking behind the horse, as then your hands are in a symmetrical position to each other.
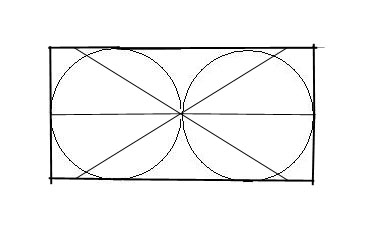
Lay your tracks down for orientation:
- During warm-up I lay down the tracks in the arena as precisely as possible, which will give me something to go by when I attempt my circles. So I change through the diagonal twice, which gives me the centre point of the arena, then I go down the centre line (and hopefully pass right through the intersection).
-
 Lay your tracks to plan your circles
-
-
Attempt a circle:
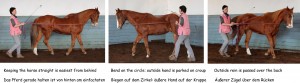
- While still walking along the wall introduce a slight bend to the inside now – and remember! We do NOT do this by pulling on the inside rein, but rather by lifting and perhaps vibrating, or giving little tugs on the rein and opening the arm to the side.
- I find it is easiest to first park the outside hand on the croup, as like this you have a good chance to at least keep it still. Remember that we have to be clear with the reins and can´t wobble!
Turning onto the circle line:
- When turning onto the circle the outside rein must GIVE just enough to tell the horse that now we are actually changing direction – this “giving” is a small movement which is done by opening your fingers a bit.
- Indicate the change in direction also with your body language (which your horse observes always, unless you walk right behind him) – lean into the curve a bit, perhaps open your inside arm, if the horse does not understand. You must determine your track exactly (if you don’t know where you are going, how could the horse feel it?) by always looking ahead ¼ circle and visually fixing the point through which you want to pass next.
- Introduce a new position (pos. 3) – next to and slightly behind the horse with the outer rein passed over the horse’s back. I find that this makes it harder to be clear on the outside rein contact – the horse tends to drift over the outside shoulder. You need to learn this position though, because we need it later (with very good rein finesse) in all the lateral work.
|
|
- Im letzten Blog haben wir geübt, wie man das Pferd biegt und sauber durch die Ecken führt. Wenn das Pferd in der Ecke auf die Wand zugeht, versteht es die Biegung natürlich besser, selbst wenn Ihre Zügelhilfen noch nicht ganz klar sind, da es ja nicht in die Wand rennen will. Diesmal werden wir Zirkel versuchen, die tatsächlich rund sein sollen. Daher lernen wir jetzt eine Feinabstimmung und Balance zwischen der inneren und äußeren Zügelhilfe, so daß das Pferd beide Anleitung bekommt, das „bleib draußen auf dem Zirkel“ sowohl wie das „bieg dich leicht nach innen“.
- Letztes Mal haben wir auch einen Handwechsel durch die Diagonale gemacht, während dessen wir gelernt haben, das Pferd gerade zu halten, indem wir genau die selben Hilfen an beiden Zügeln gegeben haben. Das ist anfangs leichter, wenn man hinter dem Pferd geht, da dann beide Hände iin einer symmetrischen Position nebeneinander stehen.
Legen Sie sich Spuren zur Orientierung:
- Während der Aufwärmphase lege ich meine Spuren so präzis wie möglich, die mior dann helfen, meine Kreise besser zu planen. Ich wechsle zweimal durch die Diagonale, was mir den Mittelpunkt der Halle angibt, und treffe den dann hoffentlich, wenn ich durch die Mittellinie wechsle.
Nun der Zirkel:
- Während ich noch auf dem Hufschlag an der Wand gehe, verlange ich eine leichte Biegung nach innen – vergessen Sie nicht! Das geschieht NICHT durch Ziehen am inneren Zügel, sondern durch Anheben oder vielleicht Vibrieren, eventuell auch kleine Zupfer oder ein Öffnen des Armes zur Seite.
- Wieder finde ich das anfangs leichter mit der äußeren Hand auf der Kruppe geparkt, da sie so leichter still zu halten ist. Wir erinnern uns, daß die Zügelhilfen klar sein müssen und daher nicht herumwackeln dürfen!
Abbiegen auf die Zirkellinie:
- Beim Abbiegen auf den Kreis muß der äußere Zügel gerade genug nachgeben, damit das Pferd versteht, daß wir nun die Richtung ändern – dieses Nachgeben ist eine kleine feine Bewegung nur durch Öffnen der Finger.
- Zeigen Sie den Richtungswechsel auch durch Körpersprache an (die das Pferd ja immer beobachtet, außer wenn Sie direkt hinter ihm gehen), indem Sie sich in die Kurve lehnen, und vielleicht den inneren Arm etwas seitlich öffnen, wenn das Pferd Sie nicht versteht. Sie müssen Ihre Spur genau planen (wenn Sie nicht mal wissen wohin Sie eigentlich wollen, wie könnte das Pferd es dann erraten?), indem Sie immer einen Viertelkreis voraus schauen und mit dem Auge den Punkt fixieren, den Sie treffen wollen.
- Nun führen wir eine neue Position ein (Pos. 3) – neben und leicht hinter dem Pferd mit dem äußeren Zügel über seinen Rücken geführt. Ich finde, das macht es noch etwas schwieriger außen klare Zügelhilfen zu geben – vielleicht driftet das Pferd nun über die äußere Schulter weg. Dennoch müssen wir das lernen, da wir diese Position später in den Seitgängen mit großer Finesse beherrschen sollen.
|
|
|
Possible problems:
- On the circle, the horse might start to drift over his outside shoulder – this is one of the main difficulties of performing a regular and round circle! He might also over-react to your rein aids of “stay out!” and “please bend!” by zigzagging around, rather than harmoniously bending on the curved track. Your aids are then either too strong or too unclear. Walk more slowly! Fine-tune your gentle tugs on the reins and check very honestly that you are not pulling! Always give the horse the chance to understand and follow your directions by himself rather than trying to coerce him into a certain position! Patience… this takes practise. Make sure he is still playing with the bit and not cramping up.
Practise different positions:
- Still on the circle, practise changing positions from next to the croup (pos. 1) to behind the horse and back (pos. 2), just like we did along the wall before. While doing this, concentrate very much on keeping the same intensity of contact on both reins! More difficult in Position 3! Interchange all three positions frequently while retaining the same soft contact on the reins. Praise for each correct reaction instantly with voice – pause, rest and feed often to keep the motivation going.
|
|
Mögliche Probleme:
- Auf dem Zirkel fängt das Pferd an über die äußere Schulter nach außen weg zu driften – eins der Hauptprobleme, wenn man versucht einen regelmäßigen und runden Kreis hinzukriegen! Vielleicht überreagiert es auch auf die beiden Hilfen des „bleib draußen“ und „bitte bieg dich“, indem es im Zickzack auf der Kurve eiert, anstatt sich zu biegen. Dann sind die Hilfen entweder zu stark oder zu unklar. Gehen Sie langsamer! Üben Sie die Feinabstimmung der leichten Zupfer an den Zügeln und kontrollieren Sie immer, daß Sie tatsächlich nicht ziehen! Geben Sie dem Pferd immer die Chance selber Ihre Anleitungen zu verstehen und zu befolgen, anstatt zu versuchen es in eine gewisse Haltung zu zwingen. Geduld… hier braucht man Übung. Schauen Sie, daß es noch abkaut und sich nicht verspannt.
Üben der verschiedenen Positionen:
- Jetzt auf dem Zirkel, wechseln Sie zwischen den verschiedenen Positionen neben der Kruppe (Pos. 1) zu hinter dem Pferd (Pos. 2), wie wir es schon entlang der Wand geübt hatten. Konzentrieren Sie sich dabei sehr auf das Erhalten der selben Intensität des beiderseitigen Zügelkontaktes! Noch schwieriger in Position 3! Wechseln Sie oft hin und her und halten Sie dabei weichen Kontakt zum Maul. Loben Sie jede richtige Reaktion sofort mit Stimme – pausieren Sie oft und füttern, damit die Motivation nicht erlahmt.
|
|
|
Figure Eights:
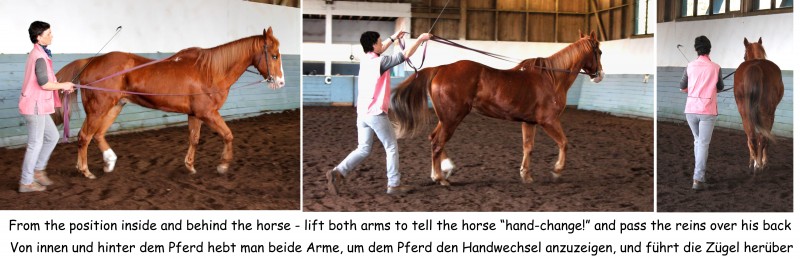
- In the last Blog we mentioned two ways to perform a hand-change (we did this on the diagonal). While walking next to the croup you can either lift both arms to pass the reins over to the other side – which you can also do from the new position 3 mentioned above. Or you drop into the position behind the horse by feeding the lines out, and then picking them up again on the other side.
Possible problems:
- It is particularly difficult at the start to retain the correct soft contact while changing sides, especially if you do the “arm-lifting” transition. This is the moment where the horse might drift to the outside the most, because that rein is usually more difficult to control. Furthermore you must speed up your walking at this point to round the croup, (which you will notice more, once you practise this in trot) which requires a new kind of hand-foot coordination – be patient with yourself too and do not get frustrated, if this takes a while! The horse will soon associate the lifting of your arms with a hand-change, this in itself will become the command.
|
|
Achter Figuren:
- Im letzten Blog haben wir zwei Arten des Handwechselns erwähnt (wir übten das auf der Diagonalen). Während Sie neben der Kruppe gehen, können Sie entweder beide Arme anheben, um die Zügel auf die andere Seite zu führen – was Sie aus der neuen Position 3 ebenso machen würden. Oder Sie fallen in die Position hinter dem Pferd zurück, indem Sie die Leinen auslassen, und nehmen sie dann auf der anderen Seite wieder auf.
Mögliche Probleme:
- Es ist anfangs besonders schwierig während dieses Seitenwechsels den weichen und konstanten Kontakt zu erhalten, besonders, wenn man dazu die Arme anhebt. In diesem Moment wird das Pferd am ehesten nach außen wegdriften, da der neue äußere Zügel am schwierigsten zu kontrollieren ist. Außerdem muß man in dem Moment des Wechseln auch ein paar Schritte schneller laufen, um die Kruppe zu umrunden, (was man später im Trab besonders merkt) und das verlangt eine neue Art der Hand-Fuß-Koordination. Seien Sie auch mit sich selbst geduldig und werden Sie nicht frustriert, wenn das eine Weile braucht! Das Pferd wird bald das Anheben der Arme schon mit dem Handwechsel assoziieren, so daß dies selbst schon das Kommando darstellt.
|
|
|
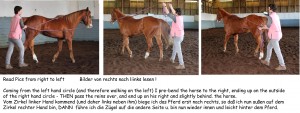
- It might be easier to achieve the hand-change with constant contact, if you pre-bend your horse to the other side by another new position (pos. 4) – namely walking on the “wrong side” with one rein passed over the back of the horse as shown below (which you must read in the direction of travel, i.e. the right picture first). In this example we are coming from a left-hand circle, so I walked on the inside of the horse (his left) with the reins over his back, then, still staying on that left side, pre-bent him to the right before passing the reins over to the other side and changing sides myself.
|
|
- Manchmal ist der Handwechsel mit konstantem Kontakt einfacher zu erreichen, wenn man das Pferd auf die andere Seite „vor-biegt“, was in einer neuen Position (Pos. 4) resultiert – in der man auf der „falschen“ Seite mit dem Zügel über dem Pferderücken geht wie im Bild gezeigt. (diese Bilder müssen in Bewegungsrichtung angeschaut werden, also von rechts nach links). In diesem Beispiel kommen wir von einem Zirkel auf der linken Hand, so daß ich innen links laufe, dann, immer noch auf der linken Seite des Pferdes, biege ich ihn nach rechts bevor ich die Zügel über den Rücken führe und selber die Seite wechsle.
|
|
|
- (Position 4 will later be used to introduce the Travers movement on the long reins).
Remember:
- Throughout watch for relaxation of the horse (does he play with the bit?) and instantly go back one learning step, if he gets nervous. Find a good walking rhythm for both of you and keep it throughout. Don´t forget to use your body language clearly! Harmonise with the horse in terms of speed – and try to make him understand that you want him to speed up or slow down (and adjust to you) when you do so.
- Interchange straight bends along the wall and on the circle frequently.
- Keep your voice aids clear and to a minimum – do not constantly click your tongue! Your conversation should be restricted to commands for right (“droite!”) and left (“gauche!”), “ho!” and “walk on!”, “good boy!” (en route to indicate he is doing the right thing) and “brav!” (emphatic – and followed by a stop to rest and feed). Your whip aids should be calm and gentle – when the whip is not “speaking” (every time the horse is doing the right thing) it points straight up or down (review the earlier blogs for positions).
- Check that you never pull, especially not on the inside rein! Mete out exactly the right dose of tugs or vibration on each rein as well as the “giving” and check for the correct result – it is always the learning result that counts! Give reinforcement with voice instantly each and every time you see the slightest improvement! For me a good result includes very much that the horse is happy and enjoys the exercise – so keep that motivation going!
Last but not least: |
|
- (Die Position 4 wird später für das Erlernen der Travers Bewegung gebraucht).
Beachten Sie:
- Die ganze Zeit müssen Sie sicherstellen, daß das Pferd noch entspannt ist (spielt es mit dem Gebiß?) und immer einen Lernschritt zurück treten, wenn es nervös wird. Finden Sie einen guten Rhythmus im Schritt für beide und erhalten Sie den. Vergessen Sie auch nicht Ihre Körpersprache klar einzusetzen! Harmonisieren Sie mit dem Pferd in puncto Tempo – und versuchen Sie auch ihm nahezulegen, sich anzupassen, wenn Sie schneller oder langsamer gehen.
- Wechseln Sie oft zwischen Biegung des pferdes auf der Geraden an der Wand zu der auf dem Zirkel.
- Beschränken Sie die klaren Stimmhilfen auf ein Minimum – und vermeiden Sie ständiges Zungenschnalzen ganz! Ihre Konversation sollte verbal nur aus Kommandos für rechts und links, „halt“ und „Schritt“, „guut“ (Anzeige: „du bist auf dem richtigen Weg“) und „brav!!“ (betont: „das wars!“, dann Pause und Futter) bestehen. Die Peitschenhilfen sollten ruhig und sanft sein – und wenn die Peitsche nicht „spricht“ (eben immer, wenn das Pferd schon das Richtige tut), sollte sie gerade nach oben oder untern in Null-Stellung sein (siehe frühere Blogs mit Bildern).
- Kontrollieren Sie immer redlich, daß Sie nicht am Zügel ziehen, vor allem nicht am inneren! Dosieren Sie Ihre Zupfer oder Vibration and jedem Zügel ganz fein, und ebenso das Nachgeben – und nehmen Sie das Resultat wahr, denn es ist immer das Lernergebnis, welches zählt! Verstärken Sie jedesmal sofort mit Stimme, wenn Sie die kleinste Verbesserung feststellen! Für mich beinhaltet ein gutes Resultat ebenfalls, daß das Pferd glücklich und zufrieden ist, so daß die Motivation erhalten bleibt.
Zu guter Letzt: |
|

|
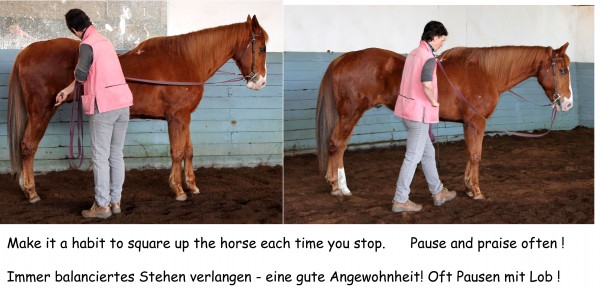
- Pause often – and make it a good habit to square up the horse each time, so he always rests balanced. Praise the horse – make long-reining a pleasure for him, as much as you can as a beginner!
Next time we will start to work in trot and practise more steering (serpentines, voltes and so on) |
|
- Pausieren Sie oft – und als gute Angewohnheit stellen Sie das Pferd bei jedem Anhalten im Gleichgewicht hin. Loben Sie Ihr Pferd – machen Sie die Arbeit am langen Zügel auch für Ihren Partner zum Vergnügen – was als Anfänger nicht selbstverständlich ist!
Nächstes Mal fangen wir an im Trab zu arbeiten und üben weiter gut zu lenken (Schlangenlinien, Volten usw.) |