Long-Reining – Part 02
|
|
Am langen Zügel –Teil 02
|
How to start:
Equipment:
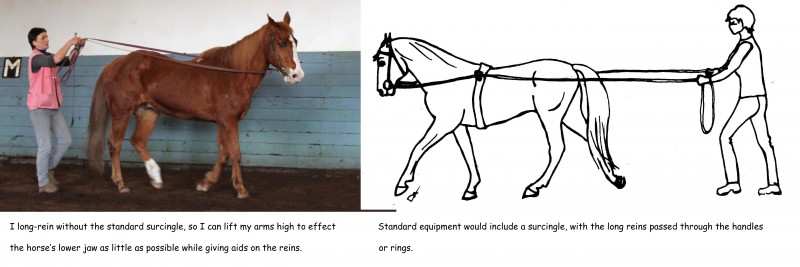
- It is not necessary to discuss any special equipment. I use a simple snaffle bridle with cheeks and my lunge line, into the hand loop of which I attach a snap hook. Both ends of the lunge line are then attached to the bit. I do not use a surcingle, because, as I will show, I try to give rein aids which go UP, rather than back, as much as this is possible (according to what I have learned from Philippe Karl and the “School of Légèreté”), so I want to be able to lift the reins well above the horse’s back.
|
|
Der Anfang:
Ausrüstung:
- Wir benötigen hierfür keine besondere Ausrüstung. Ich benutze eine einfache Knebeltrense und meine Longe, in deren Handschlaufe ich einen Karabinerhaken einschnalle. Beide Enden der Longe werden dann in das Gebiß eingehängt. Ich benutze keinen Gurt, da ich, wie ich zeigen werde, versuche solche Zügelhilfen zu geben, die nach Möglichkeit nach OBEN, anstatt nach hinten wirken (in Übereinstimmung mit dem was ich von Philippe Karl und der “School of Légèreté” gelernt habe), so daß ich die Zügel hoch über den Pferderücken heben können will.
|
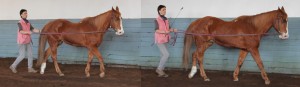
 Without a surcingle you can lift the arms high and try to direct the rein aids toward the corner of the horse’s mouth.
Ohne Gurt kann man durch Arme anheben versuchen, die Zügelhilfen mehr in Richtung Maulspalte einzusetzen.
|
- I have previously run through my prep-exercises as mentioned in the last Blog (see book “From Leading to Liberty”) to get the horse used to the feel of the line around his rump and to whip aids. I start my session with flexion exercises on the ground à la Ph. Karl (see the videos of the “School of Légèreté”) to mobilize my horse’s jaws and make Beau give his mouth. We get going along the wall, with me walking behind the horse with a good distance at the end (which is really its mid-point) of my lunge line. Only once I am sure of my horse’s behaviour do I step closer as shown in the picture below. I carry the whip in my right hand, because this is easier for me in terms of coordination, as I am right-handed, and in the beginning I point it toward the ground. Later I mostly carry it upward as shown below on the right, because this gives me more freedom to apply touching aids to the right or left, on the croup or on the flank. At the start these whip movements might make your horse nervous though, so introduce them carefully. Caress him with the whip often to express your friendly intentions!
|
|
- Ich habe mit meinem Pferd die vorbereitenden Übungen durchlaufen, die ich im letzten Blog erwähnte (siehe das Buch “From Leading to Liberty”) damit sich das Pferd an das Gefühl der Leinen um sein Hinterteil und an die Peitschenhilfen gewöhnt. Dann fange ich an mit den Biegeübungen am Boden, wie bei Ph. Karl (siehe die Videos der the “School of Légèreté”), um das Maul beweglich zu machen und Beau zum Nachgeben anzuregen. Wir laufen entlang der Bande los, ich mit gutem Abstand hinter dem Pferd fast am Ende (eigentlich die Mitte) meiner Longe. Erst wenn ich meines Pferdes sicher bin komme ich näher wie im Foto gezeigt. Ich halte die Gerte in meiner rechten Hand, weil das für mich als Rechtshänder einfacher ist, und lasse sie anfangs zum Boden gerichtet. Später trage ich sie aufrecht, wie rechts unten gezeigt, weil ich so variabler in der Anwendung bin, mit Touchierhilfen nach rechts oder links, auf der Kruppe oder an der Flanke. Führen Sie diese Hilfen vorsichtig ein, falls Ihr Pferd durch diese Bewegungen der Peitsche anfangs noch nervös wird. Streicheln Sie oft mit der Gerte, um Ihre freundlichen Absichten auszudrücken!
|
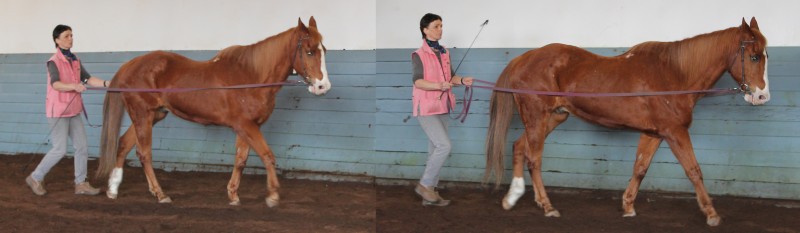
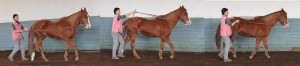
 Carry the whip pointing down at the start, later the upward position is more flexible.
Anfangs hält man die Gerte nach unten, aber später ist die andere Position flexibler in der Anwendung. |
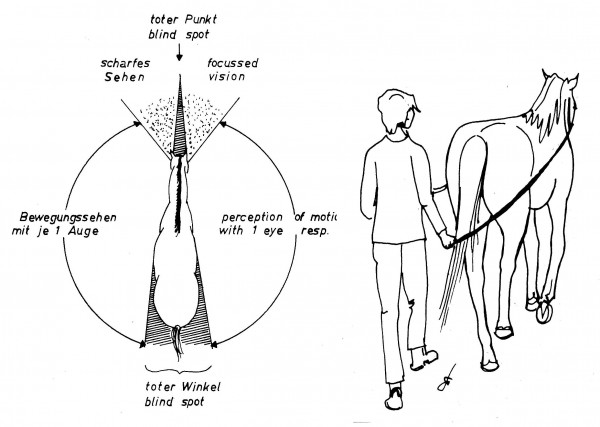
- Your horse might also show signs of nervousness if you walk directly behind him – in his blind spot. Recall what the horse’s eye can see and how: directly behind his tail he can see nothing, so you have to step sideways to leave the blind spot to be clearly visible to him at the start.
|
|
- Auch wenn Sie direkt hinter dem Pferd laufen kann es nervös werden, denn da sind Sie in seinem toten Winkel. Erinnern Sie sich, wie und was das Pferd sehen kann: direkt hinter seinem Schweif sieht es nichts, also treten Sie besser ein bißchen seitwärts, damit es Sie klar erkennen kann.
|
 Keep in mind what the horse is able to see! If he gets nervous, step out of his blind spot to the side.
Direkt hinter sich kann das Pferd nichts sehen! Wenn es nervös wird, treten Sie mehr zur Seite.
|
- While walking you first attempt to make your horse relax. You also want him to play with the bit: “please chew!” Establish a very soft contact on the reins for this. In case of doubt: less is better! If you do not use a noseband (and we don’t), then your horse has the option to tell you very clearly, when your hand is too hard.
|
|
- Noch im Schritt wollen Sie zuerst Ihr Pferd zum Entspannen bringen. Es soll auch mit dem Gebiß spielen: „bitte kau!“ Hierfür muß man einen sehr sanften Kontakt am Zügel herstellen. Im Zweifelsfalle ist weniger immer besser! Wenn Sie keinen Nasenriemen benutzen (wir tun das nicht), dann hat das Pferd die Möglichkeit klar auszudrücken, ob Ihre Hand zu hart ist.
|
 Without noseband the horse can protest! No matter how loose the reins look – if the mouth is open like this your rein-aids are too strong!
Ohne Nasenriemen kanndas Pferd protestieren! Egal wie lose die Zügel aussehen – wenn das Maul so geöffnet ist sind die Zügelhilfen zu stark. |
- He will open his mouth in protest, take his nose up and hollow his back. If your horse is very finicky like my traumatized Beau, just use a little vibration on the reins to entice him to chew. Practice on both sides and find out with which position (you more to the right or left, closer or further away) your horse is most comfortable. Remember that according to the Laws of Shaping it is your job as a trainer to make success easy for your horse! Introduce your voice commands and beware of constant tongue clicking! Try to only talk when it means something to the horse – this is what being clear means! Establish a regular rhythm in walk. Watch for relaxed ears and mobile mouth. Now hook the end of the lunge line between the ring finger and pinkie of your left hand – this is where the end is always to be, (unless you use the whole length of the line) in order to never get tangled or uncoordinated with your reins! Resist enough with your outer hand to not lose the soft contact to the horse’s mouth while sliding your inner hand forward to shorten the reins. Do not pull on the horse! When the inner hand arrives at the height of the croup, join with the other hand, so you end up in the position next to the horse.
|
|
- Es wird dann das Maul protestierend aufreißen, die Nase hoch nehmen und den Rücken wegdrücken. Wenn Ihr Pferd sehr pingelig ist wie mein traumatisierter Beau, vibriert man nur ein bißchen am Zügel, um ihn zum Kauen anzuregen. Üben Sie auf beiden Seiten und beobachten in welcher Position (Sie mehr rechts oder links, näher am Pferd oder weiter weg) es Ihrem Pferd am angenehmsten ist. Sie erinnern sich, daß es nach den Geboten des Formen Ihr Job als Trainer ist, dem Pferd den Erfolg leicht zu machen! Führen Sie nun Stimmkommandos ein und hüten Sie sich vor ständigem Zungenschnalzen! Reden Sie nur, wenn es dem Pferd etwas bedeutet – das ist es, was klar sein bedeutet! Erreichen Sie im Schritt einen regelmäßigen Rhythmus. Das Pferd sollte entspannte Ohren und Kaubewegungen zeigen. Nun hängen Sie das Ende der Longe zwischen den Ring- und kleinen Finger der linken Hand – da bleibt das Ende immer solange Sie nicht die volle Länge der Longe nutzen, damit Sie sich nicht mit den Zügeln verheddern! Mit der äußeren Hand hält man die Zügel gerade straff genug, um den weichen Kontakt mit dem Pferdemaul nicht zu verlieren, während man mit der inneren Hand nach vorn gleitet, um die Zügel zu verkürzen. Ziehen Sie nicht am Pferd! Wenn die innere Hand auf der Höhe der Kruppe ankommt, kommt die andere Hand dazu und man kommt in der Position neben dem Pferd an.
|
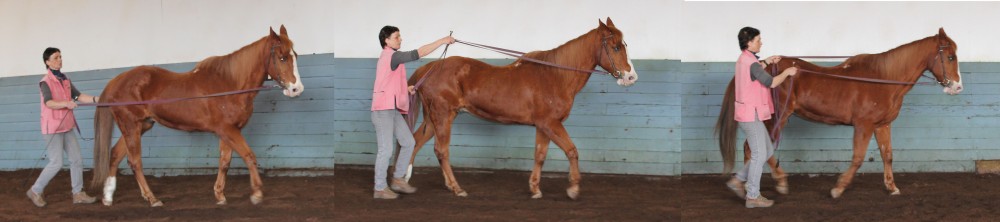
 Change in position from behind horse to next to croup: slide your right hand forward on both reins without loosing contact.
Positionswechsel von hinter dem Pferd nach neben der Kruppe: die rechte Hand gleitet an beiden Zügeln nach vorn ohne den Kontakt zu verlieren. |
- Now your outer hand rests on the croup, while the inner rein is held lower, approximately at the height of the horse’s hip bone. Let the reins slide through your hands again until they are long like before – practise this change of position from behind the horse to next to him, until you can interchange fluidly and without losing the soft and ever same contact to his mouth.
- Next time we will start steering in earnest!
|
|
- Nun ruht die äußere Hand auf der Kruppe, während die innere etwas tiefer gehalten wird, etwa auf Höhe des Hüftknochens des Pferdes. Lassen Sie nun die Zügel wieder langsam durch die Hände gleiten bis sie wieder ganz lang sind – üben Sie diesen Wechsel in der Position von neben dem Pferd nach hinten und umgekehrt, bis es flüssig geschehen kann, ohne dabei den weichen Kontakt zum Pferdemaul zu verlieren.
- Nächstes Mal werden wir anfangen echt zu lenken!
|