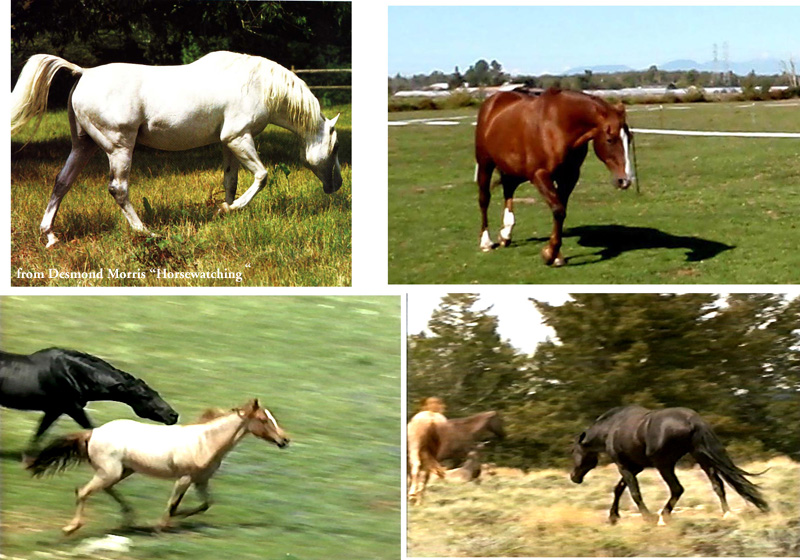
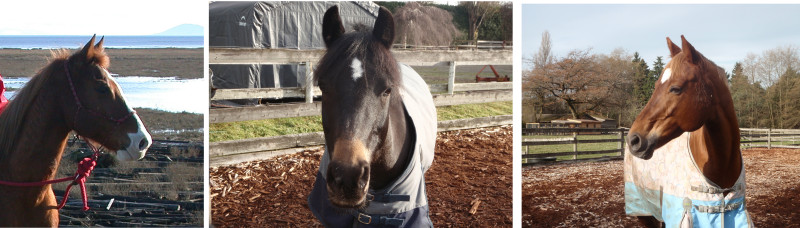
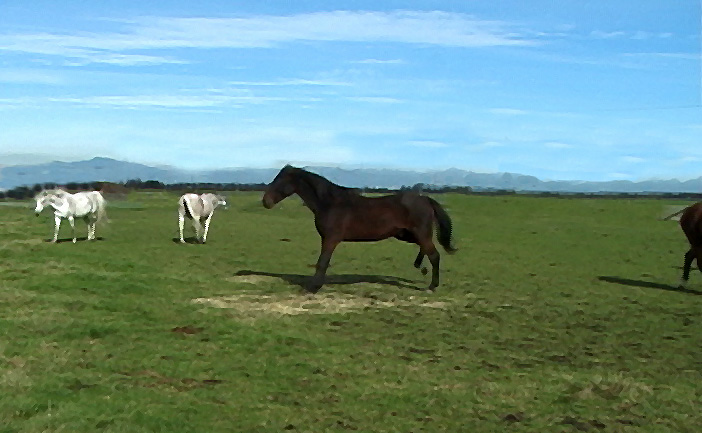
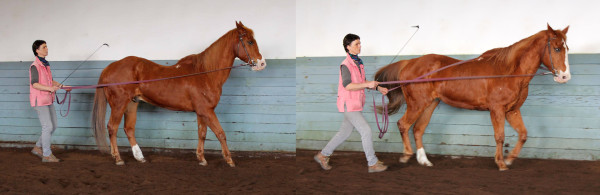
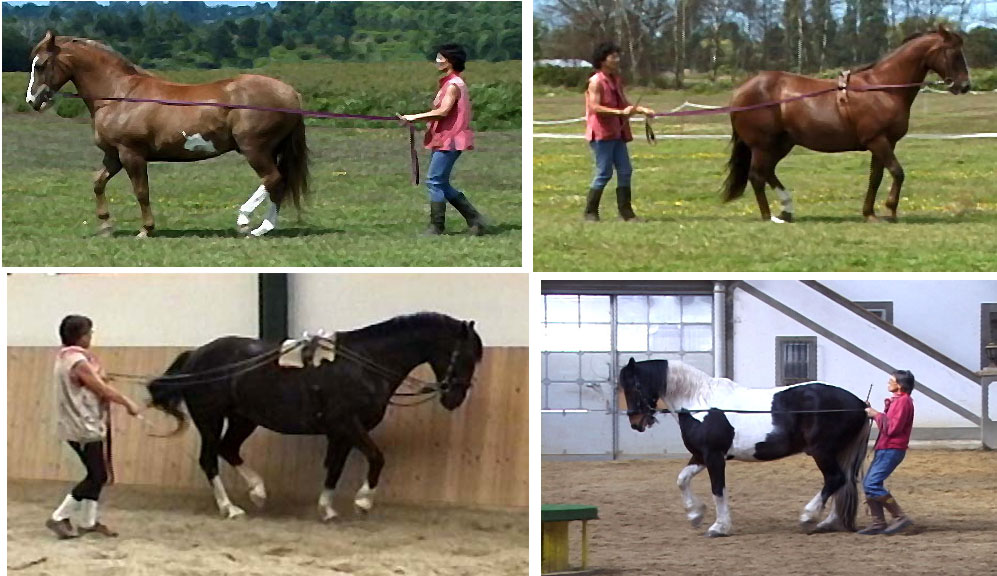
History of the Horse – The Eocene era – Part 2 |
Die Geschichte des Pferdes – Das Eozän – Teil 2 |
|
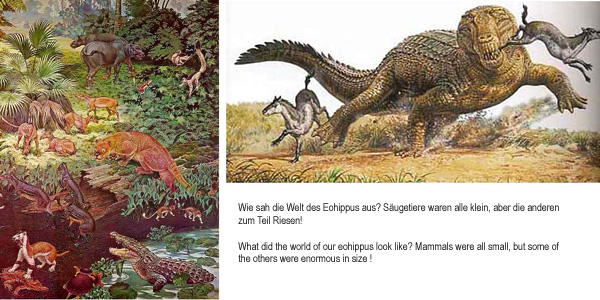
A strong rise in temperature occurred!
|
Ein starker Temperaturanstieg geschah!
|
|
 Continental plate position in the Eocene era. |
||
Suddenly more oxygen in the air!
Now new species evolved!
|
Es gab plötzlich mehr Sauerstoff !
So entstanden neue Tierarten !
|
|
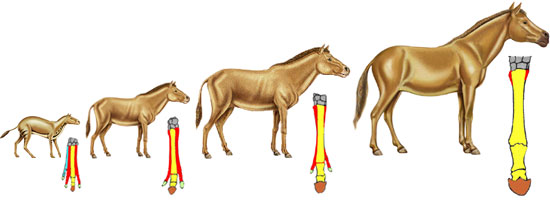
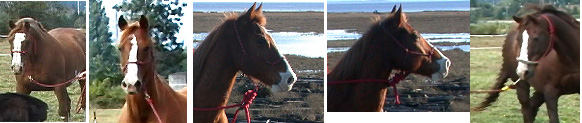
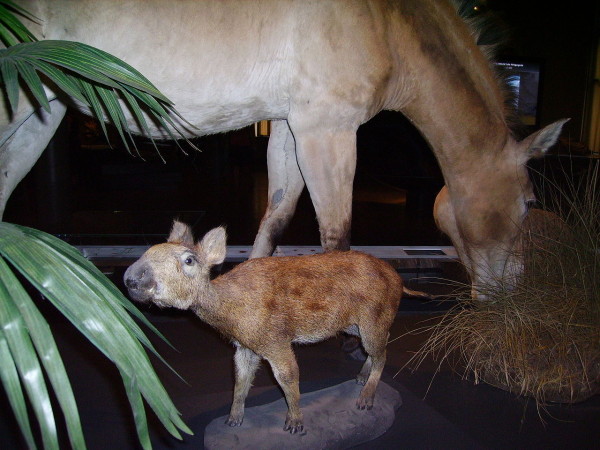 the Eohippus compared to the modern horse. |
||
|
|
|
 |
||
|
|
|
| More about the development of the first horses in the next Blog – read on !! | Mehr über die Entwicklung der Urpferde im nächsten Blog – lesen Sie weiter !! | |

Blog of Smart Horses with Jutta Wiemers
Posted in History of Horse
Tagged Development of the Horse Eocene, Entwicklung des Pferdes im Eozän
No Comments
History of the Horse – The Eocene era – Part 1 |
Die Geschichte des Pferdes – Das Eozän – Teil 1 |
|
The horse has been around much longer than we!
We owe what is known to geology!
We shall begin only in the Eocene era…
We start 56 million years ago:
|
Pferde gibts schon viel länger als uns!
Wir verdanken unser Wissen der Geologie!
Wir fangen erst im Eozän an…
Wir fangen vor 56 Millionen Jahren an:
|
|
 |
||
In the eocene, i.e. about 56 Million years ago, begins the development of horse-like species.
Join me in my travel into the past –Read on !!
|
Im Eozän, also etwa vor 56 Mio Jahren beginnt die Entwicklung pferdeähnlicher Arten.
Kommen Sie mit auf die Reise in die Vergangenheit –Lesen Sie weiter! |
|
Posted in History of Horse
Tagged Development of the horse Eocene Entwicklung des Pferdes Eozän
No Comments
Understand your Horse – Part 23 |
Ihr Pferd verstehen – Teil 23 |
|
Sounds 2
4) The Snort:
5) The Blow:
6) The Squeal:
7) The roar, the scream:
8) Snore:
9) Grunt:
10) Groan:
11) Sigh:
This concludes my series of “Understanding your Horse”. I hope that reading about all the various signals, which your horse might send to you with his body language to communicate his feelings to you – his best friend and partner – has sharpened your eyes to his needs and deepened your interest in the life of an animal, which is so dependent on your good intentions – and, to have positive repercussions those must be knowledgeable!! |
Sounds 2
4) Trompeten:
5) Prusten und Schnauben:
6) Quietschen:
7) Schrei:
8) Schnarchen:
9) Grunzen:
10) Stöhnen:
11) Der Seufzer:
Hiermit schließe ich meine Serie „Ihr Pferd verstehen“ ab. Ich hoffe, daß das Lesen über all die Signale, die Ihr Pferd mit Körpersprache an Sie, seinen besten Freund und Partner, sendet, um Ihnen seine Gefühle mitzuteilen, Ihnen die Augen für seine Bedürfnisse geschärft und Ihr Interesse an dem Leben dieses Tieres, welches ja so auf Ihre guten Absichten angewiesen ist, vertieft hat – und die, um wirksam zu sein, eben auf richtiger Kenntnis basieren sollten!!
|
Understand your Horse – Part 22 |
Ihr Pferd verstehen – Teil 22 |
|
SOUNDS
How we use sounds:
Sounds a horse can make:
1) “Bubbling”:
2) Nicker:a) Greeting nicker:
b) Mare to foal:
c) Courtship nicker:
3) The Neigh:
We continue in the next Blog with more sounds! Read on !!!
|
LAUTE
Wie wir Laute benutzen:
Die Laute des Pferdes:
1) Blubbern:
2) Leises Wiehern:a) Zur Begrüßung:
b) Stute zu Fohlen:
c) Brummeln eines Freiers:
3) Lautes Wiehern:
Wir machen weiter im nächsten Blog mit mehr Lautgebungen! Lesen Sie weiter!! |
Understand your Horse – Part 21 |
Ihr Pferd verstehen – Teil 21 |
|
The Legs
1) Back leg lift:
|
Die Beine
1) Hinterbein anheben:
|
|
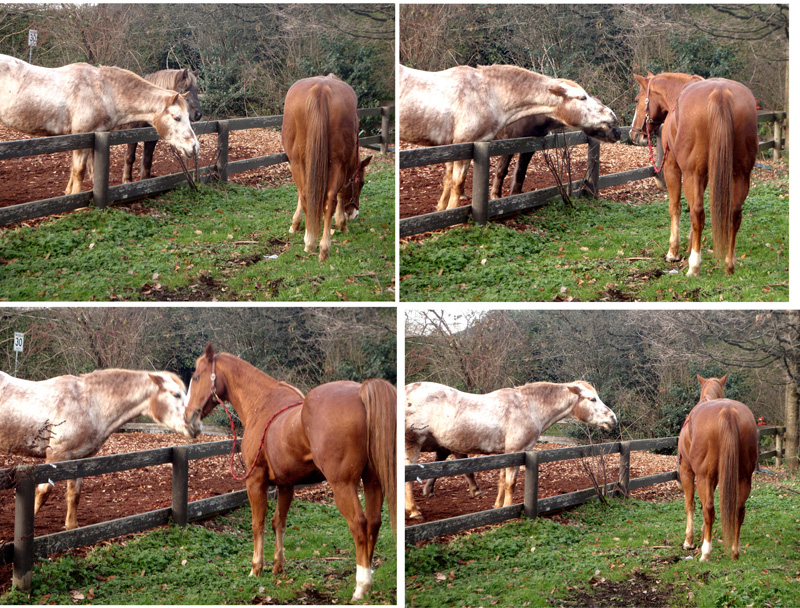
 Presenting the butt and lifting a hind leg are a warning that a kick will follow, if ignored. |
||
|
|
|
 A leg kinked like this harbours no threat – this horse is asleep! |
||
2) Front leg lift:
|
2) Anheben des Vorderbeins:
|
|
 Striking out a front leg is a gesture of fight – or like here: play! Front leg lifts are the milder form. |
||
3) Pawing the ground:
|
3) Scharren:
|
|
 Beau (left) is exploring the ground for food. The horse on the right is pawing with impatience to get out! |
||
4) Stamping:
5) Knocking:
In the next Blog we will listen… though most of the horse’s feelings will be expressed by body language, horses ARE able to communicate by sounds as well! Read on!! |
4) Stampfen:
5) Klopfen:
Im nächsten Blog hören wir zu … denn obwohl Pferde die meisten ihrer Gefühle durch Körpersprache ausdrücken, sind sie dennoch auch fähig sich mit Lauten mitzuteilen! Lesen Sie weiter!! |
|
Understand your Horse – Part 20 |
Ihr Pferd verstehen – Teil 20 |
|
The Tail
1) Drooped tail:
|
Der Schweif
1) Hängender Schweif:
|
|
 Limply drooping tails indicate sleep, submission or exhaustion. |
||
But note:
|
Aber Achtung:
|
|
 Sick horses also let their tails droop, so it can be a sign of pain! Always check for the cause. |
||
2) Carried tail:
|
2) Getragener Schweif:
|
|
 A healthy, awake, alert horse will never let his tail droop limply! |
||
|
|
|
 In play as well as under the rider the horse will carry his tail proudly as part of his grace of movement. |
||
3) High Tail: also flicking
|
3) Hochgereckter, auch schnippender Schweif:
|
|
 High Tails are a sign of excitement and exuberance – also an invitation to play! |
||
|
|
|
 High tails are part of display behaviour – showing off requires high muscle tension! |
||
4) Pinched tail:
|
4) Eingeklemmter Schweif:
|
|
 A pinched tail is a sign of distress or acute anxiety or fear. |
||
5) Stiff rod:
6) Swishing tail:
|
5) Steife Schweifrübe:
6) Peitschender Schweif:
|
|
 When the horse is annoyed he swishes his tail as if to rid himself of annoying pests – don’t be one! |
||
7) Twisting Tail:
8) Slapping the tail hard:
Read on!!! |
7) Schweif-Zwirbeln:
8) Den Schweif hart schlagen:
Lesen Sie weiter!! |
|
Posted in Understanding Your Horse
Tagged body language horse the tail, der Schweif, Korpersprache Pferdes verstehen, understand your horse
No Comments
Understand your Horse – Part 19 |
Ihr Pferd verstehen – Teil 19 |
|
Neck 3
11) Head wobble:
|
Hals 3
11) Kopf wackeln: Hals schwenken
|
|
 Top left: “I want to get out of here!” unhappy horse under the rider. All others are showing happy play gestures “let us romp a little!” |
||
12) Neck wringing:
|
12) Hals verwinden: in Spirale
|
|
 Neck wringing is a dramatic twisting of the entire neck in a spiral movement. It shows a spirit of enterprise! |
||
13) Horizontally extended neck:
|
13) Kopf horizontal ausgestreckt:
|
|
 A stretched out neck, often horizontal, is a demand for an increased private space. It indicates a planned bite. Make way or submit! |
||
14) Head snaking:
|
14) Kopf Schlängeln:
|
|
 Head snaking, a side to side wobble with an outstretched low neck, is shown by stallions rounding up their mares. |
||
Neurotic Neck movements:
|
Neurotische Halsbewegungen:
|
|
15) Head circling:
16) Weaving:
In the next Blog let’s turn to the tail, which a horse can of course also use for communication! Read on !! |
15) Kopf Kreiseln:
16) Weben:
Wenden wir uns im nächsten Blog dem Schweif zu, mit dem ein Pferd sich ja auch verständigen kann! Lesen Sie weiter !! |
|
Posted in Understanding Your Horse
Tagged body language horse, Korpersprache des Pferdes verstehen, uunderstand your horse
No Comments
Understand your Horse – Blog 18 |
Ihr Pferd verstehen – Teil 18 |
|
Neck 2
6) Head turning toward you:
|
Hals 2
6) Kopf zum Menschen hin drehen:
|
|
 Turning the head toward you means the horse is addressing you – and very often seeking reassurance! Please respond! |
||
7) Head swing away from:
|
7) Kopf weg drehen:
|
|
 Turning the head away can be submissive-defensive (left top and bottom) or show avoidance of an unpleasant situation. |
||
8) Head bobbing:
9) Chin thrust:
|
8) Kopf Auf-und-Abtauchen:
9) Kopf Stoßen:
|
|
 Left: these horses and ponies want to get going! Right: an invitation to play ! |
||
10) Head jerk:
But horses can express much more with their Head and neck movements! In the next Blog we continue with head wobbling… Read on !! |
10) Kopf Rucken:
Aber Pferde können noch viel mehr mit Kopf und Hals Bewegungen ausdrücken! Im nächsten Blog geht es weiter mit Kopf-Wackeln… Lesen Sie weiter !! |
|
Posted in Understanding Your Horse
Tagged body language horse, Koerpersprache des Pferdes verstehen, sein Pferd verstehen, understand horse
No Comments
Understand your Horse – Part 17 |
Ihr Pferd verstehen – Teil 17 |
|
Neck & Head 1
1) High head position: concave top line
|
Hals & Kopf 1
1) Hohe Kopfhaltung: konkave Oberlinie
|
|
 |
||
2) High head position: convex top lineDisplay behaviour
|
2) Hohe Kopf Position: konvexe OberlinieImponiergehabe
|
|
|
|
||
As we are discussing movements in the following points, there will be fewer pictures. I hope the descriptions are clear enough. 3) Head toss:
4) Head and neck shake:
|
Da wir hier in den folgenden Punkten hauptsächlich Bewegungen ansprechen, gibt es weniger Bilder. Ich hoffe die Beschreibungen sind klar genug. 3) Kopf hoch werfen:
4) Kopf und Hals schütteln:
|
|
 |
||
5) Low head and neck posture:
In the next Blog we continue with Head and Neck posturesRead on !!! |
5) Tiefe Kopf und Hals Haltung:
Im nächsten Blog geht es weiter mit Kopf und Hals Haltungen.Lesen Sie weiter !!! |
|
|
|
||

Posted in Understanding Your Horse
Tagged body language horse, koerpersprache pferd, Pferd verstehen, understand horse
No Comments
Understand your Horse – Part 16 |
Ihr Pferd verstehen – Teil 16 |
|
The Mouth 2
7) Mouth neutral and relaxed:
|
Maul 2
7) Maul neutral und entspannt:
|
|
 |
||
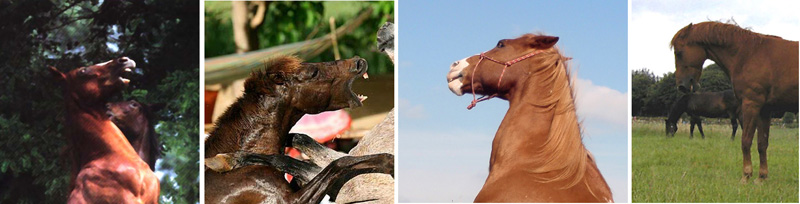
8) Jaws held tensely open with fully exposed teeth:
|
8) Weit offenes Maul mit gebleckten Zähnen:
|
|
|
|
||
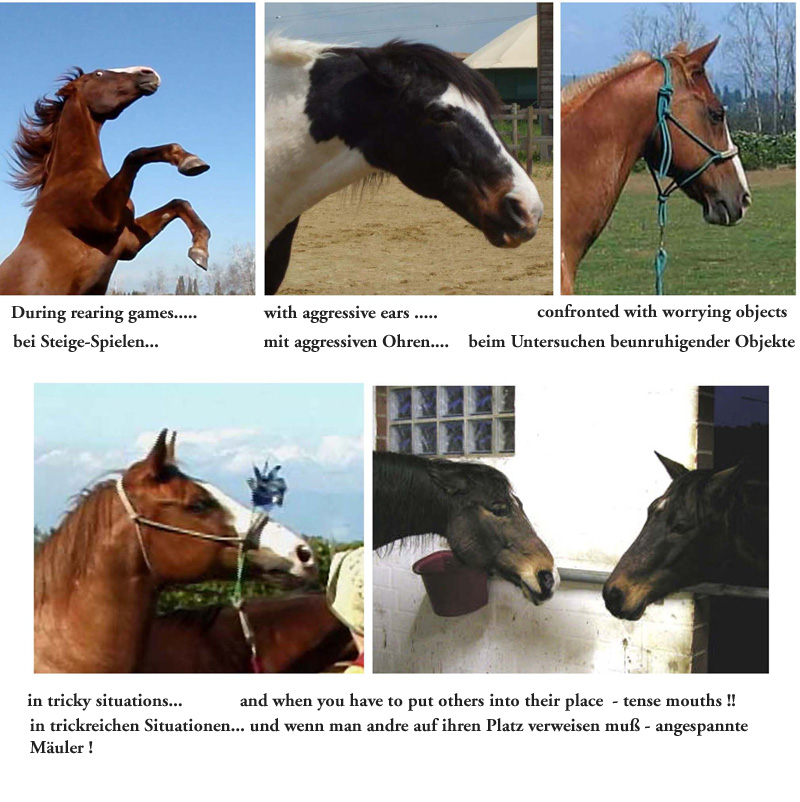
9) Tight lipped mouth:
|
9) Angespannte Maulpartie:
|
|
 |
||
|
|
|
|
|
||
10) Disgruntled mouth:
|
10) Mißmutiges Maul:
|
|
|
|
||
11) Chewing, licking and showing the tongue:
|
11) Kauen, Lecken und Zunge zeigen:
|
|
 |
||
12) Yawning:
|
12) Gähnen:
|
|
 |
||
13) Licking as sign of tenderness:
|
13) Lecken – Ausdruck von Zärtlichkeit:
|
|
 |
||
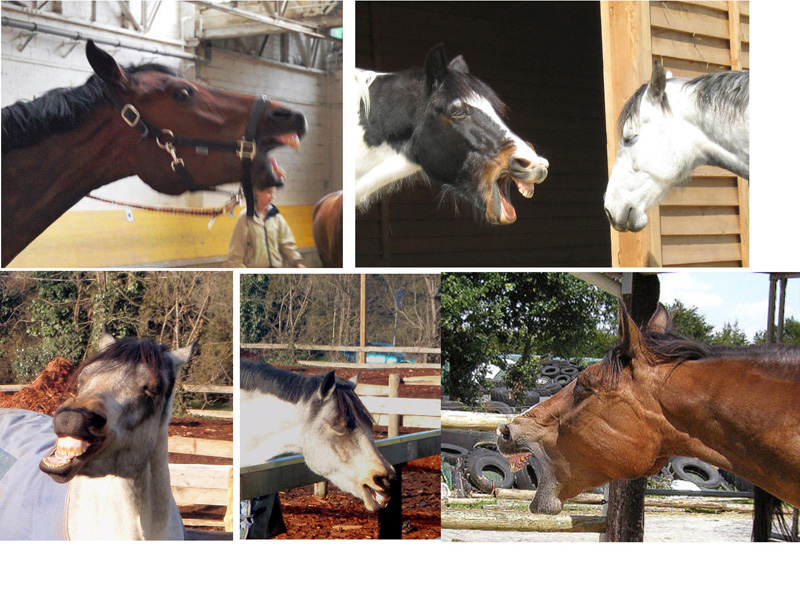
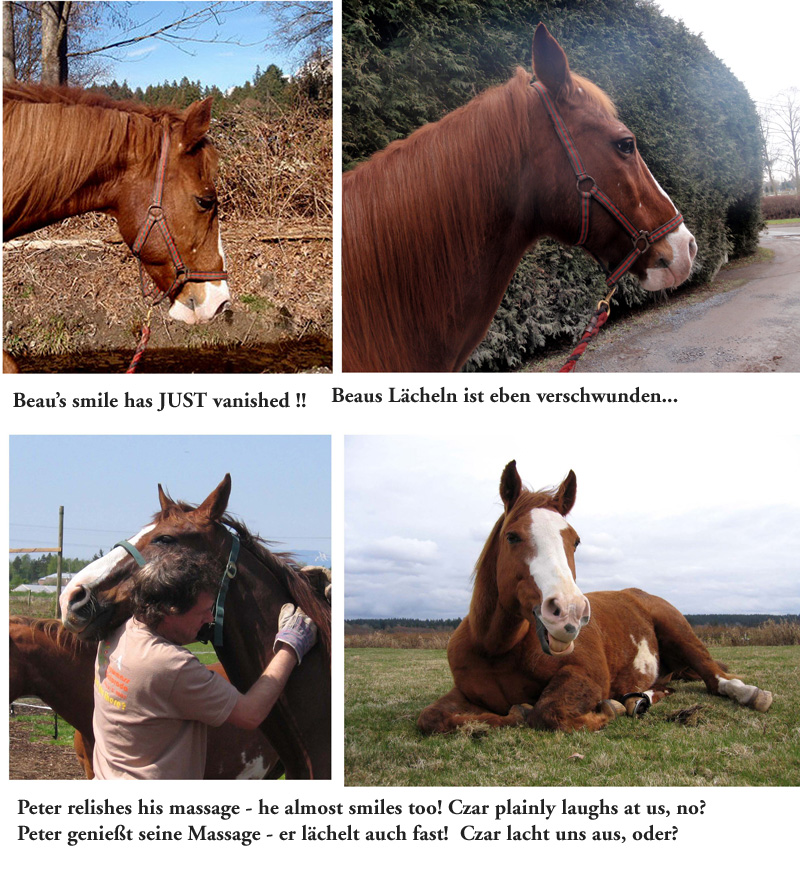
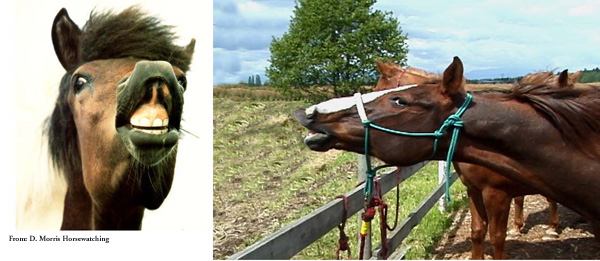
14) A smile!
Let’s move on to the horse’s neck in the following Blog! Read on !!! |
14) Ein Lächeln!
Weiter gehts mit dem Hals des Pferdes im nächsten Blog! Lesen Sie weiter !! |
|


Posted in Understanding Your Horse
Tagged mouth of the horse, Pferd verstehen, Pferdemaul, understand horse
No Comments
Understand your Horse – Part 15 |
Ihr Pferd verstehen – Teil 15 |
|
Mouth 1
1) The function:
|
Maul 1
1) Die Funktion:
|
|
|
||
2) Food intake:
3) Sense of taste:
|
2) Nahrungsaufnahme:
3) Schmecken:
|
|
 Horses love variety like we do and will eat an interesting mix of plants when given the choice. |
||
4) The lips:
5) The tactile hairs:
Now to the first “expression” with the mouth. |
4) Die Lippen:
5) Tasthaare:
Nun zum ersten „Ausdruck“ mit dem Maul. |
|
 By “Snapping” or “Teeth clapping” the foal indicates peaceful sumission and begs for “baby protection” |
||
6) Foal snapping:
We continue in the next blog with more expressions of the horse’s mouth.
Read on !!! |
6) Leer kauen:
Im nächsten Blog geht es weiter mit dem, was das Pferd mit dem Maul ausdrücken kann.
Lesen Sie weiter !!! |
|
Posted in Understanding Your Horse
Tagged mouth of the horse, Pferd verstehen, Pferdemaul, understand horse
No Comments
Understand your Horse – Blog 14 |
Ihr Pferd verstehen – Teil 14 |
|
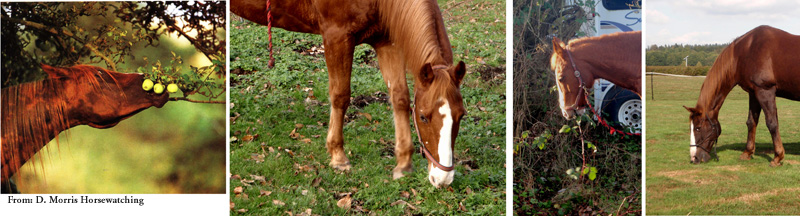
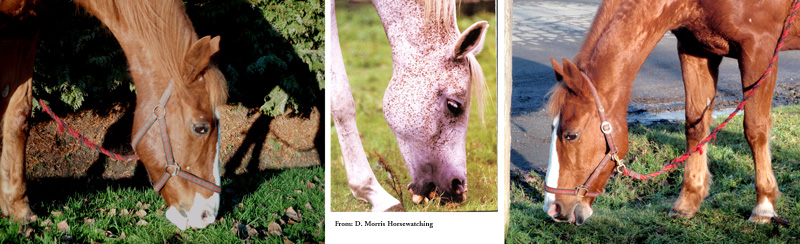
Nose
1) The nose: the function
|
Die Nase
1) Die Nase: Funktion
|
|
 Ah those irresistible noses !! |
||
2) Evolution:
3) Survival:
4) Emotions:
|
2) Evolution:
3) Überleben:
4) Emotionen:
|
|
 Taking in the individual odour of another – mother and foal know each other by scent. |
||
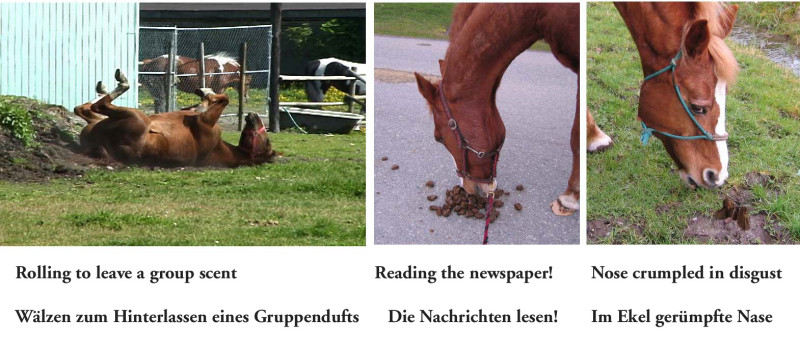
5) Leaving a group scent:
6) Reading the news:
|
5) Einen Gruppenduft hinterlassen:
6) Nachrichten lesen:
|
|
 |
||
7) Being disgusted:
8) Nostrils flared:
9) Flehmen:
|
7) Ekelhaft!
8) Geblähte Nüstern:
9) Flehmen:
|
|
 Shutting off the nostrils to pass the scent directly past the vomero-nasal organs – Flehmen. |
||
10) Itchy nose! Substitute activity
|
10) Juckende Nase! Übersprunghandlung
|
|
 Happy crinkle noses in all situations – but particularly often when sitting! |
||
11) Happy crinkle nose:
Next time we look at the horse’s mouth. Read on!!
|
11) Glückliche Kräuselnase:
Nächstes Mal sehen wir uns das Pferdemaul an. Lesen Sie weiter!! |
|
Posted in Understanding Your Horse
Tagged know your horse, Nase des Pferdes, nose of the horse, Pferd verstehen
No Comments
Understand your Horse – Part 13 |
Ihr Pferd verstehen – Teil 13 |
|
Eyes 3
10. Frontal stare:
|
Augen 3
10. Frontales Anstarren:
|
|
 Left: Frontal stare with challenging body posture – right: … changes to a “bite threat” if not heeded. |
||
11. Worry lines around the eyes:
|
11. Sorgenfalten um die Augen:
|
|
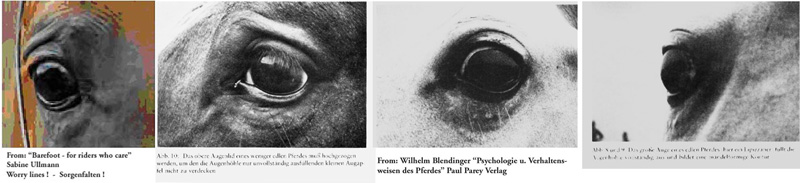 Real worry lines or just a matter of smaller or larger eye balls in relationship to the size of the head? |
||
12. Dark rings:
|
|
|
 Left: eyes as normal – Centre: dark rings start to appear – right: Beau is in distress |
||
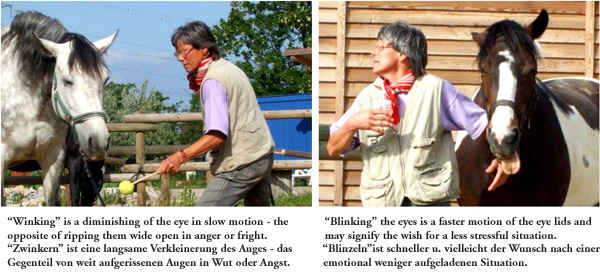
13. Your horse may wink at you!
|
13. Ihr Pferd zwinkert Sie an!
|
|
|
|
||
14. Blinking the eyes:
Summary eyes:
|
14. Blinzeln:
Zusammenfassung Augen:
|
|
|
|
||
We move on to other parts of the horse to understand his emotions! Read on !! |
Wir sehen uns demnächst weitere Körperteile des Pferdes an, um seine Gefühle zu verstehen! Lesen Sie weiter!! |
|
Posted in Understanding Your Horse
Tagged die Augen des Pferdes, Ihr Pferd verstehen, Kommunikation Pferd, Körpersprache Pferd
No Comments
Understand your Horse – Part 12 |
Ihr Pferd verstehen – Teil 12 |
|
Eyes 2
1. Attentive eyes, bifocal, focussed and three dimensional vision:
|
Augen 2
1. Aufmerksame Augen, bifokal, scharfes und drei dimensionales Sehen:
|
|
 |
||
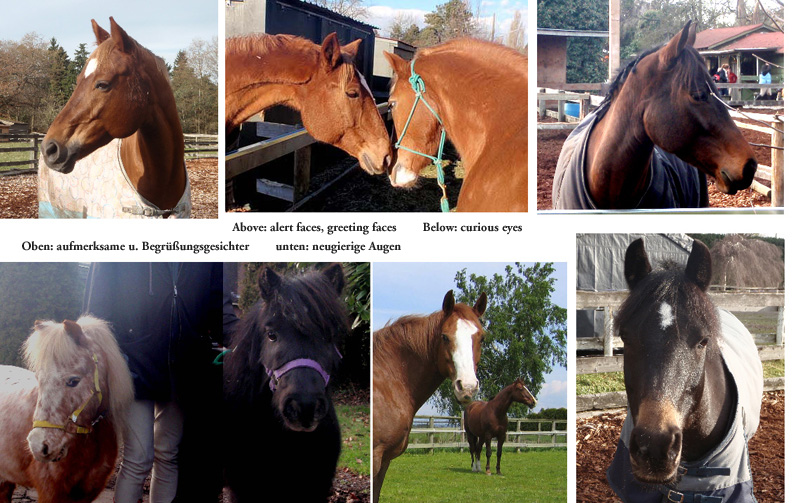
2. Curious eyes¸ interested eyes:
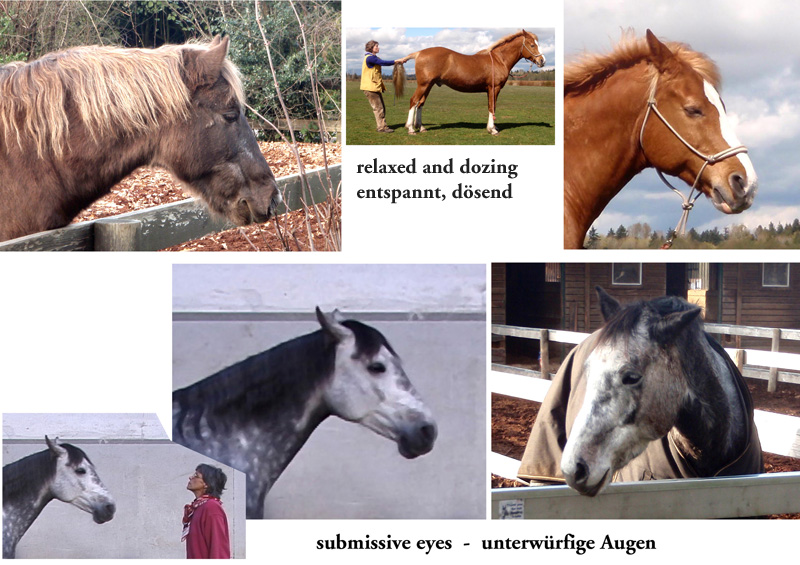
3. Half closed: a) peaceful relaxation, or dozing
|
2. Neugierige, interessierte Augen:
3. Halb geschlossen: a) friedlich entspannt oder dösend
|
|
|
|
||
4. Half closed: b) submission, appeasement
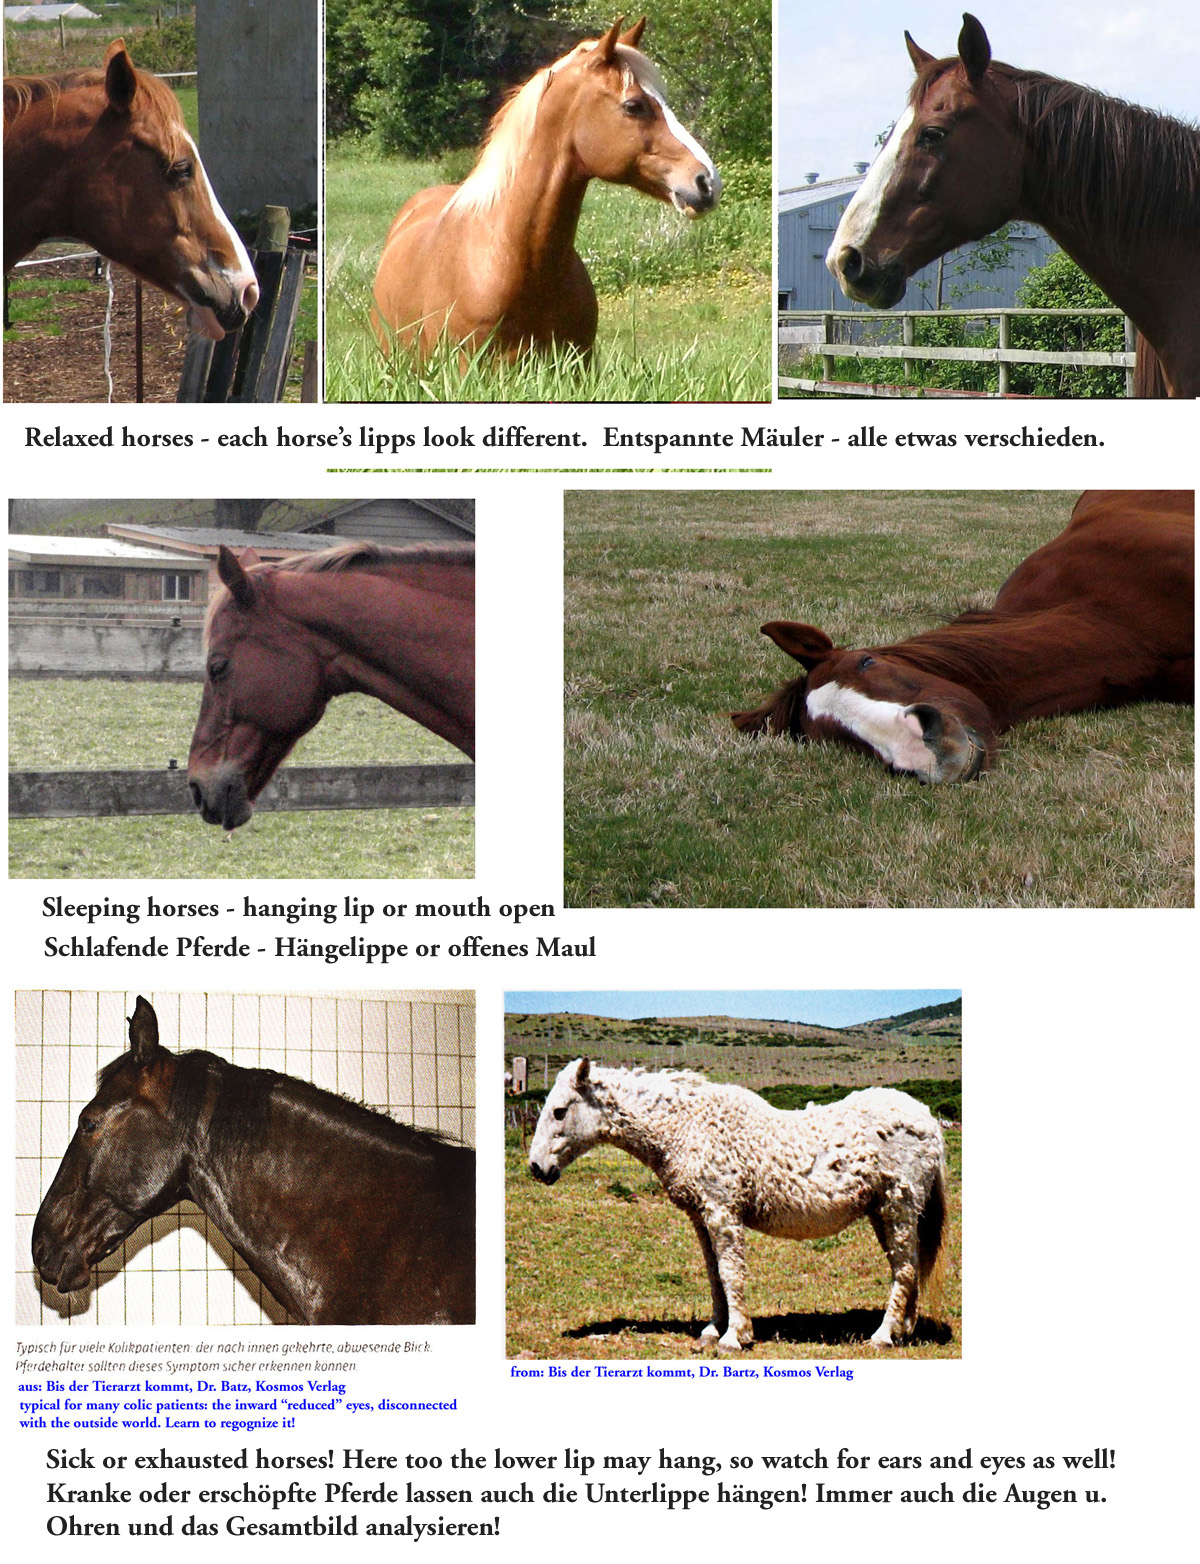
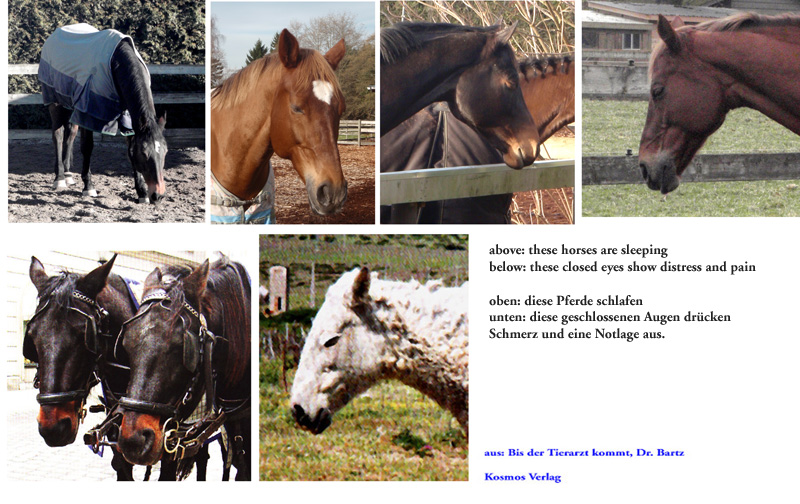
5. closed eyes: a) sleepingWhen the horse is truly sleeping, the eyes are completely closed. The deeper the sleep (and the greater the trust in peaceful and safe surroundings) the lower the ears and the head may droop at the same time. On the left you see Deena, who sleeps so deeply that she nearly topples over. The lower lip is always relaxed and often hanging down in quite a pronounced manner. |
4. Halb geschlossen: Unterwürfig, beschwichtigend
5. Geschlossene Augen: a) Schlaf
|
|
 |
||
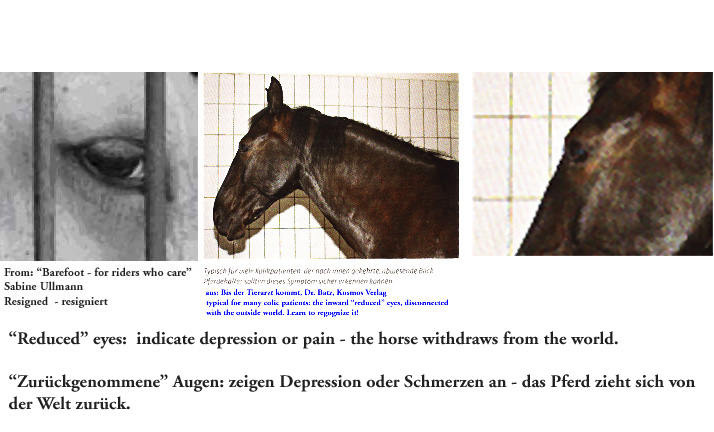
6. Closed eyes: b) exhaustion or pain
|
6. Geschlossenen Augen: b) Schmerz oder Erschöpfung
7. „Zurückgenommener Blick“: deprimiert, resigniert
|
|
|
|
||
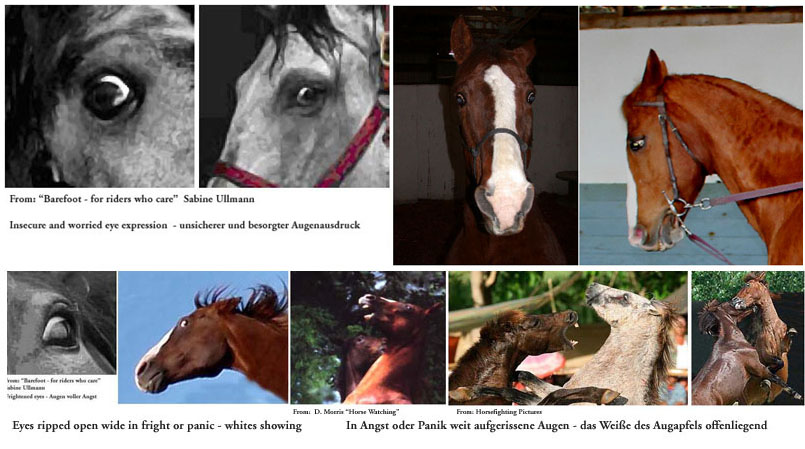
8. Showing some white: worried eyes
|
8. Ein bißchen weiß: besorgte Augen
|
|
|
|
||
9. Wide eyes: fear, panic, flight or real anger
In the next Blog we will finish with the expression of the eyesRead on !! |
9. Weit aufgerissen: Angst, Panik, Flucht oder echte Wut
Im nächsten Blog schließen wir mit den Augen ab.Lesen Sie weiter!! |
|
Posted in Understanding Your Horse
Tagged body language horse, Kommunikation Pferd, Pferd verstehen, the eyes of the horse
No Comments
Understand your Horse – Part 11 |
Ihr Pferd verstehen – Teil 11 |
|
Eyes 1
|
Augen 1
|
|
 |
||
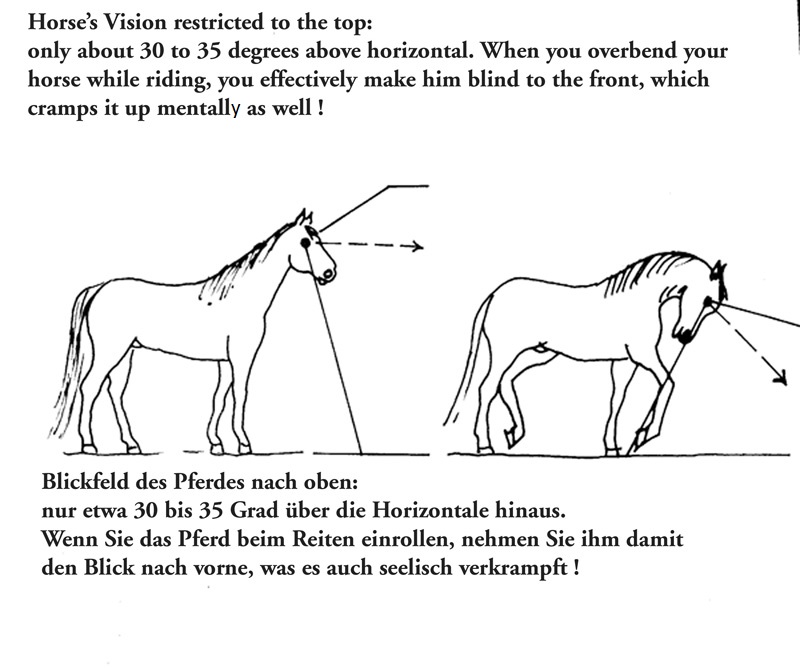
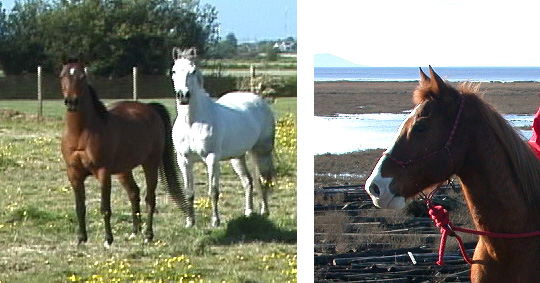
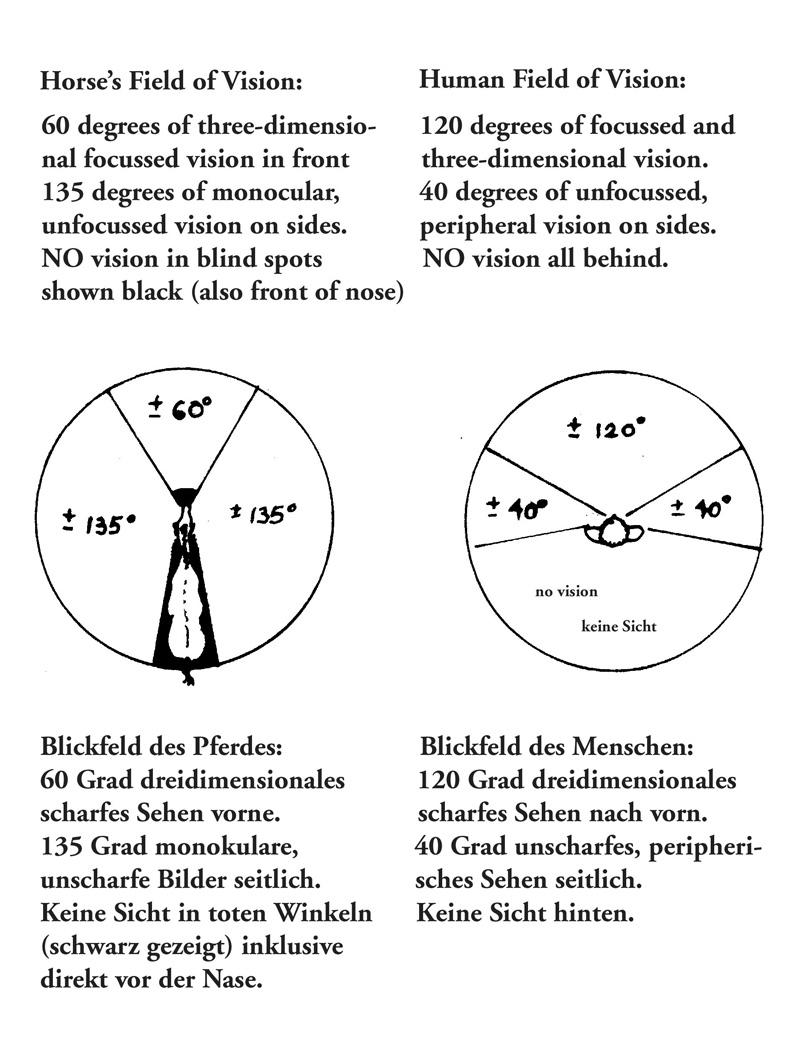
The main difference between our outlooks on the world:
Retina with Rods and cones:
Field of vision:
|
Der Hauptunterschied unserer „Welt-Anschauungen“:
Retina mit Stäbchen und Zäpfchen:
Gesichtsfeld:
|
|
|
|
||
The “spooky side”:
Field of vision to the top:
|
Die „Scheu“ seite:
Blickfeld nach oben:
|
|
 |
||
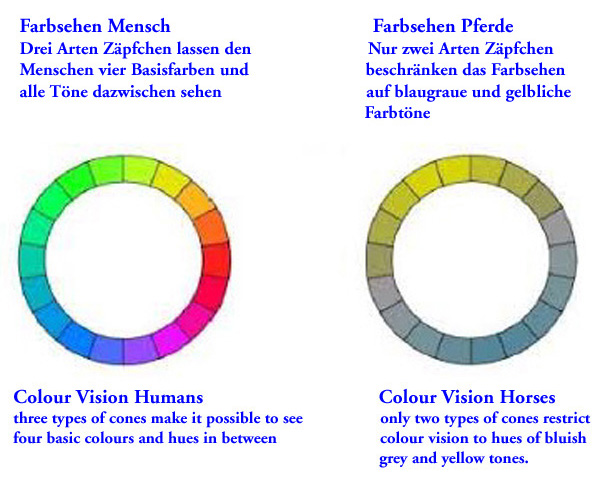
Colour vision:
|
Farbsehen:
|
|
|
|
||
|
|
|
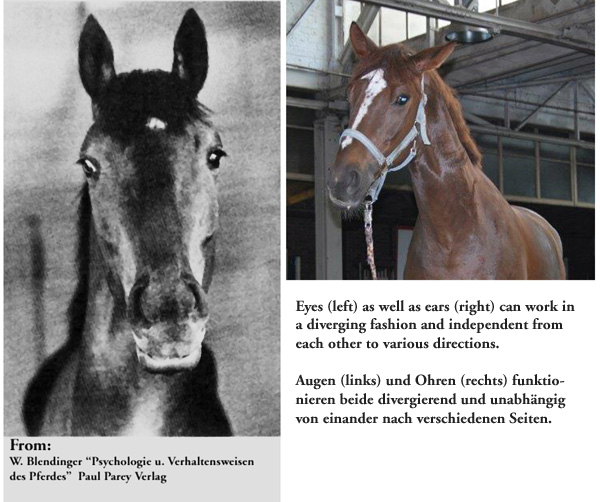
 When the eyes are looking at something in the focussed range, the ears are always pointed to the front ! |
||
This is the world your horse sees! Next time we go into what the horse communicates to us with his eyes!
Read on !! |
So also sieht Ihr Pferd! Nächstes Mal schauen wir, was es uns mit den Augen sagen kann.
Lesen Sie weiter !! |
|
Posted in Understanding Your Horse
Tagged body language horse, Kommunikation Pferd, Pferde verstehen, understanding horses
No Comments
Understand your Horse – Part 10 |
Ihr Pferd verstehen – Teil 10 |
|
continued – Ears 4
|
Fortsetzung – Ohren 4
|
|
 |
||
Questioning – happy or apprehensive?
9. Disapproving Ears:
|
Fragend – zufrieden oder ängstlich besorgt?
9. Mißmutige Ohren:
|
|
 Disapproving and mistrusting faces. |
||
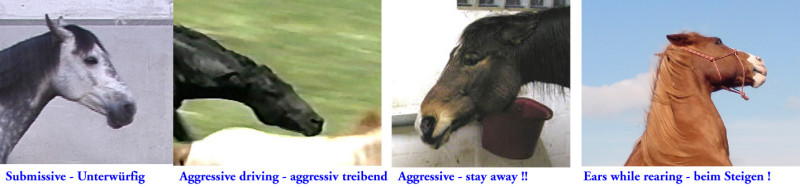
10. Aggressive Ears: pinned
|
10. Aggressive Ohren: angepreßt
|
|
 These ears are unmistakably threatening and aggressive! |
||
|
|
|
 The most threatening ears are pinned tightly to the head and horizontal. |
||
11. Play Ears:
|
11. Spiel-Ohren:
|
|
 Play-Ears are slightly flattened to the back – but of course NOT aggressive or threatening !! |
||
Conclusion Ears:Do not always assume aggression !!
We learned:
In the next Blogs we will look at the horses eyes – how he sees the world and what he is trying to signal to us with them. Read on !!
|
Zusammenfassung Ohren:Nicht immer Aggression vermuten!
Wir haben gelernt:
Im nächsten Blog wollen wir die Augen des Pferdes erforschen – wie es die Welt sieht und was es versucht, uns mit ihnen zu sagen.
Lesen Sie weiter !! |
|
Posted in Understanding Your Horse
Tagged die Ohren des Pferdes, Kommunikation Pferd, Körpersprache Pferd, Pferd verstehen
No Comments
Understand your Horse – Part 09 |
Ihr Pferd verstehen – Teil 09 |
|
continued: Ears 3
|
Fortsetzung Ohren 03
|
|
 Various airplane ears! Left: sleeping. Mid: relaxed. Right: needs help. |
||
5/6: Questioning and helpless:
|
5/6: Fragend und ratlos:
|
|
 Questioning ears – horses are all at a loss! Reduced eyes and stuck-out tongues are typical. |
||
Airplane Ears – what do they mean:pain, distress, submissiveness, or appeasement ?? 7. Depressed Ears:
|
Flügelohren – was sie bedeuten :Schmerz, Kummer, Unterwürfigkeit, oder Beschwichtigung ?? 7. Deprimierte Ohren:
|
|
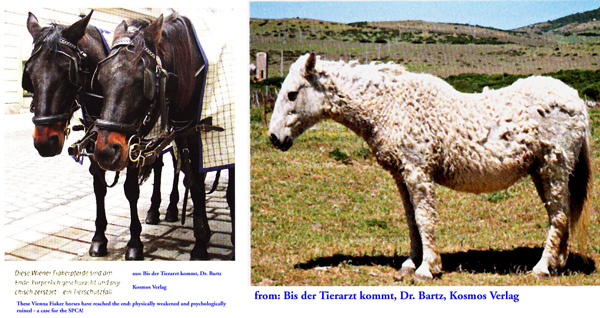 These are very depressed ears. The Vienna Fiaker horses are physically and mentally finished – the horse at the right is sick. |
||
8. Appeasing Ears:
|
8. Beschwichtigende Ohren:
|
|
 Appeasing ears send a clear message that the horse wishes to avoid conflict. |
||
|
|
|
 Can you recognize which of these ears are submissive or appeasing? |
||
In the next part we will finish with the contemplation of the ears’ language. Read on !!
|
Im nächsten Teil schließen wir mit der Sprache der Ohren ab. Lesen Sie weiter!! |
|
Posted in Understanding Your Horse
Tagged body language horse, equine communication, the horse`s ears, understand horses
No Comments
Understand your Horse – Part 08Ears instalment 2 |
Ihr Pferd verstehen – Teil 08Fortsetzung Ohren 2 |
|
4. Sleepy Ears:
|
4. Schlafohren:
|
|
 Relaxed airplane ears – hanging head – hanging lower lip – kinked hind leg – all signs of sleep. |
||
5. Helpless ears, at a loss:
|
5. Ratlose Ohren:
|
|
 Left: this horse is sleeping – see the hanging lip! Right: this pony is sadly at a loss – tight mouth! He needs help! |
||
|
|
|
 |
||
6. Questioning Ears:
|
6. Fragende Ohren:
|
|
 Questioning ears – Fragende Ohren |
||
|
|
|
In the next Blog we will continue with more interesting ears expressions!!Read on !! |
Im nächsten Blog kommen noch mehr interessante Ohren!Lesen Sie weiter !! |
|
Posted in Understanding Your Horse
Tagged body language horse, equine communication, understand horses
No Comments
Understand your Horse – Part 07 |
Ihr Pferd verstehen – Teil 07 |
|
Ears – part 1
We start with the attempt to interpret the moods expressed by the ears.
|
Ohren – Teil 1
Versuchen wir mal die Interpretation der Gefühle, die mit den Ohren ausgedrückt werden.
|
|
|
|
||
The ears receive sounds and transmit visual signals to the others at the same time:
1. Rapt Attention Ears
|
Die Ohren empfangen Geräusche und senden gleichzeitig visuelle Signale an die anderen:
1. Aufmerksam angespannte Ohren:
|
|
|
||
2. Attentive relaxed:
|
2. Aufmerksam entspannt:
|
|
 |
||
|
|
|
|
||
3. Neutral Ears:
|
3. Neutrale Ohren:
|
|
|
|
||
In the next Blog we continue – the most interesting ears are yet to come!Read on !! |
Im nächsten Blog geht es weiter – die interessantesen Ohren Kommen noch!Lesen Sie weiter !!
|
|
Posted in Understanding Your Horse
Tagged body language horse, communication horse, understand horse
No Comments
Understand your Horse – Part 06 |
Ihr Pferd verstehen – Teil 06 |
|
4. The grooming face:
|
4. Putzgesichter:
|
|
 Grooming faces – Putzgesichter |
||
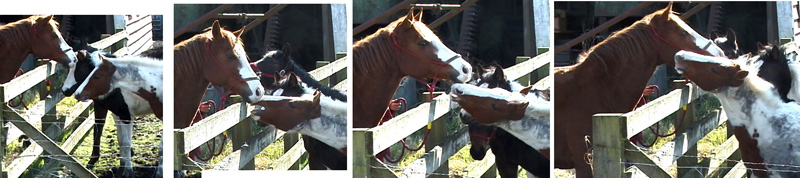
5. The greeting face:
|
5. Ein Begrüßungsgesicht:
|
|
|
|
||
|
|
|
 The sequence of faces during a greeting – what do they say to each other? |
||
|
|
|
|
|
||
|
|
|
This is what we shall attempt to clarify in the coming Blogs and will turn to the language of the ears!
Read on !! |
In den nächsten Blogs versuchen wir das zu erklären und wenden uns der Sprache der Ohren zu!
Lesen Sie weiter!! |
|

Posted in Understanding Your Horse
Tagged body language horse, communication horse, understand horse
No Comments
Faces – Part 1 |
Gesichter – Teil 1 |
|
The sequence of events:
Conversation is language:
“Culture” is part of language:
In every conversation the ranking plays an important role!
We therefore have to take a lot into consideration, before we can draw knowledgeable conclusions!
As mentioned before: your good and interested intentions are more important than the fact that you get it absolutely right.
THE FACE:
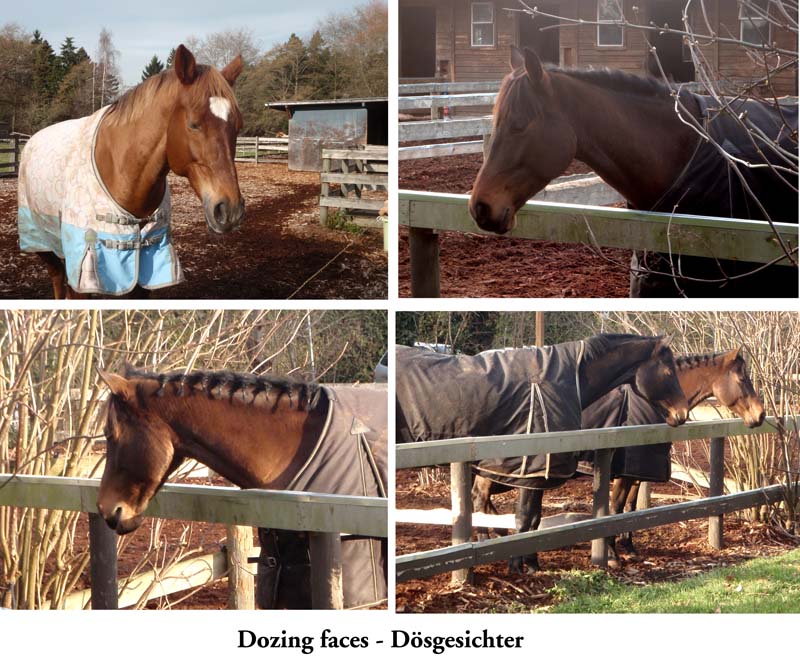
1. A dozing face:
|
Der Ablauf:
Unterhaltung ist Sprache:
„Kultur“ ist Teil der Sprache:
In jeder Konversation spielt die Rangordnung also auch eine wichtige Rolle!
Bevor wir also fachmännische Rückschlüsse ziehen können, müssen wir also vielerlei in Betracht ziehen!
Wie schon früher erwähnt: Ihre guten und interessierten Absichten sind hier wichtiger als die Tatsache, daß man es absolut richtig trifft.
DAS GESICHT:
1. Ein Dösgesicht:
|
|
 |
||
2. Mother faces:
|
2. Müttergesichter:
|
|
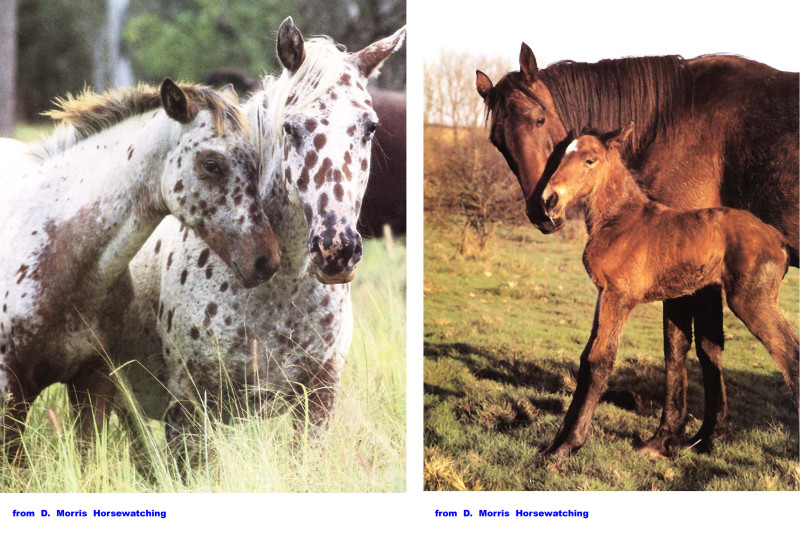 Mother faces – Müttergesichter |
||
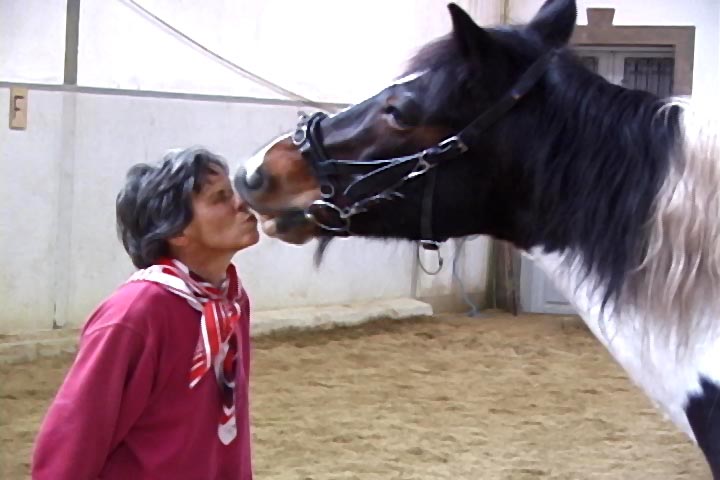
3. Loving faces:
|
3. Liebevolle Gesichter:
|
|
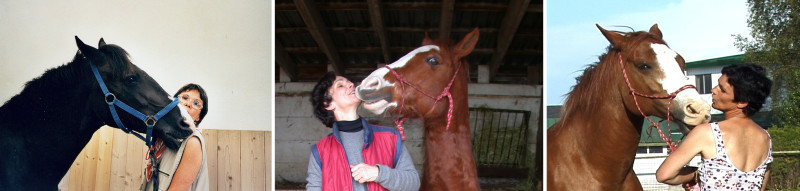 Real horse kisses – echte Pferdeküsse! |
||
|
|
|
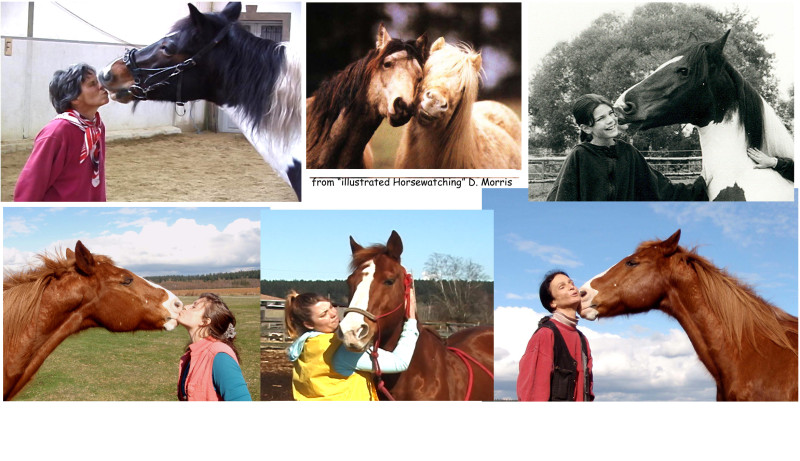 Loving faces – Liebevolle Gesichter |
||
|
|
|
 |
||
We have learned:
In the next Blog we will continue with grooming and greeting faces. Read on! |
Wir haben gelernt:
Im nächsten Blog machen wir weiter mit Putzgesichtern und Begrüßungsmimik. Lesen Sie weiter! |
|
Posted in Understanding Your Horse
Tagged body language horse, communication horse, understand horse
No Comments
Understand your Horse – Part 04 |
Ihr Pferd verstehen – Teil 04 |
|
3) Standing or moving parallel to or with a partner:
|
3) Sich mit einem Partner parallel stellen oder bewegen:
|
|
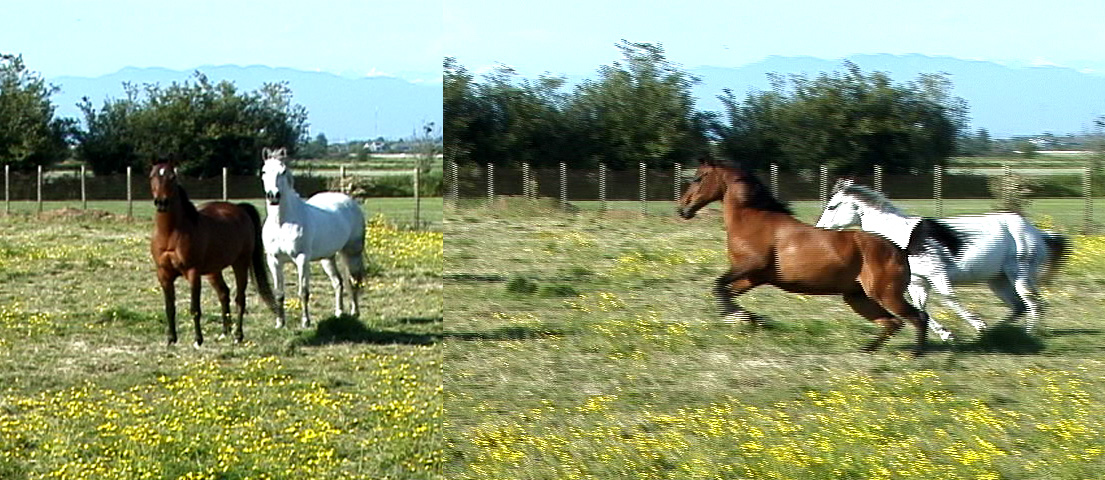
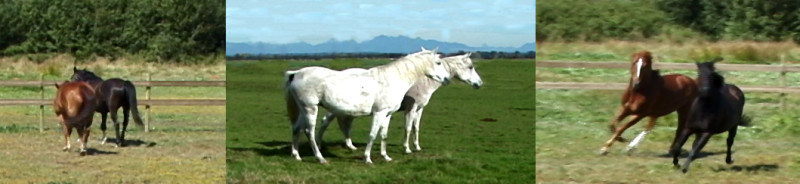 Whether out on a stroll – or just hanging out – or playing at tempo: being parallel expresses friendship. |
||
4) The body check or body block:
|
4) Die Körpersperre:
|
|
 Praise when your horse comes promptly – but body block to preserve your private space! |
||
5) The shoulder barge:
6) The rump presentation:
|
5) Schulter rempeln:
6) Das Hinterteil präsentieren:
|
|
 Left: rump presentation as warning – centre: will be followed by a kick! Right: the clear warning is promptly heeded. |
||
More to come – read on !!! |
Es kommt noch mehr – lesen Sie weiter !!! |
|
Posted in Understanding Your Horse
Tagged communication horse, horse body language, understanding horses
No Comments
Understand your Horse – Part 03 |
Ihr Pferd verstehen – Teil 03 |
|
Function versus emotion:
The function always overrides the display of an emotion!!
Functions:
Emotions shown by horses:
You need to educate your eyes:
Expression with the whole body:
1) Coming toward you:
|
Funktion versus Gefühle:
Die Funktion hat immer den Vorrang vor dem Ausdruck eines Gefühls!!
Funktion:
Gefühle, die ein Pferd zeigt:
Sie müssen Ihre Augen schulen:
Ausdruck mit dem ganzen Körper:
1) Auf jemanden zukommen:
|
|
 |
||
1) Turning away from you:
|
1) Sich wegdrehen:
|
|
 “Thank you – but I don’t think so!” |
||
In the next Blog we will continue with more “vocabulary”, what the horse expresses with the whole body – read on !! |
Im nächsten Blog fahren wir mit dem „Vokabular“ , was das Pferd mit dem ganzen Körper ausdrückt, fort – lesen Sie weiter! |
|
Posted in Understanding Your Horse
Tagged communication horses, horse body language, understand horses
No Comments
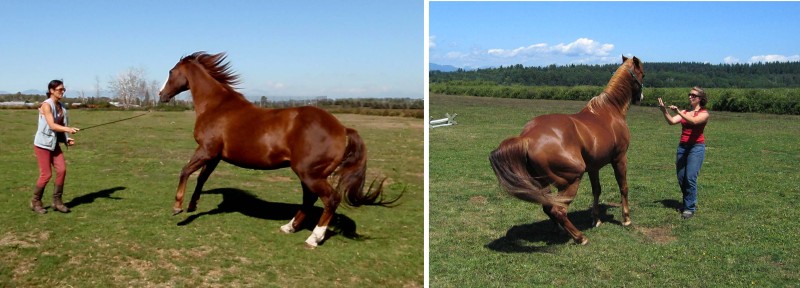
Happy Holidays!Speaking on my own behalf |
Fröhliche Feiertage!In eigener Sache |
|
|
|
|
Posted in Smart Horses
No Comments
Understanding your horse – Part 02 |
Ihr Pferd verstehen – Teil 02 |
|
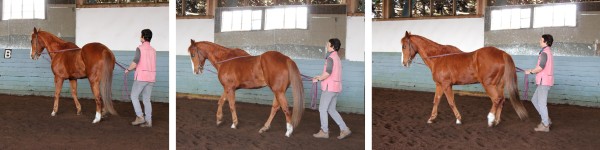
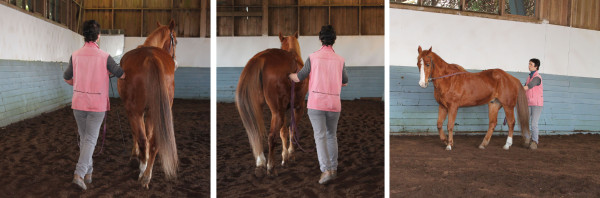
Awareness of signals sentOur last conversation example:
|
Erkennen der gesendeten SignaleUnsere letzte Unterhaltung:
|
|
 This body language is easily translated – every part expresses friendship: ears, eyes, nostrils, mouth and posture. |
||
Learning to see the signals:
Start the fascinating exploration!
|
Das Sehen der Signale lernen:
Wir starten die faszinierende Untersuchung:
|
|
 This horse is not sleeping – he is an unhappy picture of being at a total loss – he symbolically withdraws from a depressing situation. |
||
Another example, for why this is necessary:
|
Noch ein Beispiel für die Notwendigkeit:
|
|
 The frontal stare is a request for yielding, which is understood by all horses, as they have learned it in the herd – we need not swing ropes in their faces! |
||
Again: the human lead-mare:
|
Wiederum: die menschliche Leitstute:
|
|
 Here the situation has escalated already and the signal is clear – the bunched up rear promises a good kick and the other horse clears out! |
||
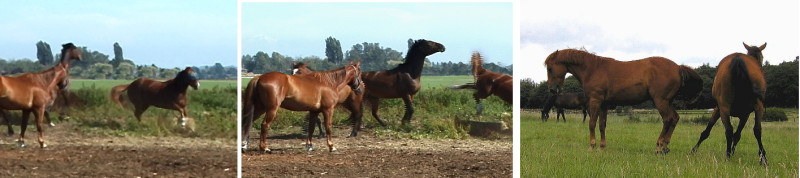
The escalation is never happy:
|
Die Eskalation ist nie glücklich:
|
|
 Ears on the left say: “Stay clear of my bucket!” – but what do the three horses on the right say to each other?? |
||
The soft signals:
Read on! |
Die sanften Signale:
Lesen Sie weiter! |
|
Posted in Understanding Your Horse
Tagged communication with horses, horse body language, understand your horse
No Comments
Understanding your horse – Part 01
|
Ihr Pferd verstehen – Teil 01 |
|
Introduction to the conversation:
|
Einführung in die Unterhaltung:
|
|
 Three different activities and faces: Czar greets me, Peter stands watch (right back) and Beau, the leader, grazes in peace. |
||
|
|
|
 A very content Czar: right ear scans the surroundings, but left ear is pleased to hear my praise! VERY happy crinkle nose! |
||
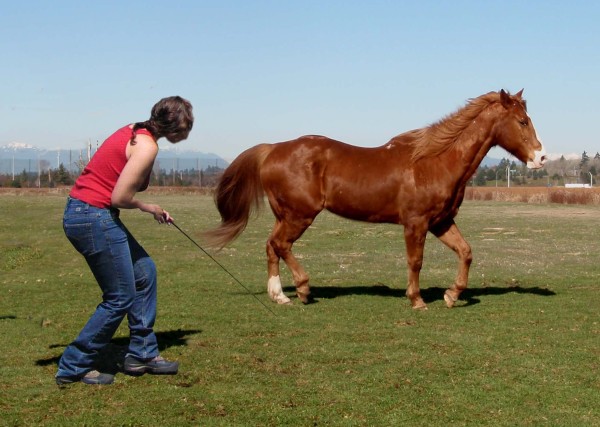
Here is such a conversation:
|
Hier ist so eine Unterhaltung:
|
|
 The “basic bubble”: you can clearly perceive the circle around the leader, into which nobody enters without invitation – even the llamas respect it !! |
||
A) Horses speak with their whole bodies well as with parts thereof :
B) ALL conversations happen in phases of increasing intensity:
|
A) Pferde sprechen mit ihrem ganzen Körper oder auch mit Teilen davon:
B) ALLE Unterhaltungen immer in Phasen von ansteigender Intensität ablaufen:
|
|
 The brown mare dared come too close! Flattened ears of the leader send her promptly back out of the “bubble”! |
||
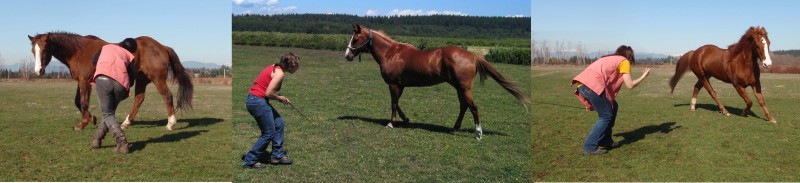
THEN the horse has two options:
|
DANN hat das Pferd zwei Möglichkeiten:
|
|
 Totally flattened ears and a readily cocked hoof show that it is high time to clear out: the brown mare`s tail can just be seen vanishing on the right! |
||
| We get into more details next timeRead on! | Nächstes Mal gehen wir tiefer ins Detail.Lesen Sie weiter! | |
Posted in Understanding Your Horse
Tagged horse body language, horse communication, understanding your horse
No Comments
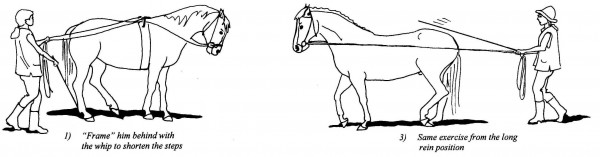
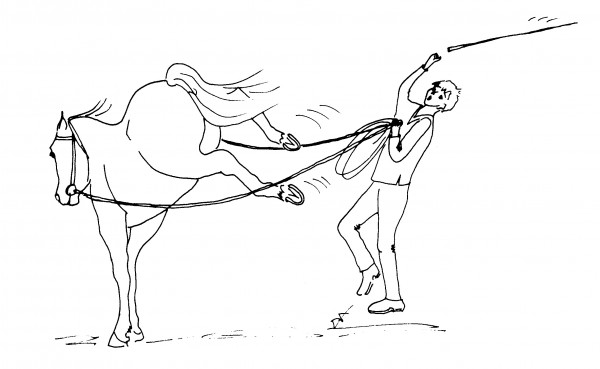
Long-reining – Part 12 |
Arbeit am langen Zügel – Teil 12 |
|
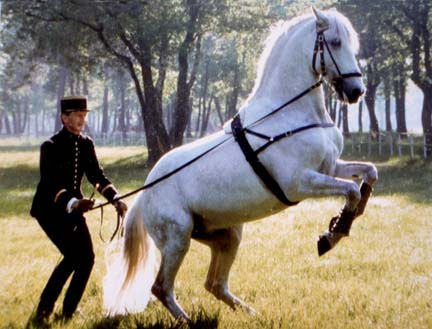
The piaffe:
|
Die Piaffe:
|
|
 Demonstrated by the masters! |
||
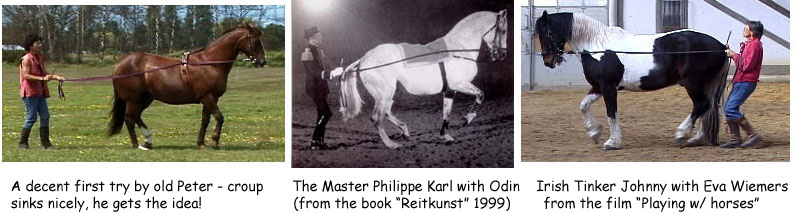
Very useful prep-Games:
|
Sehr nützliche Vorbereitung:
|
|
 Frequent transitions from backing up to trot will help the horse to slow down and collect. |
||
Back-up and trot transitions:
|
Übergänge Rückwärtsrichten und Antraben:
|
|
 All our horses learned the concept of tilting the pelvis and collecting on the long reins. |
||
|
|
|
 Although Beau`s mouth is never totally relaxed, his bearing is proud and he piaffes light in my hands. |
||
Canter on the long-reins:
Synchronize well!
|
Galopp am langen Zügel:
Sychronisieren Sie sich!
|
|
 Beau canters slow enough so I can walk along – though with big strides. Do NOT pull ! |
||
Read on! |
Lesen Sie weiter! |
|
Posted in Long-Reining
Tagged canter on the long-reins, equestrian long-reining, Piaffe on the long-reins
No Comments
Playing with Knowledge – Part 14 |
Fachmännisch spielen – Teil 14 |
|
What the horse says!
So let’s get to point b).
|
Was das Pferd dazu sagt!
|
|
|
|
||
The horse’s body language: a) The meaning of distances:
This will be the topic of the next series, called: “Understanding your horse”! Read on! |
Die Körpersprache des Pferdes: a) Die Bedeutung von Distanzen:
Darum also wird es sich in den nächsten Blogs handeln, die ich “Verstehen Sie Ihr Pferd_” nennen werde. Lesen Sie weiter!
|
|
Posted in Playing with Knowledge
Tagged equestrian knowledge, playing with horses, understanding horses
No Comments
Long-reining – Part 11 |
Arbeit am langen Zügel – Teil 11 |
|
We needed cheering up!
The Spanish Step: a great motivator!
|
Wir brauchten Aufheiterung!
Er spanische Schritt ist eine tolle Motivation!
|
|
 Left: help with body language – synchronize ! |
||
The Spanish Walk on the long-reins:
Teach it in small increments:
|
Der spanische Schritt am langen Zügel:
In kleine Lernschritte zerlegen:
|
|
 Left: first standing still – the horse learns to react to the alternating touching aid on his shoulders. Touching on both sides simultaneously is wrong! |
||
|
|
|
 Insist on a fluid forward movement with good rhythm. The horse should not stomp a hole into the ground, but rather step actively with his hind legs all the time. |
||
|
|
|
 If you want the horse to step with expression, you must move rhythmically and energetically yourself. |
||
The timing of aids is essential!
Pre-requisites fulfilled:
|
Das Timing der Hilfen ist wesentlich!
Alle Voraussetzungen erfüllt:
|
|
 Top left: lift the rein clearly to indicate the request for the leg lift. |
||
Give it a try! See if it doesn’t motivate your horse! Read on!! |
Versuchen Sie es! Sie werden sehen wie sehr es Ihr Pferd motiviert! Lesen Sie weiter!! |
|
Posted in Long-Reining
Tagged equestrian long-reining, Spanish steps on the long-reins, work on the long reins
No Comments
Playing with Knowledge – Part 13 |
Fachmännisch spielen – Teil 13 |
|
11. Be interesting and fun !
|
11. Seien Sie interessant und amüsant!
|
|
 We canter in Sync – body language is clear, horse fully focused! |
||
How do you make your horse stick around?
Feeling pressured never interests a horse!
|
Was tun, damit es bei Ihnen bleibt?
Unter Druck gesetzt zu werden interessiert ein Pferd nie!
|
|
 “Airplane” ears and tongue stuck out show he is at a loss |
||
Help, Explain and Motivate:
What if the horse shows no interest?
|
Helfen, Erklären und Motivieren:
Was, wenn das Pferd kein Interesse zeigt?
|
|
 King says: “I’d rather die! I simply can’t !!” |
||
|
|
|
 |
||
If you read German:
Let your horse take some decisions too!
|
Für deutsche Leser:
Lassen Sie Ihr Pferd Entscheidungen treffen!
|
|
 Peter well over 30, still proud to rear! |
||
Variety is the spice of life!
This concludes our list of leadership qualities, which comprised eleven points:
We will continue with more information about Knowledgeable Playing in the next Blog! Read on!!
|
Abwechslung ist das halbe Leben!
Hiermit beenden wir unsere Liste der Führerqualitäten, die elf Punkte umschloß:
Wir fahren fort mit weiteren Informationen über fachmännisches Spielen – lesen Sie weiter! |
|
Posted in Playing with Knowledge
Tagged be interesting to your horse, equestrian knowledge, leadership qualities, playing with horses
No Comments
Obituary on Johnny, October 2013 |
Nachruf auf Johnny, Oktober 2013 |
|
|
|
|
 |
||
|
|
|
|
|
||
|
|
|
 |
||
|
|
|
|
|
||
|
|
|
|
|
||
|
|
|

Posted in Smart Horses
No Comments
Long-Reining – Part 10 |
Arbeit am langen Zügel – Teil 10 |
|
The pirouette:
|
Pirouette:
|
|
 Left: The pirouette starts from the Travers on the circle. Mid: diminish the circle size consecutively. Right: Ph. Karl with Odin in canter! |
||
|
|
|
 Left: start of turn by straddling forelegs. Mid: crossing of forehand. Right: hind legs stay in one spot. |
||
|
|
|
 Left: start pirouette from track. Centre: the forehand swings around, hind stays put. Right: forehand crossing seen from behind. |
||
The half-pass:
|
Die Traversale:
|
|
 Left: help with hand or elbow. Centre: don’t let the hind end lead! Right: use reins to move him over. |
||
|
|
|
 Read from right to left: working my way around Beau’s croup to end up on inner side of the half-pass in direction of travel. |
||
Half-pass in trot:
Read on in part 11 ! |
Traversale im Trab:
Lesen Sie weiter im nächsten Teil! |
|
Playing – with Knowledge – Part 12 |
Fachmännisch spielen – Teil 12 |
|
Use Reason, understand instincts
|
Vernunft und Instinkte
|
|
 Complete trust on my part – Peter feeling completely safe with me – favourable conditions for happy play! |
||
9. Be reasonable:
The next point is: 10. Understand and let them live out their instincts:
Create a win-win situation:
Set up favourable routines:
Understand a flight animal’s worries:
Understand his social rules:
So read on for the conclusion in part 13! Become the perfect knowledgeable partner and friend!
|
9. Seien Sie einsichtig:
10. Verständnis für das Ausleben der Instinkte:
Eine Win-Win Situation herstellen:
Gute Routine einführen:
Verständnis für die Sorgen eines Fluchttiers:
Seine sozialen Regeln kennen:
Lesen Sie also weiter im Teil 13! Werden Sie ein perfekter fachmännischer Partner und Freund! |
|
Posted in Playing with Knowledge
Tagged equestrian knowledge, horse instincts, leadership qualitites, playing with horses, reasonable with horses
No Comments
Long-reining – Part 09 |
Arbeit am langen Zügel – Teil 09 |
|
Travers:
|
Travers:
|
|
 |
||
Travers:
|
Travers:
|
|
|
|
||
Travers along the wall: next to horse
|
Travers an der Bande: neben dem Pferd
|
|
 |
||
Travers on the circle: next to horse
Natural crookedness of the horse:
|
Travers auf dem Zirkel: neben dem Pferd
Natürliche Schiefe des Pferdes:
|
|
|
|
||
Travers: position behind the horse
Travers: position behind on inside of horse
|
Travers: Position hinter dem Pferd
Travers: Position innen hinter dem Pferd
|
|
|
|
||
Read on about the pirouette and half-pass in the next Blogs! |
Weiter gehts im nächsten Teil mit der Pirouette und Traversalen! |
|
Posted in Long-Reining
Tagged equestrian long-reining, Travers on the long reins, work on the long reins
No Comments
Longreining – Part 8 |
Arbeit am langen Zügel – Teil 8 |
|
Straight bends
The straight bend:
Explain from the front first:
|
Biegung auf der Geraden
Biegung auf der Geraden:
Zuerst von vorne erklären:
|
|
 The high hand demands the bend, but it sinks once it is achieved. Do not pull! Vibrate and give. Work both sides. |
||
In halt, from behind:
In walk along the wall:
|
Im Halten, von hinten:
Im Schritt auf dem Hufschlag:
|
|
 The high inside rein asks for the bend – the outside just gives enough to make it possible and then remains firm. Sink the inside hand, when the bend is achieved. |
||
Onto the volte and extend:
|
Dehnen auf der Volte:
|
|
 Top right: asking for “Action-Reaction” on the long reins. Top left: Let him extend his neck on a small volte. |
||
Straight Bend from behind:
Straight bend in trot:
Misunderstandings:
The outside straight bend:
|
Gerade Biegung von hinter dem Pferd:
Gerade Biegung im Trab:
Mißverständnisse:
Biegung auf der Geraden – außen:
|
|
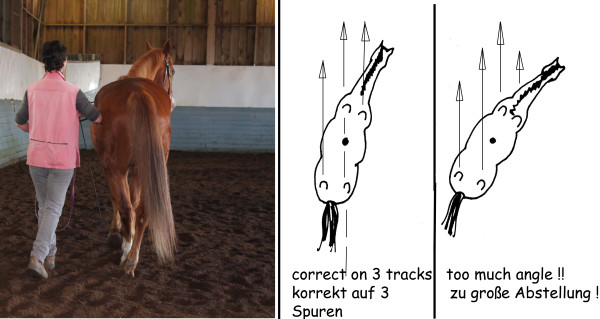
 Try to work on the second track so the horse can bend without hitting his nose on the wall. Increase bend from 45 to 90 degrees in stages. |
||
Straight bend on the centre line:
|
Gerade Biegung auf der Mittellinie:
|
|
 Be content with a small bend at first – keep the horse on a straight track! Gradually increase the bend only once he has well understood the exercise. |
||
In the next Blog we will attempt the travers and the pirouette. Read on! |
Im nächsten Blog versuchen wir Travers und Pirouette. Lesen sie weiter! |
|
Posted in Long-Reining
Tagged equestrian long-reining, the straight bend on the long reins, work on the long reins
No Comments
Playing – with knowledge – Part 10 |
Fachmännisch spielen – Teil 10 |
|
Exploration behaviour
7. LEAD and let’s explore!
Exploration distance:
Flight distance:
Exploration behaviour – phase 1 from afar:
|
Erkundungsverhalten
7. Erkundung anleiten!
Erkundungsdistanz:
Fluchtdistanz:
Fernorientierung:
|
|
 The leadmare (left) is in the front to check out the danger, first from a safe distance. |
||
Phase 2, from up close:
|
Phase 2 – Nahorientierung:
|
|
 After checking out the danger from afar, the leadmare decides to flee – the others follow simultaneously! |
||
The biggest leader mistake:
|
Der größte Anführer-Fehler!
|
|
 Left: Beau has reached the limit between exploration from afar and closer up: he is clearly less curious than I am! |
||
How to do it:
|
Was also tun:
|
|
 Peter is in the first stage of exploring up close: he circles the object (left) – then decides it is safe to come closer (right) |
||
Leading does not mean being over-protective!
|
Anführer sein heißt nicht über-Beschützen!
|
|
 I point and encourage the horse, but let him decide when to go closer. He will still vacillate right and left, perhaps circle. |
||
Conclusion:
In the next Blog we continue with our list of Leadership qualities! |
Zusammenfassung:
Im nächsten Blog geht es mit unserer Liste der Führungsqualitäten weiter! |
|
Posted in Playing with Knowledge
Tagged equestrian knowledge, explore with your horse, leading an exploration with horses
No Comments
Long-Reining – Part 07 |
Arbeit am langen Zügel – Teil 07 |
|
Learning to bend and step under:
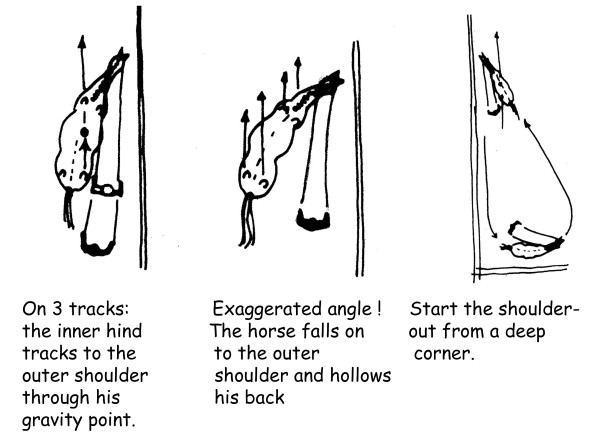
The “Shoulder-out”:
|
Biegen und Untertreten:
Das „Schulter-Heraus“:
|
|
 |
||
|
|
|
|
|
||
|
|
|
 You can use your whip or your outside hand to push the horse’s croup over. |
||
Shoulder-in:
|
Schulter-Herein:
|
|
|
|
||
Shoulder-in on the circle – balance:
|
Schulter-Herein auf dem Zirkel – Balance:
|
|
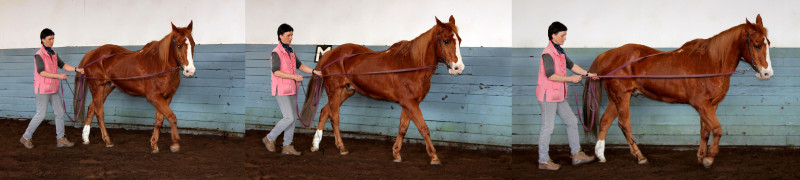 Here in trot we show how the inner hand can help the crossing of the hind legs with the whip. |
||
In the next part we will attempt the straight bend! Much more difficult for my horses to understand! Read on! |
Im nächsten Teil werden wir die Biegung auf der Geraden versuchen – für meine Pferde viel schwieriger zu verstehen! Lesen Sie weiter! |
|

Posted in Long-Reining
Tagged equestrian long-reining, lateral work on the long reins, Long-reining horses, shoulder-in exercise on the long reins
No Comments
Longreining – Part 06 |
Arbeit am langen Zügel – Teil 06 |
|
Rein-back, lower Croup
Rein-Back:
|
Rückwärtsrichten, Kruppe absenken
Rückwärtsrichten:
|
|
 When you pull you will typically see a high head, hollow back and mouth open in protest. |
||
Prep-Games:
|
Vorbereitung:
|
|
 It is the anticipation of the reversal in direction which makes the horse shorten his steps. The tilting of the pelvis brings the hind legs more under the belly, which leads to a natural collection. |
||
On the long-reins:
Start with “Action- Reaction” in Halt:
|
Am langen Zügel:
Zuerst „Aktion – Reaktion“ im Halten:
|
|
 |
||
The concept of collection – prep-game:
|
Konzept Versammlung – Vorbereitung:
|
|
 When you touch him on the dock, he will pinch his tail and tilt his pelvis. With shortened steps and hind legs further under his belly he will start to collect. |
||
On the long reins:
Transitions:
Note:
|
Wieder am langen Zügel:
Übergange:
Achtung:
|
|
 From rhythmic trot directly into the rein-back – and again to trot, all with slow and shortened strides, will lead to piaffe-like steps with more collection. |
||
Slowing down:
Cradle in the long-reins:
|
Tempo verlangsamen:
Die Wiege im langen Zügel:
|
|
 The horse learns in the “Cradle” to play with his gravity point. |
||
|
|
|
In the next Blog we’ll get more ambitious!Read on !! |
Im nächsten Blog werden wir ehrgeiziger!Lesen Sie weiter!! |
|
Posted in Long-Reining
No Comments
Work on the Long-reins – Part 05 |
Arbeit am langen Zügel – Teil 05 |
|
Let’s try some trot:
NOTE:
|
Wir versuchen Trab:
BEACHTEN SIE:
|
|
 |
||
|
|
|
|
|
||
Is the horse still relaxed?
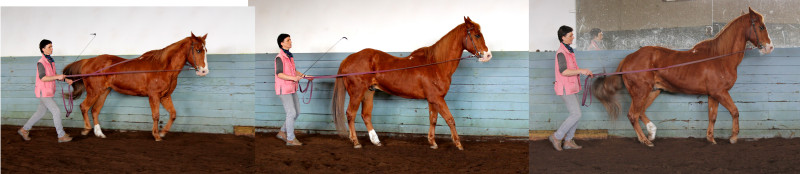
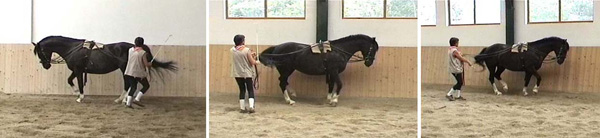
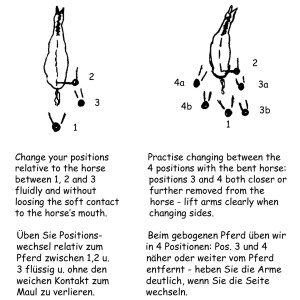
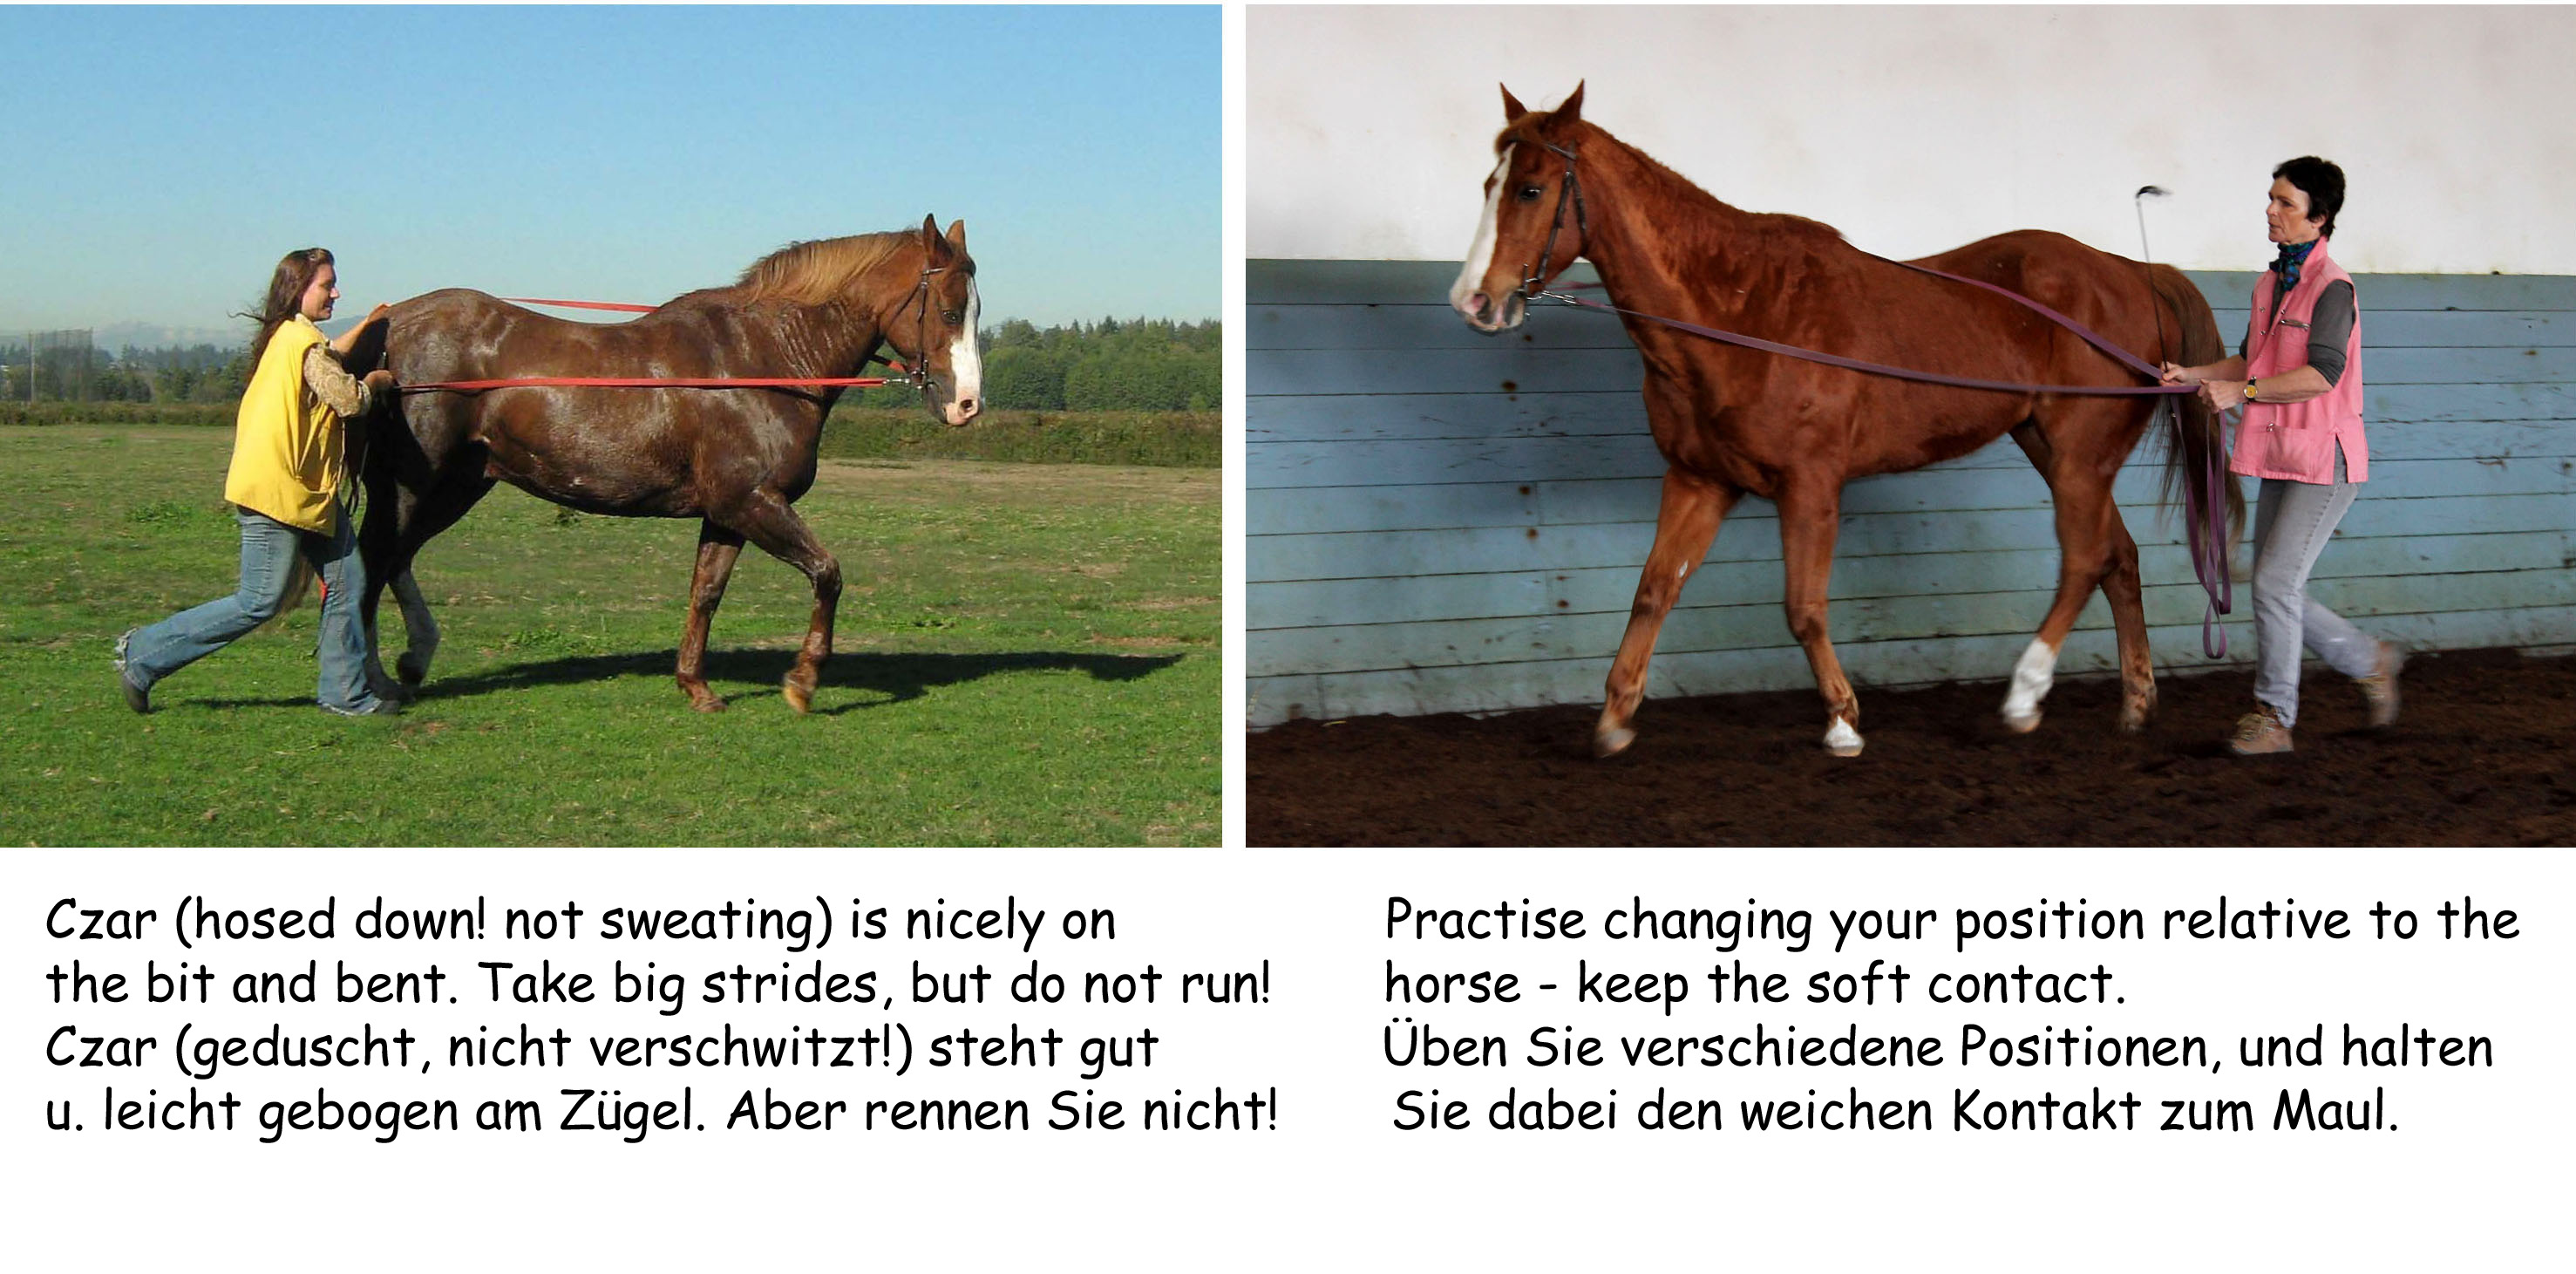
Change your position:
|
Ist das Pferd noch entspannt?
Wechseln Sie Ihre Position:
|
|
 |
||
Try a circle:
|
Probieren wir einen Zirkel:
|
|
|
|
||
Hand-changes in trot:
|
Handwechsel im Trab:
|
|
|
|
||
Try serpentines and voltes:
In the next Blog we want to practice rein-backs and explain to the horse to collect a bit and to slow down within a gait. |
Schlangenlinien und Volten:
Dehnung:
Im nächsten Blog wollen wir Rückwärtsrichten üben und dabei dem Pferd zu erklären versuchen, daß es sich ein wenig versammeln und innerhalb einer Gangart langsamer werden soll. |
|
Playing – with Knowledge – Part 07 |
Fachmännisch spielen – Teil 07 |
|
|
|
|
 |
||
Leadership qualities:
|
Führungsqualitäten:
|
|
|
|
||
|
|
|
 |
||
|
|
|
|
|
||
|
|
|
|
|
||
| In the next Blog we will go into more detail. | Im nächsten Blog gehen wir weiter ins Detail. | |


Posted in Playing with Knowledge
Tagged becoming a good leader for your horse, equestrian leadership qualities, Staying calm when horse spooks
No Comments
Playing – with Knowledge – Part 06 |
Fachmännisch spielen – Teil 06 |
|
| Continued from the last Blog:
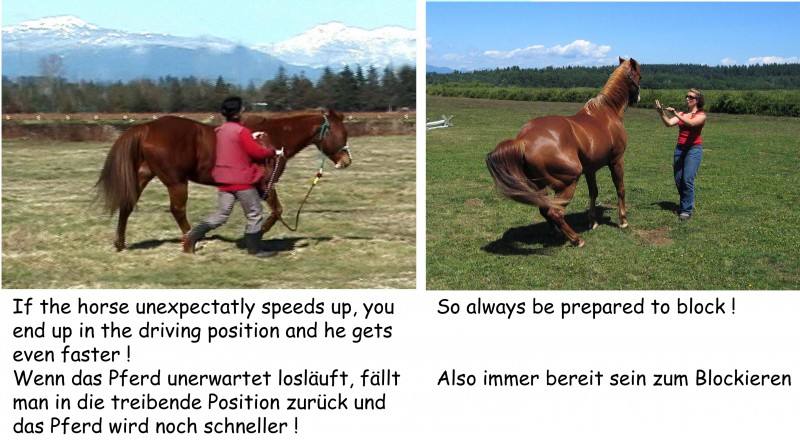
Your horse gets too fast:
|
Fortsetzung des letzten Blogs:
Das Pferd wird zu schnell:
|
|
 |
||
|
|
|
|
|
||
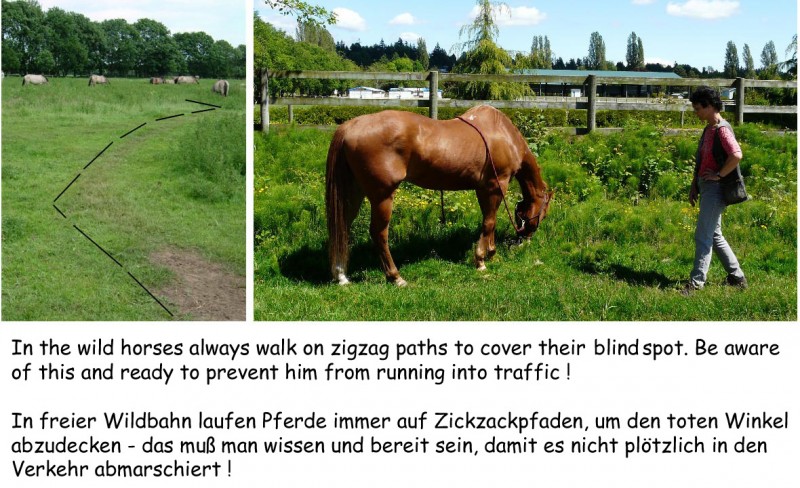
Zigzag:
|
Zickzack:
|
|
 |
||
Drive out the ghosts:
|
Treiben Sie die Gespenster aus:
|
|
|
|
||
What if he spooks?
|
Was tun, wenn es scheut?
|
|
|
|
||
Observe and learn:
Time to be social!
You find this too boring?
In the next Playing Blog we will discuss further, how you have to behave to prove to your horse that he can feel safe with you. |
Beobachten und lernen Sie:
Zeit gesellig zu sein!
Sie finden es zu langweilig?
Im nächsten Blog besprechen wir weiter, wie man sich verhalten muß, um seinem Pferd zu beweisen, daß es sich mit uns sicher fühlen kann. |
|
Posted in Playing with Knowledge
Tagged correct leading a horse, equestrian knowledge, going for walk with your horse
No Comments
Playing – with Knowledge – Part 05 |
Fachmännisch Spielen – Teil 05 |
|
Going for a walk:
The rope:
Where to walk?
|
Wir gehen spazieren:
Das Seil:
Wohin gehen?
|
|
 Be in the leader position – look where you are going! |
||
|
|
|
 The leader must see potential problems FIRST, as the horse looks to her for further instruction – to flee or not to flee! |
||
Stop and Go!
|
Stopp und Weiter!
|
|
 When the leader goes – the herd goes. When the leader stops the others stop also! |
||
Ignoring the leader is the only thing we will never allow!
Resting – staying stopped:
|
Den Anführer zu ignorieren ist das Einzige, das wir nie erlauben!
Ruhen – Stehen bleiben:
|
|
 Your body always speaks to him – my legs show “rest!”, my positions says “stay put!” |
||
Resting but ready to go:
|
Geparkt – aber bereit zum Weiterlaufen:
|
|
 If I stand in the partner position, the horse is free to walk on when he chooses. |
||
| To be continued in the next Blog – this one became too long! Grazing is an unbelievably important topic, as your horses can tell you! | Im nächsten Blog geht es weiter – die Fortsetzung, da dieser Blog zu lang wurde! Grasen ist eben ein unglaublich wichtiges Thema, wie Ihre Pferde Ihnen sagen können! | |
Posted in Playing with Knowledge
Tagged correct leading a horse, equestrian knowledge, walk with horse
No Comments
Work on the long-reins – Part 04 |
Arbeit am langen Zügel – Teil 04 |
|
Lay your tracks down for orientation:
Attempt a circle:
Turning onto the circle line:
|
Legen Sie sich Spuren zur Orientierung:
Nun der Zirkel:
Abbiegen auf die Zirkellinie:
|
|
 |
||
Possible problems:
Practise different positions:
|
Mögliche Probleme:
Üben der verschiedenen Positionen:
|
|
|
|
||
Figure Eights:
Possible problems:
|
Achter Figuren:
Mögliche Probleme:
|
|
 |
||
|
|
|
|
|
||
Remember:
Last but not least: |
Beachten Sie:
Zu guter Letzt: |
|
|
|
||
Next time we will start to work in trot and practise more steering (serpentines, voltes and so on) |
Nächstes Mal fangen wir an im Trab zu arbeiten und üben weiter gut zu lenken (Schlangenlinien, Volten usw.) |
|


Posted in Long-Reining
Tagged equestrian Long-reining positions, long-reining a horse on circles
No Comments
Playing – with Knowledge – Part 04 |
Fachmännisch Spielen – Teil 04 |
|
3) Becoming the “human” lead-mare:
a) How do we tell the horse that we intend to become his leader? |
3) Wir werden die “menschliche” Leitstute:
a) Wie sagen wir dem Pferd, daß wir vorhaben der Anführer zu werden? |
|
 The boss has the biggest “bubble” – so leading with large distance creates respect ! |
||
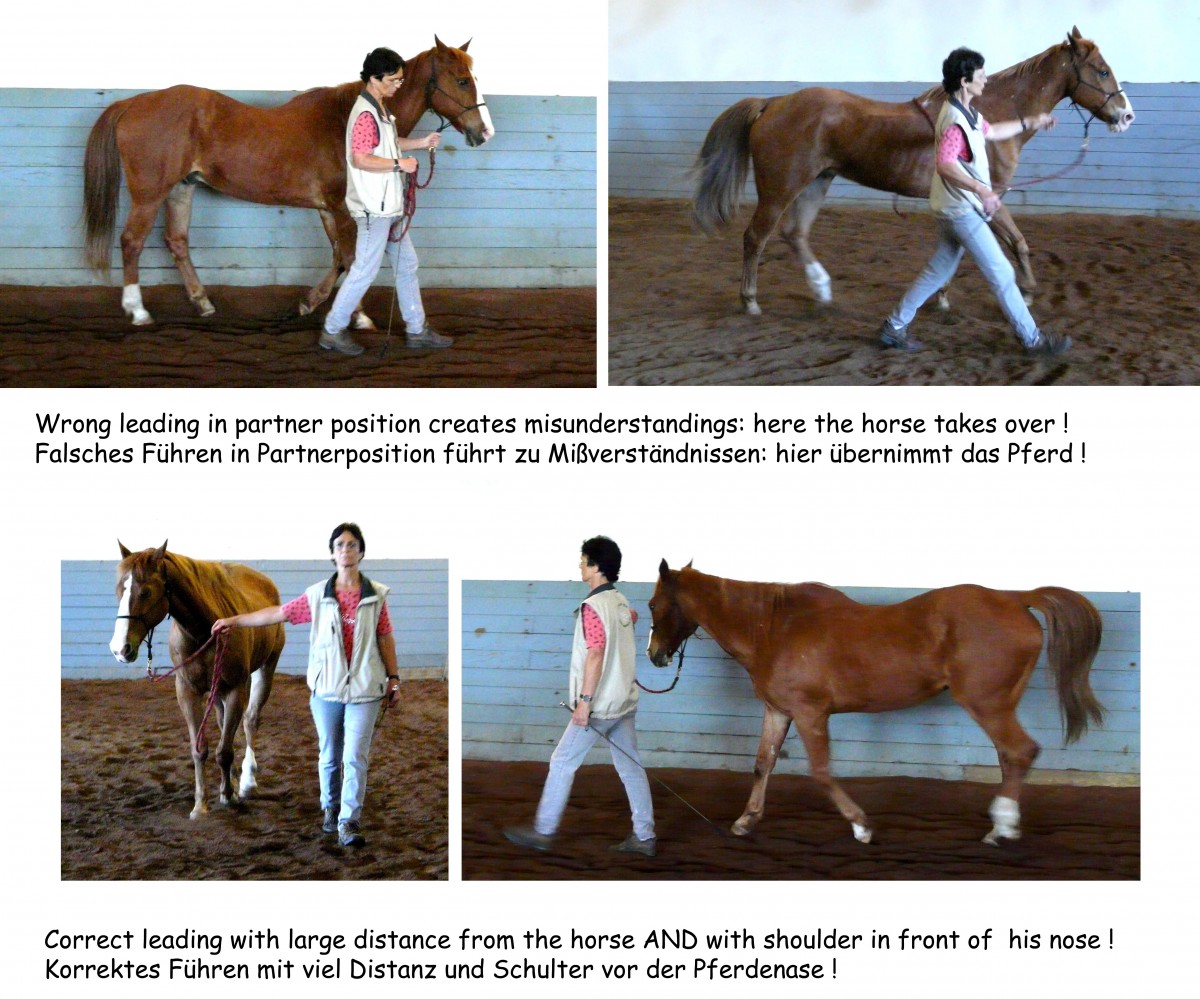
a-1) Private space and ranking:
|
a-1) Privatsphäre und Rangordnung:
|
|
 Wrong leading position: I am too close to the horse, I hang on tight (which no lead-mare would do!) and I am not in front of the horse´s nose. |
||
a-2) Your Position:
Different roles (jobs) within the herd are shown by different positions:
Lead-stallion position:
|
a-2) Ihre Position:
Verschiedene Rollen in der Herde werden durch verschiedene Positionen ausgedrückt:
Leithengst Position:
|
|
 The lead-stallion position is used to drive the horse forward. |
||
Lead-mare position:
|
Leitstuten Position:
|
|
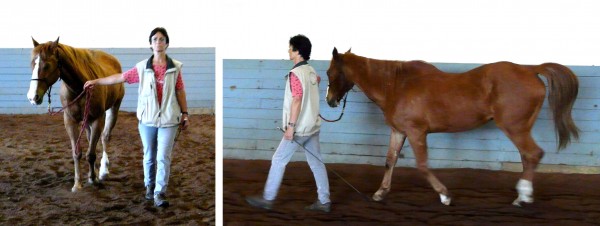 Correct lead-mare position: large sideways “bubble” and the leader’s shoulder in front of the horse’s nose. |
||
Partner position:
|
Partner Position:
|
|
|
|
||
So again: correct Lead-mare position:
In the next Playing Blog we will practise correct leading by going for a walk with our horse! Read on!! |
Daher wiederum: korrekte Leitstuten Position:
Im nächsten Playing Blog warden wir das korrekte Führen bei einem Spaziergang mit unserem Pferd üben! Lesen Sie weiter!! |
|
Posted in Playing with Knowledge
Tagged correct leading of a horse, equestrian correct leading
No Comments
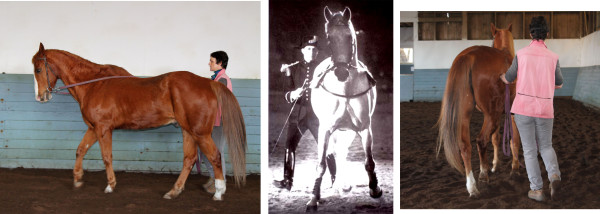
Work on the Long-reins – Part 03 |
Arbeit am langen Zügel – Teil 03 |
|
Up to here:
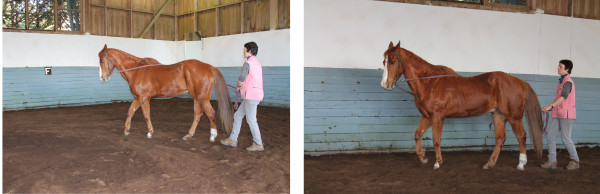
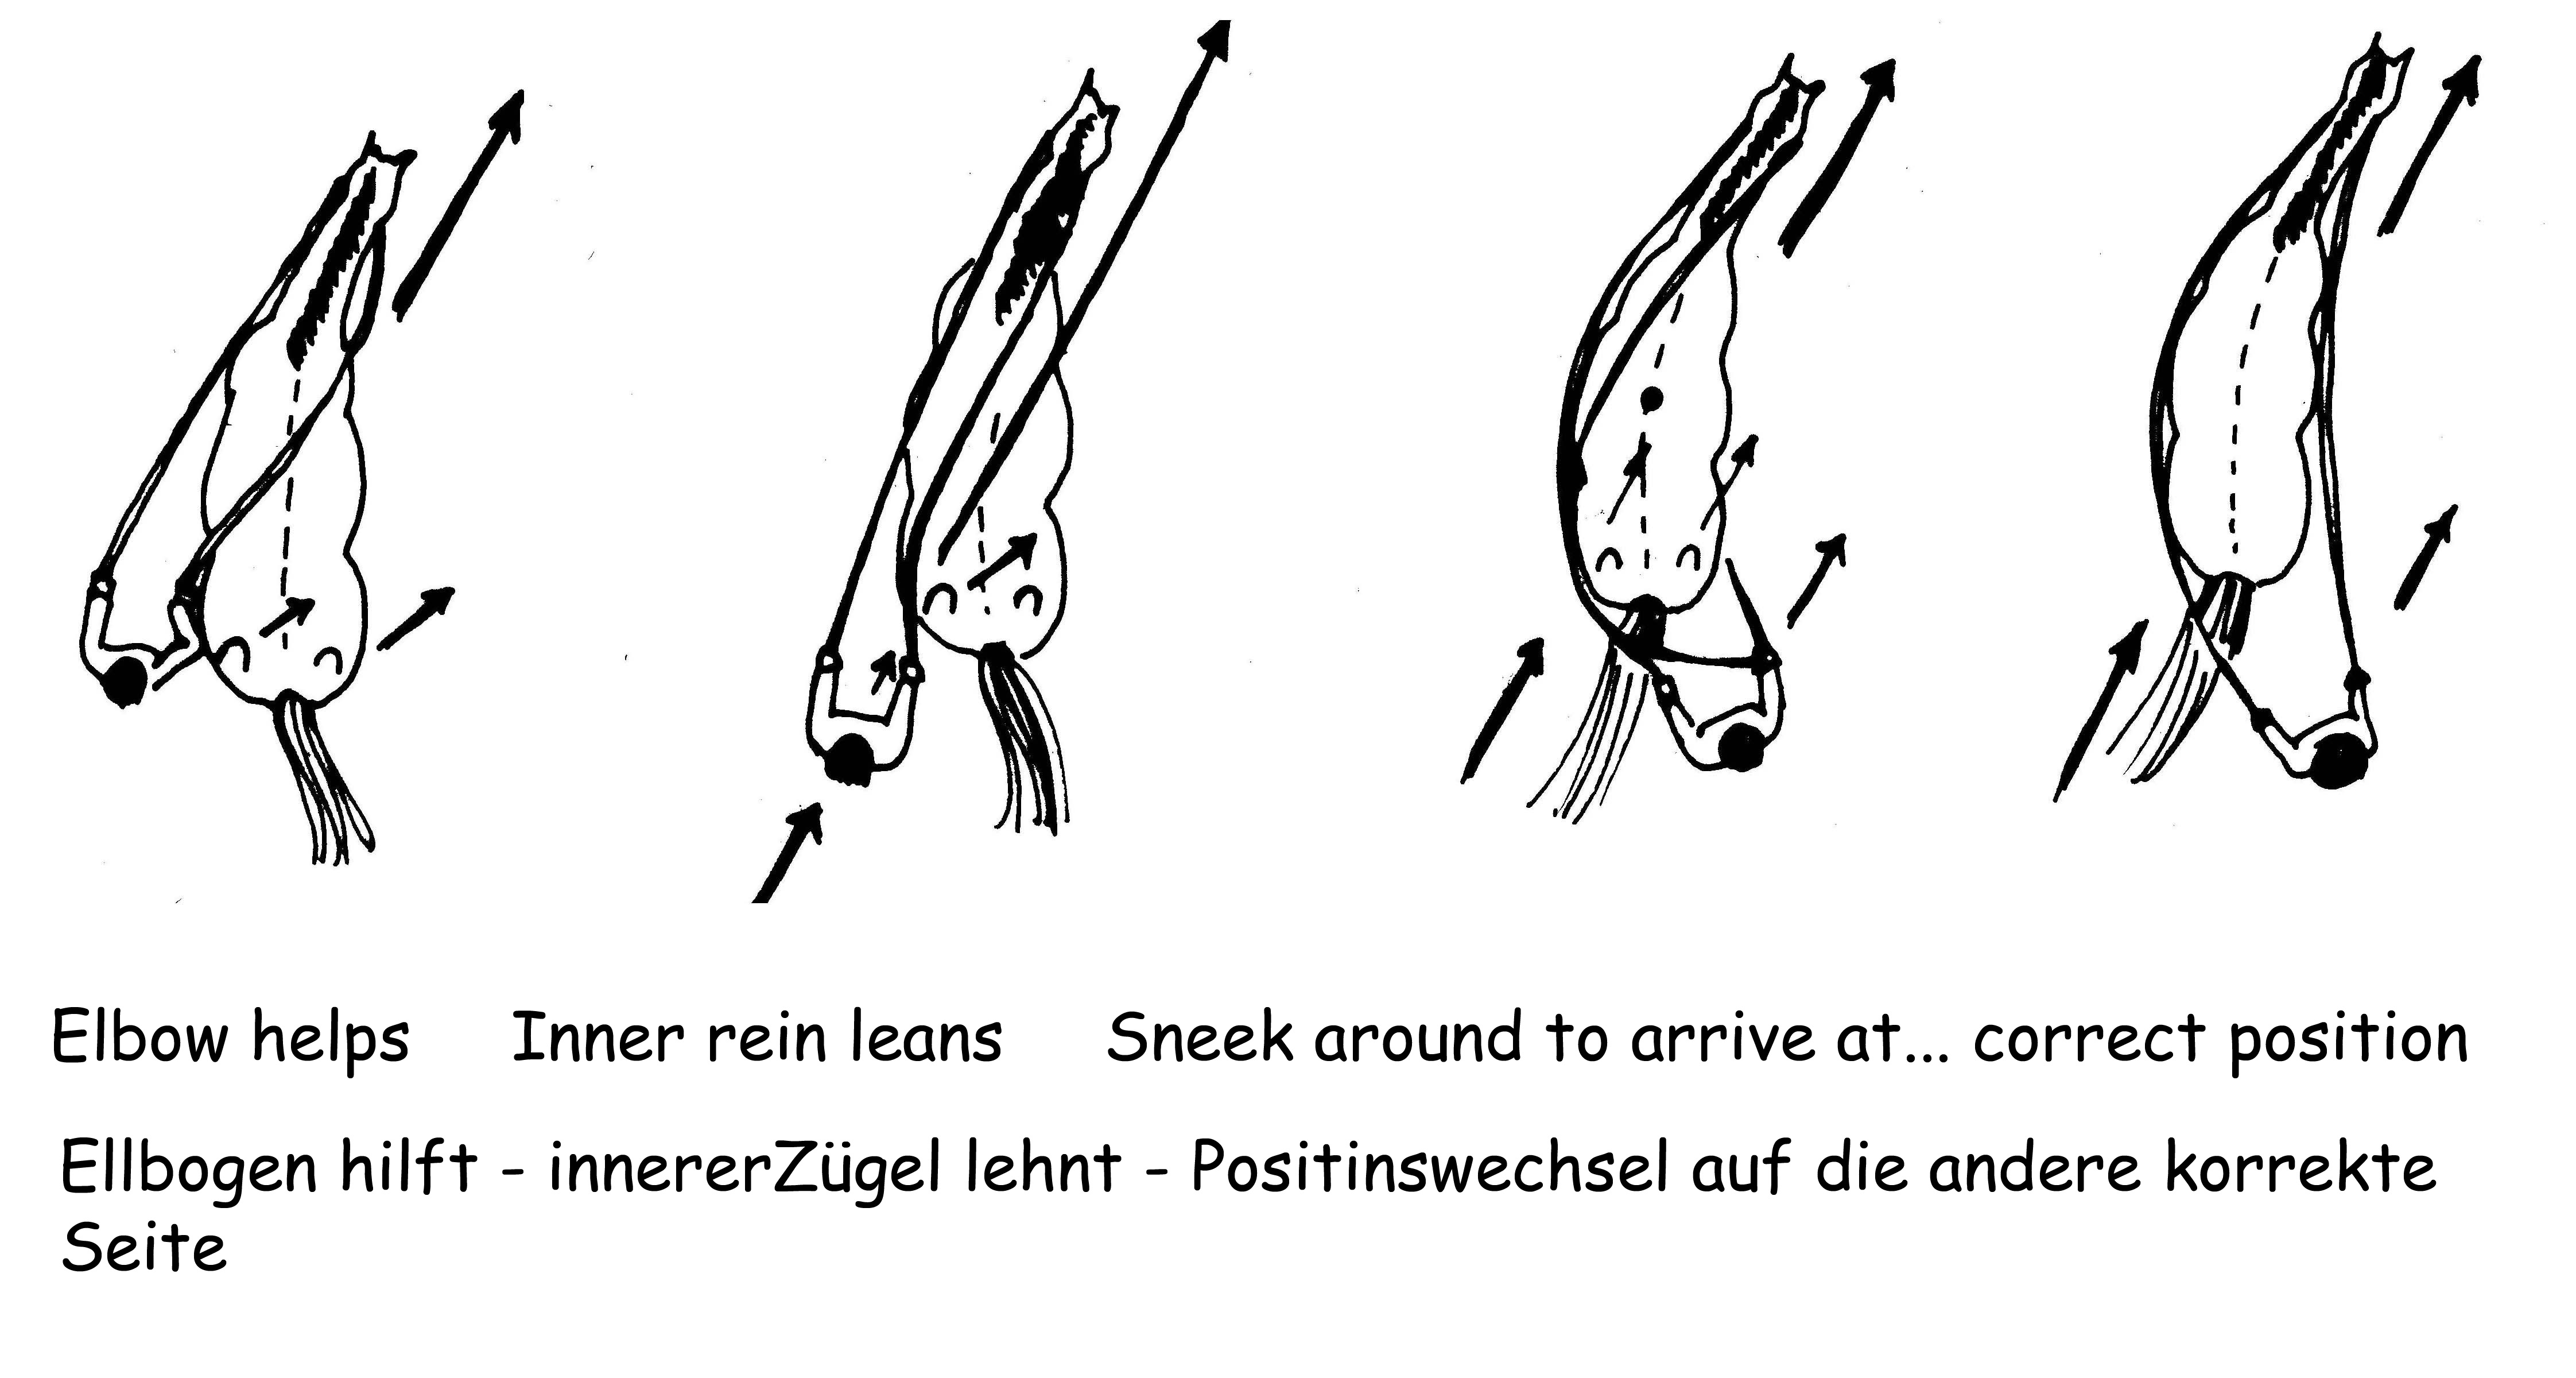
1. The Bend – through the corner:
|
Bis hierher:
1. Biegen – durch die Ecke:
|
|
 I apply the aid for the bend by lifting the rein high, so it acts in the direction of the corner of the mouth as much as possible. |
||
The rein aid for a bend therefore is:
|
Die Zügelhilfe für das Biegen ist daher:
|
|
 To gently and quickly vibrate the rein I extend my index finger, as I can move it faster than my wrist. |
||
Possible problems:
NOTE:
|
Mögliche Probleme:
BEACHTEN SIE:
|
|
 To make my aid quite clear to my horse, I lift AND open my arm to the side for the bend. |
||
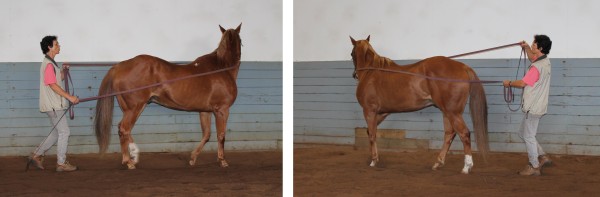
2. Hand-change on the diagonal:
Possible problems:
|
2. Handwechsel auf der Diagonalen:
Mögliche Probleme:
|
|
 Check the horse’s straightness on the diagonal by walking behind him. |
||
3. Determine the track!
|
3. Bestimmen Sie die Spur!
|
|
 To check my steering, I leave the beaten track and walk beside it. |
||
NOTE:
Next time we will attempt Circles and Figure Eights – and find out, how difficult a truly round circle can be! We will also start working in trot – getting our legs going in harmony with the horse! |
BEACHTEN SIE:
Das nächste Mal versuchen wir Zirkel und Achten – und merken wie schwierig ein wirklich runder Kreis sein kann! Wir werden auch Trab versuchen – und |
|
Playing with knowledge – Part 03 |
Fachmännisch spielen – Teil 03 |
|
Problems with your friendship?
|
Probleme mit der Freundschaft?
|
|
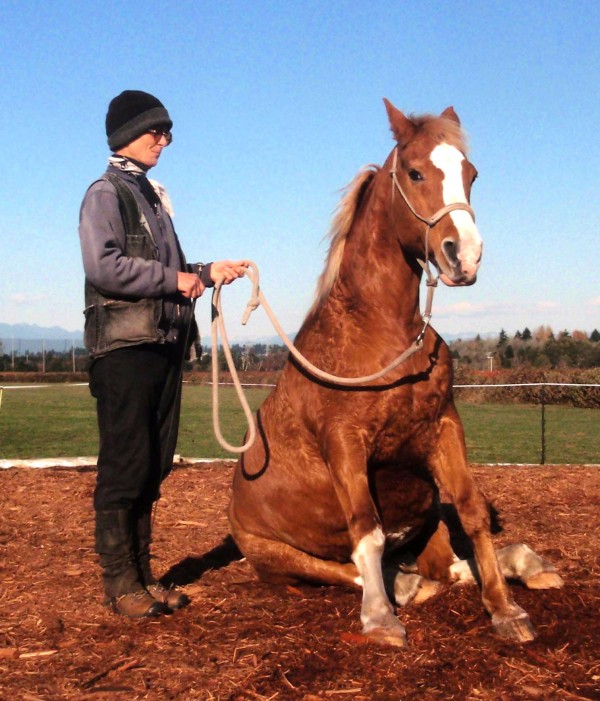 King’s first Sit ! This takes peace of mind too – now he has it and is happy. |
||
Such behaviour throws up several questions, because
|
Solches Verhalten wirft eininge Fragen auf, da
|
|
 My horse must slip into the halter willingly – I do not “catch” horses ! |
||
I do not “catch” or “corner” horses.
|
Ich „fange“ keine Pferde und treibe sie nicht in die Enge.
|
|
 When I call my horses, they come running ! This is how it should be: always expecting s.th. wonderful (and rightly so) |
||
According to my training method H.E.M. …
|
Nach meiner Trainingsmethode H.E.M. …
|
|
 At first King could only kneel being sandwiched between his friends – he needed them for reassurance! |
||
In the next Blog
|
Im nächsten Blog
|
|
 King has become so trusting that he remains in the Kneel until Terri has safely mounted! |
||
| Read on !!! | Lesen Sie weiter !!! | |
Posted in Playing with Knowledge
Tagged causes of problems, Equestrian, misunderstanding with horses
No Comments
Long-Reining – Part 02 |
Am langen Zügel –Teil 02 |
|
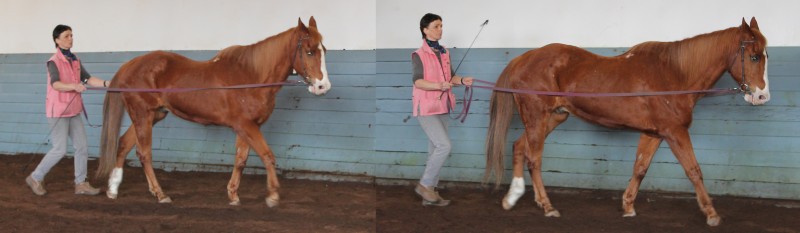
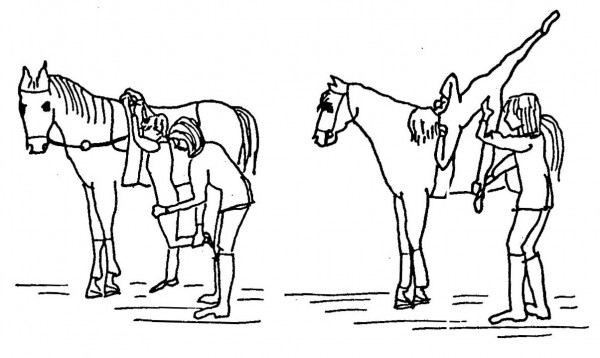
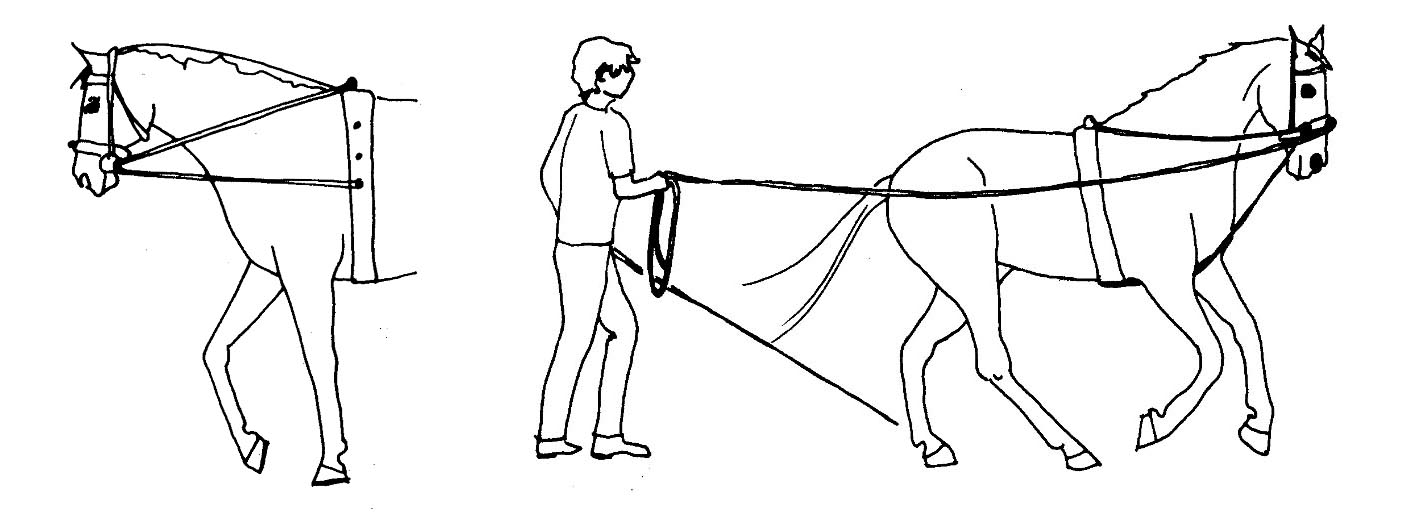
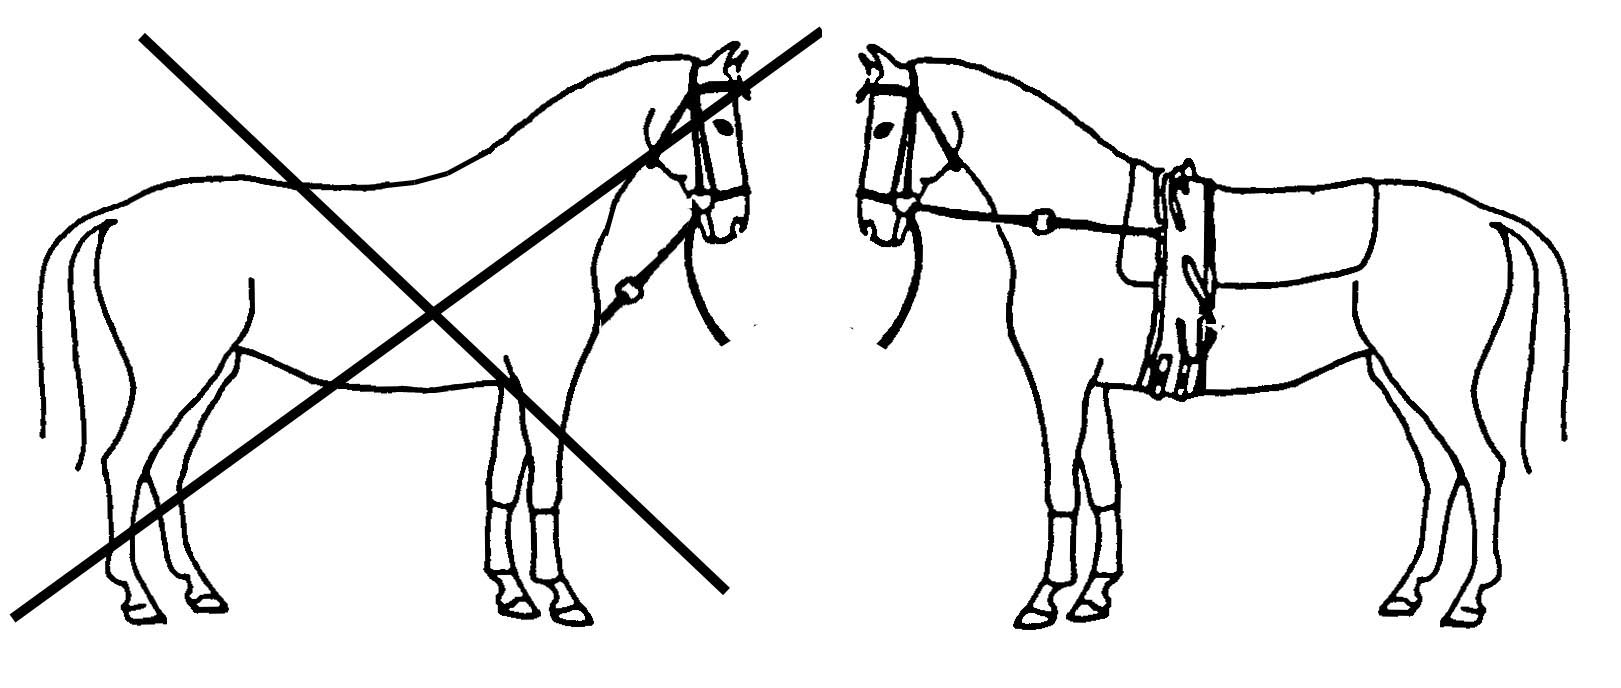
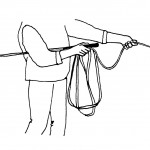
How to start:Equipment:
|
Der Anfang:Ausrüstung:
|
|
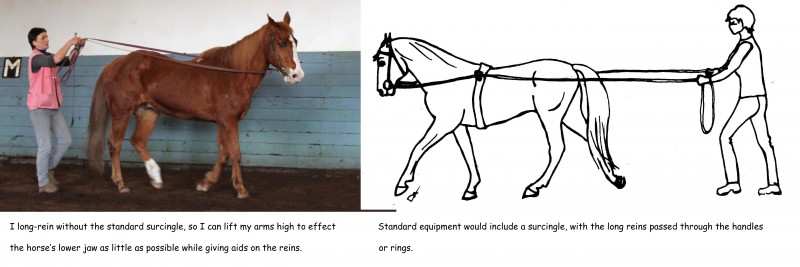 Without a surcingle you can lift the arms high and try to direct the rein aids toward the corner of the horse’s mouth. |
||
|
|
|
 Carry the whip pointing down at the start, later the upward position is more flexible. |
||
|
|
|
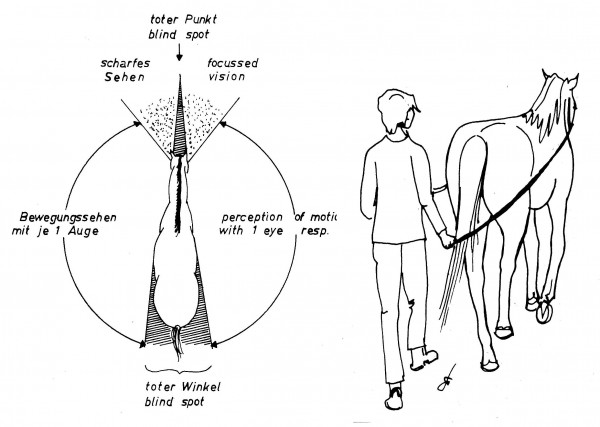 Keep in mind what the horse is able to see! If he gets nervous, step out of his blind spot to the side. |
||
|
|
|
 Without noseband the horse can protest! No matter how loose the reins look – if the mouth is open like this your rein-aids are too strong! |
||
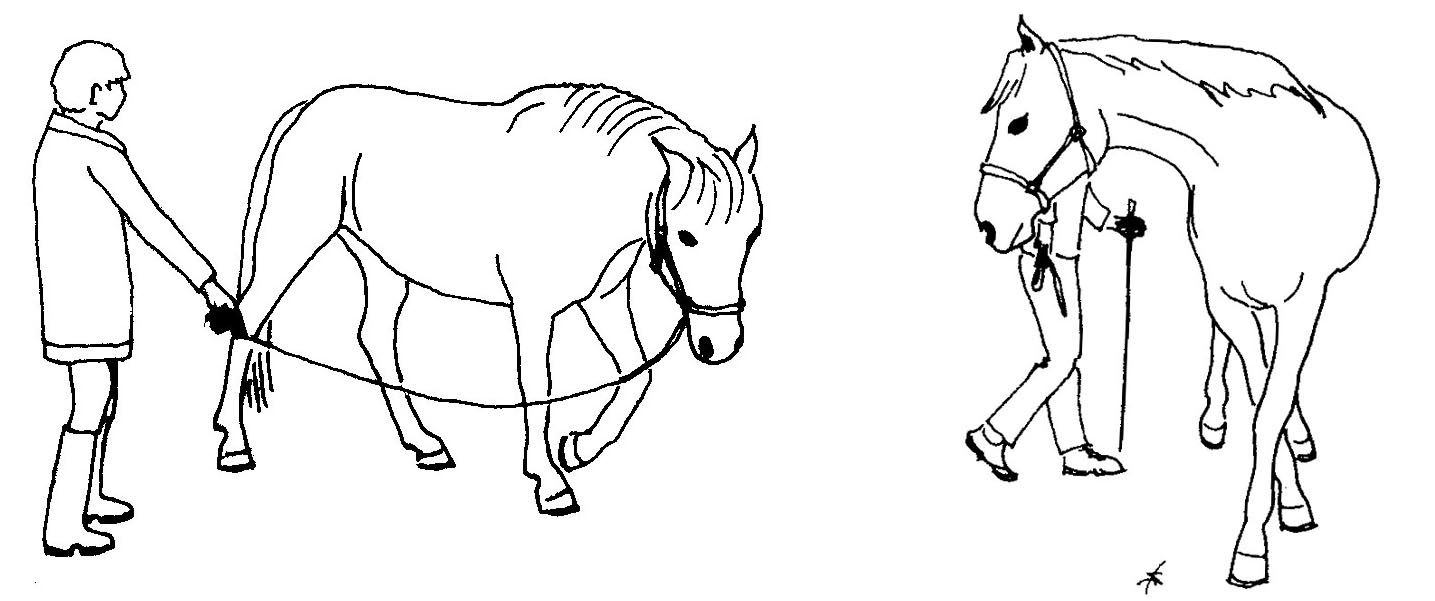
|
|
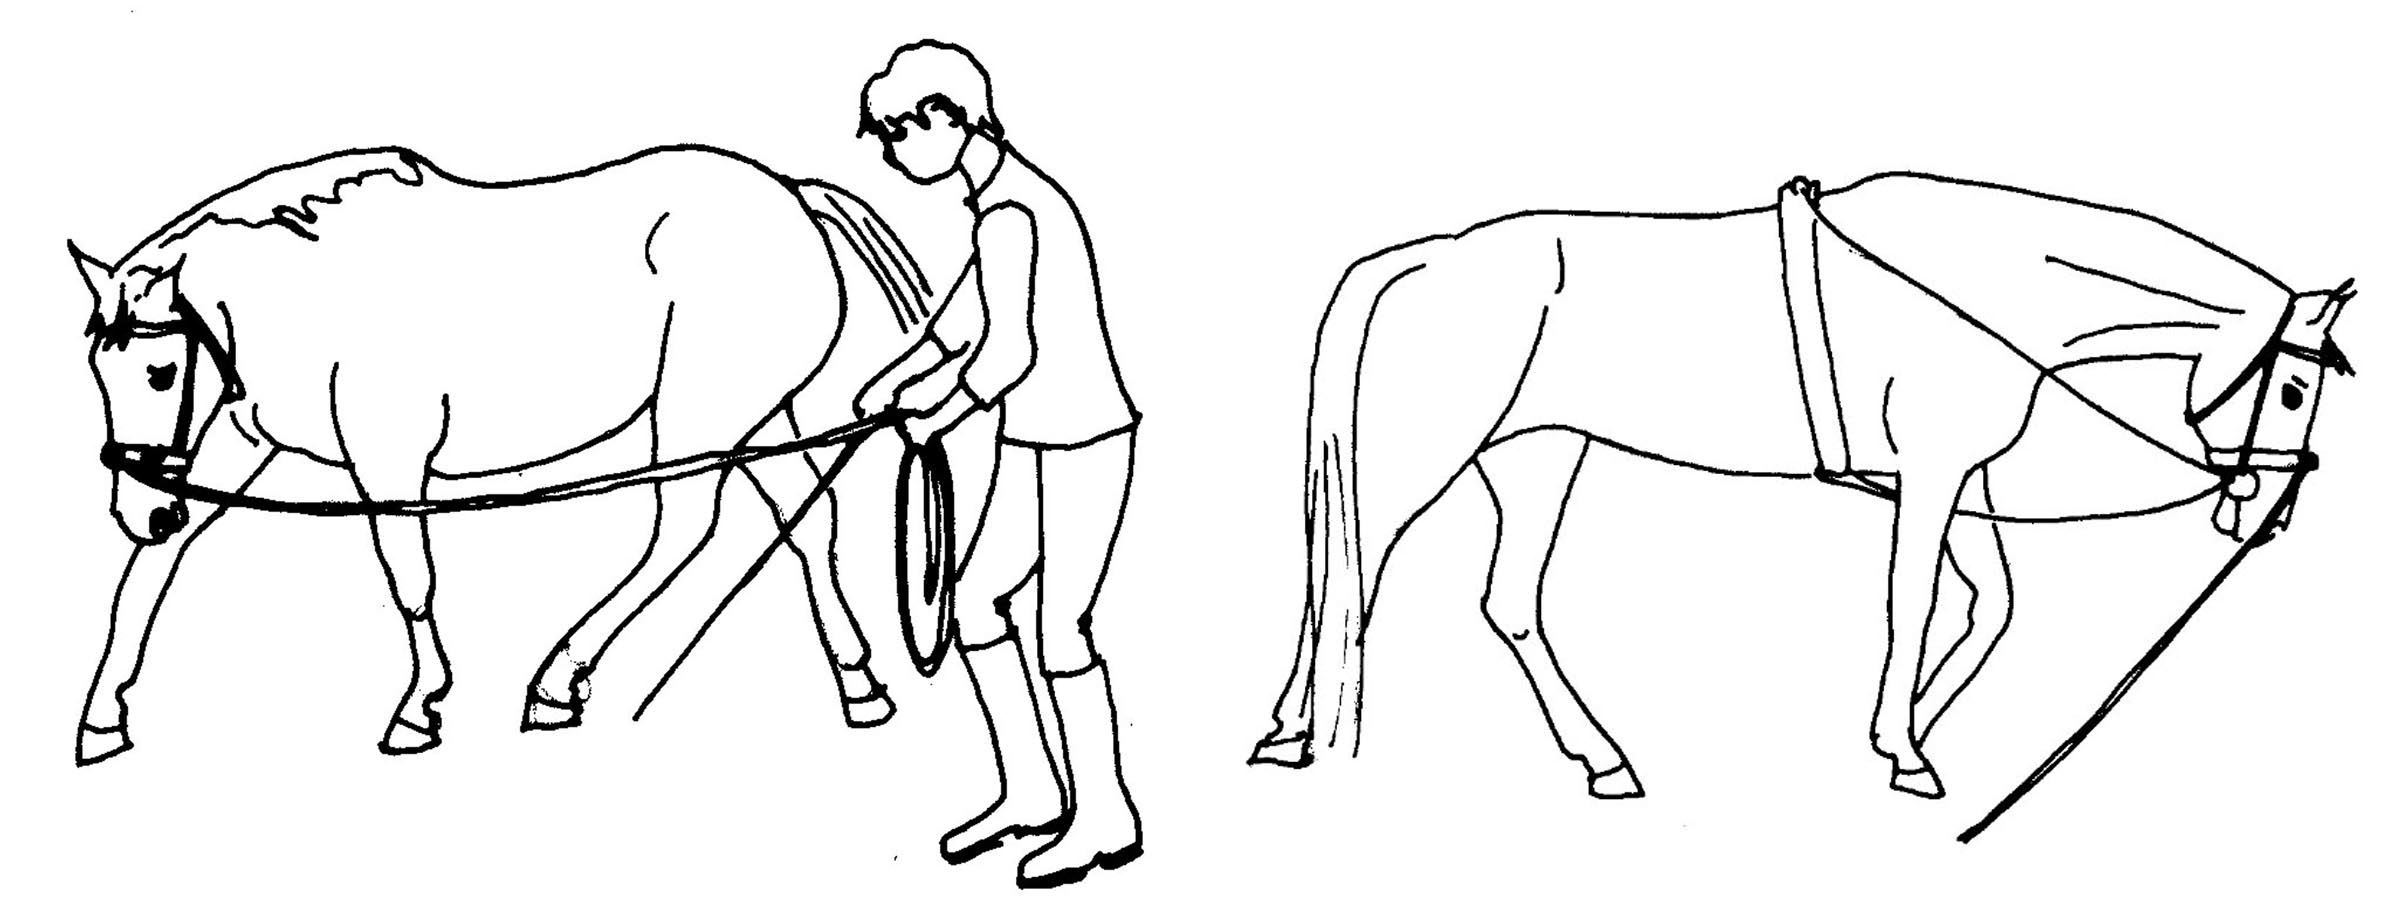
|
 Change in position from behind horse to next to croup: slide your right hand forward on both reins without loosing contact. |
||
|
|
|
Playing – with Knowledge – Part 02 |
Fachmännisch Spielen – Teil 02 |
|
2) Becoming a “herd member”
|
2) Wir werden “Herdenmitglied”
|
|
 Focussed eyes to the front – prowling body movements – flattened ears – all signs of a predator! |
||
Becoming a friend:
|
Freunde werden:
|
|
 Staring at a horse is a demand to yield – Beau flattens his ears, but turns away politely (and steps backwards) |
||
|
|
|
 Sky’s nose expresses utter delight – Hanna knows her favorite scratch spots! |
||
a) Friends hang out together:
|
a) Freunde hängen zusammen rum:
|
|
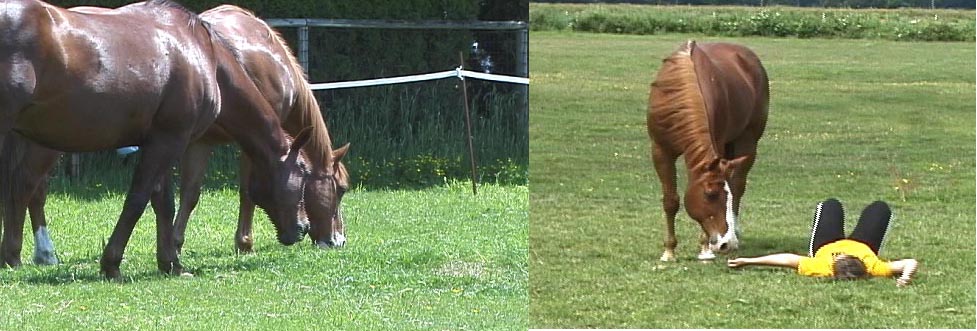 Only friends graze mouth to mouth! Nur Freunde fressen Maul an Maul! |
||
b) Only friends graze together and eat mouth to mouth.
c) Use your body language
|
b) Nur Freunde grasen Maul an Maul.
c) Auch mit Körpersprache
|
|
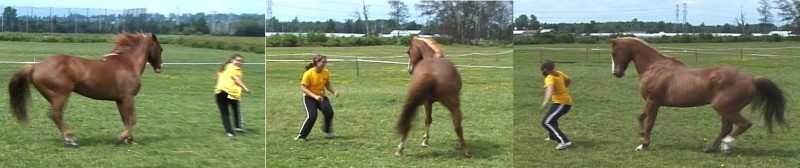 Fast turns together – ever interesting changing ideas – sometimes lead and sometimes follow! This is how real friends play! |
||
d) Be fun!
Next time we discuss what it takes to become a human lead-mare. Read on! |
d) Seien Sie vergnüglich!
Nächstes Mal diskutieren wir was man als menschliche Leitstute wissen muß. Weiterlesen! |
|
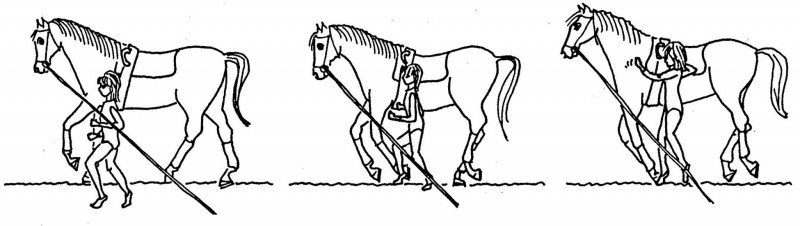
Long-Reining – Part 1 |
Arbeit am langen Zügel – Teil 1 |
|
Introduction:
|
Einführung:
|
|
 See long-reining games in “From Leading to Liberty” J.A, Allen 2010 |
||
|
|
|
|
|
||
|
|
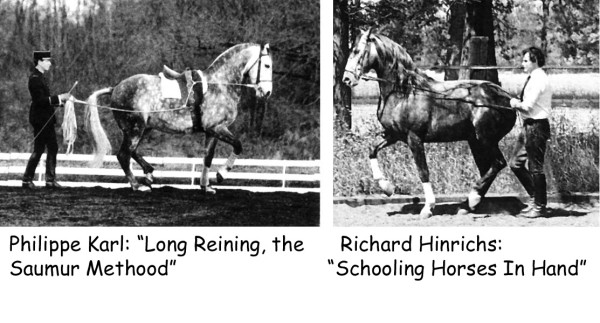
|
 The High School of Long Reining can not be our goal here. Ph. Karl with Odin (from “The Art of Riding”) – can we learn lightness on the long reins? |
||
|
|
|
|
|
||
|
|
|
 Never underestimate the necessary safety distance to the side as well as rear ! |
||
In the next Long-Reining Blog we will discuss of how to start this new adventure! |
Im nächsten Langen Zügel Blog fangen wir mit diesem neuen Abenteuer an! |
|

Playing – with Knowledge – Part 01: |
Fachmännisch Spielen – Teil 01: |
|
One nice response I got! Thanks Raphaëlle!
So let us move on with: Playing – with knowledge and like an expert1) Being the lead-mare:
Natural horsemanship is all about becoming the “lead-mare”.
|
Ich habe eine nette Antwort bekommen! Danke Raphaëlle!
Also machen wir weiter mit:
|
|
 the herd guards the sleeping foals. |
||
Herd rules:
|
Regeln in der Herde:
|
|
 Left: Typical “snaking” head movements of the stallion demand a get-go! Right: the stallion drives a mare to rejoin the herd. |
||
Lead stallion:
|
Leithengst:
|
|
 When the leader decides to go, everyone else starts moving and follows. |
||
Leadmare:
|
Leitstute:
|
|
 Left: the herd politely circles around the leader. Mid: she doesn’t plan to share her food, she “stares” the others away as a first warning. Right: she lifts her hind hoof – a definite warning not to come any closer! |
||
The other herd members
|
Alle anderen Herdenmitglieder
|
|
|
Left: the leader’s ears are still friendly. Not for long! Don’t come closer! Mid: She demands a “nose-away!” which is promptly followed. Right: mission accomplished! |
||
So in the next Blogs we will discuss
In the next part we discuss how to develop the necessary leader qualities! |
In den nächsten Blogs werden wir sehen
Wie man Führungsqualitäten entwickelt erfahren sie im nächsten Teil! |
|
Dear Blog readers! |
Liebe Blog Leser! |
|
For this you would have to send me an Email through my contact page. What I would like to know:
Rise to the occasion! No question is too unimportant! Make me happy by letting me know, whether I am at all on the right path with these articles! I thank all my readers and wish you much FUN !!
 Running parallel is a sign of friendship – horses love it!
|
Dazu müßten Sie mir eine Email über meine Contact Seite schicken. Was mich sehr interessieren würde ist:
Geben Sie sich einen Ruck! Keine Frage ist zu unwichtig! Machen Sie mir die Freude mich wissen zu lassen, ob ich mich meinen Artikeln überhaupt auf dem richtigen Weg bin! Ich danke allen Lesern und wünsche weiterhin viel Spaß !!
|
Posted in Smart Horses
No Comments
Work on the Lunge Line – Part 18 |
Arbeit an der Longe – Teil 18 |
|
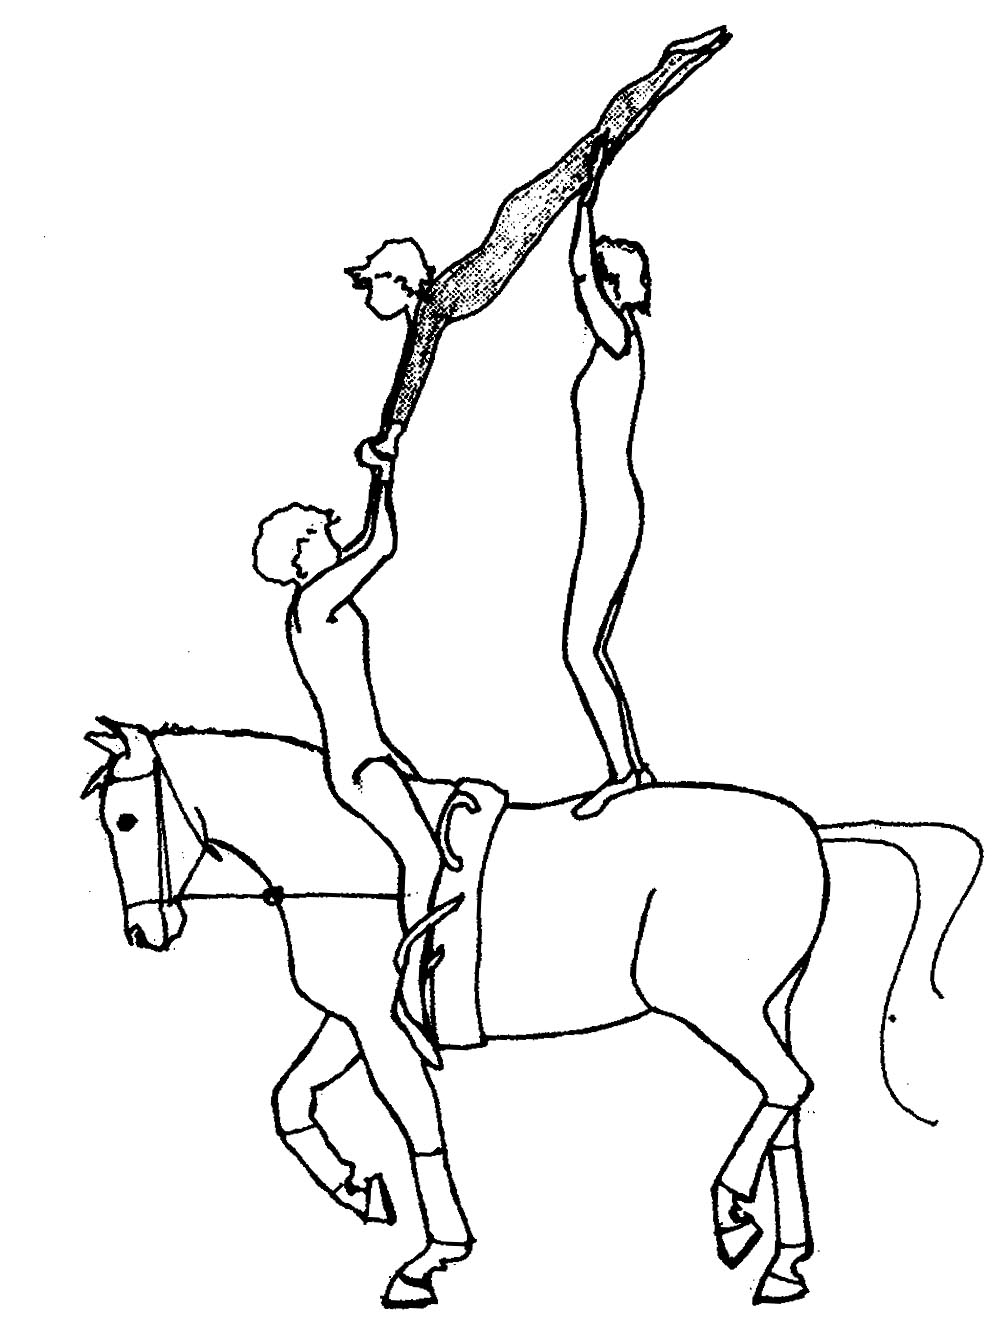
Lunging for Vaulting – the first exercises
|
Longieren für Voltige – erste Übungen
|
|
 The vaulter must approach AND retreat along the lunge line, always in full view for the horse. |
||
|
|
|
 For mounting in halt and walk always use a pusher to minimize the discomfort to the horse and keep the gravity point of the vaulter over the grips. |
||
|
|
|
 The horse is gently introduced to the idea that we intend to use his whole body from neck to croup. |
||
|
|
|
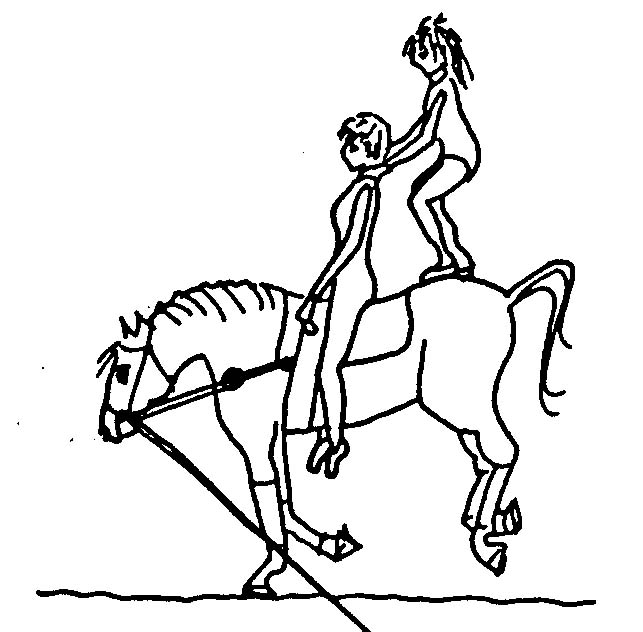 Use a light and confident vaulter for first try. Do not dig toes into the kidneys! Do not punish the horse for this first little protest !! |
||
Conclusion:
|
Zusammenfassung:
|
|
Work on the Lunge Line – Part 17 |
Arbeit an der Longe – Teil 17 |
|
Warm-up phase:
Schooling Phase:
Your signals:
The cool down phase:
The end goal of your schooling:
Work over poles:
|
Lösungsphase:
Arbeitsphase:
Ihre Signale:
Entspannungsphase:
Endziel der Ausbildung:
Arbeit über Stangen:
|
|
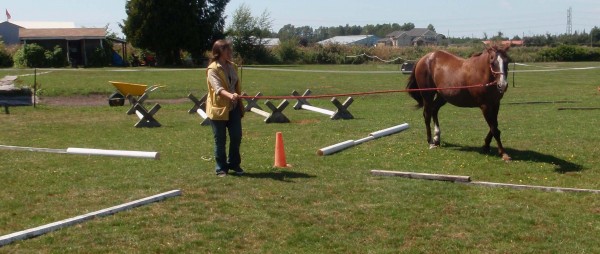
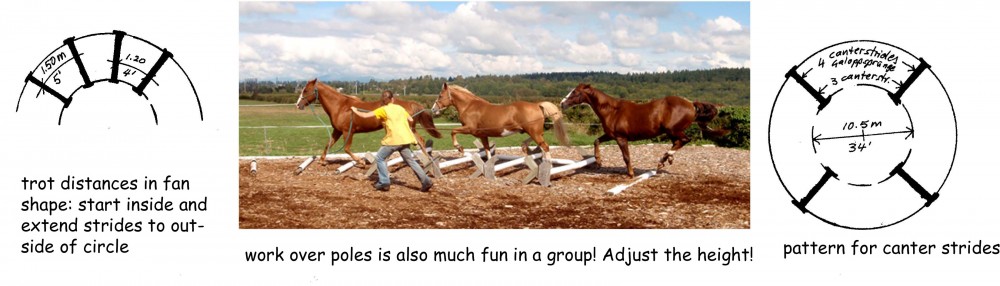 Left: trot pole distances vary from 1.2 m further in to 1.5 m on the outside. Start with poles on the ground – later in low elevation as in the photo centre. Right: distances for gymnastic exercises in canter over poles. On the outside of the cirle for 4 canter strides, further inside for 3. |
||
Lunging for vaulting:
Next time : a few special hints for work on the lunge line – for equestrian vaulting. |
Longieren für Voltige:
Nächster Blog: Tipps für Longenarbeit in der Voltige. |
|
Posted in Lungeing
Tagged true dialog with horse on the lunge line, true dialogue equestrian longeing
No Comments
Work on the Lunge Line – Part 16 |
Arbeit an der Longe – Teil 16 |
|
More Patterns, more games:
|
Mehr Muster und Spiele:
|
|
 Use your whip and your own body position to drive, frame or point out the horse. |
||
|
|
|
 Don’t let the horse cut corners in the square! Be ready with your whip sign early. |
||
|
|
|
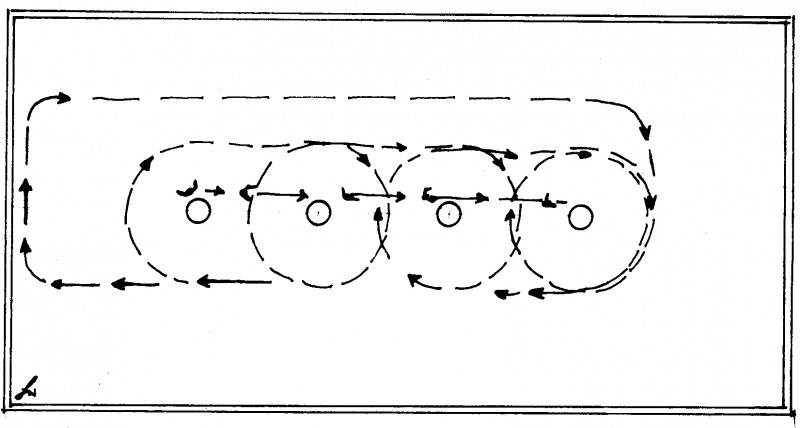 The lunger should move on a straight line and with regular strides – also backward ! |
||
|
|
|
 Practise picking up the lunge and letting it out again in a fluent motion. |
||
|
|
|
 The Bretzel and Cloverleaf will later be your horse’s favourite off-line games! |
||
|
|
|
Posted in Lungeing
Tagged Moving patterns for equestrian lunging, moving while lunging a horse
No Comments
Work on the Lunge Line – Blog 15: Mobilisation exercises, patterns and games for balancing the horse
March 17, 2013
Work on the Lunge Line – Part 15 |
Arbeit an der Longe – Teil 15 |
|
Gymnastic exercises:
click on picture to enlarge |
Gymnastizierung:
|
|
 We mobilise the entire spine from poll to croup. |
||
|
|
|
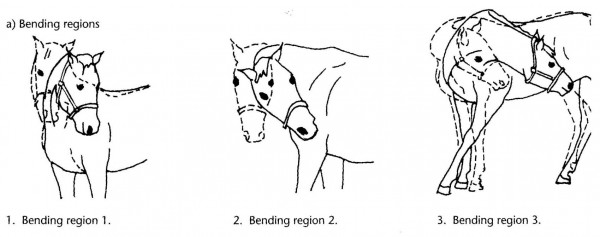 It is important to guide the horse throught the regions correctly. |
||
|
|
|
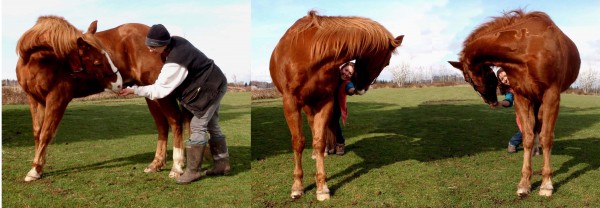 With training any healthy horse can reach his knee! |
||
|
|
|
 The horse bends naturally and without coercion. In the “Labyrinth” he is very attentive! |
||
|
|
|
 If your horse is hollow on the right, the opposite applies. |
||
Next time more patterns, more games! |
|
|
Posted in Lungeing
Tagged balancing horse on the lunge line, Equestrian Lunging Horse, mobilisation for horse on lunge line
No Comments
Work on the Lunge Line – Part 14 |
Arbeit an der Longe – Teil 14 |
|
We shortly recapitulate up to here:
|
Wir rekapitulieren bis hierher:
|
|
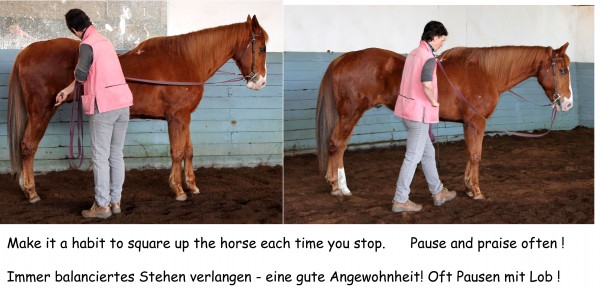
 Practise our body language in the “Teach Stop” exercise. Make sure the horse squares up each time. |
||
|
|
|
 Now practise your body language commands for speeding up and slowing down your horse. |
||
|
|
|
|
|
|
 As long as the horse still storms off in canter, go back to walk or trot (right). |
||
In the next blog we will introduce some patterns to help the horse find his balance. |
Im nächsten Blog fahren wir mit einigen Übungsmuster fort, um dem Pferd zu besserem Gleichgewicht zu verhelfen. |
|
Posted in Lungeing
Tagged training exercises equestrian lunging, training exercises for lunging horses
No Comments
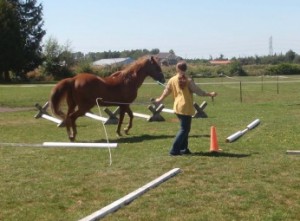
Work on the Lunge Line – Part 13 |
Arbeit an der Longe – Teil 13 |
|
Overview over auxiliary reins:
|
Überblick Hilfszügel:
|
|
 Left: according to Ph. Karl the horse would go against the reins here. Right: the horse finds the way down. |
||
|
|
|
 Elevation is needed for collection. |
||
|
|
|
 |
||
|
|
|
 On the see-saw the horse explores his gravity point. |
||
Warm-up phase: During warm-up we start without running reins until the horse has found natural rhythm in walk and trot. A helper leads the inexperienced or nervous horse out onto the circle line and stays with him until he calms down. Then we connect the auxiliary reins in position for relaxation – inducing the horse to drop his head, and start seeking some contact to us on the lunge line. We work on both hands. The length of the warm-up should be at least ten minutes, but with a nervous horse as long as it takes. There is no sense in making any kind of “schooling” demands as long as the horse is nervously cramped up!
Schooling phase:
Cool-down:
Next time we’ll recapitulate and begin to exercise what we have learned so far. |
Lösungsphase:
Arbeitsphase:
Entspannungsphase:
Das nächste Mal rekapitulieren wir und üben, was wir bis hierher gelernt haben. |
|
Posted in Lungeing
Tagged auxiliary reins for lunging horses and use during training phases
No Comments
Work on the Lunge Line – Part 12 |
Arbeit an der Longe – Teil 12 |
|
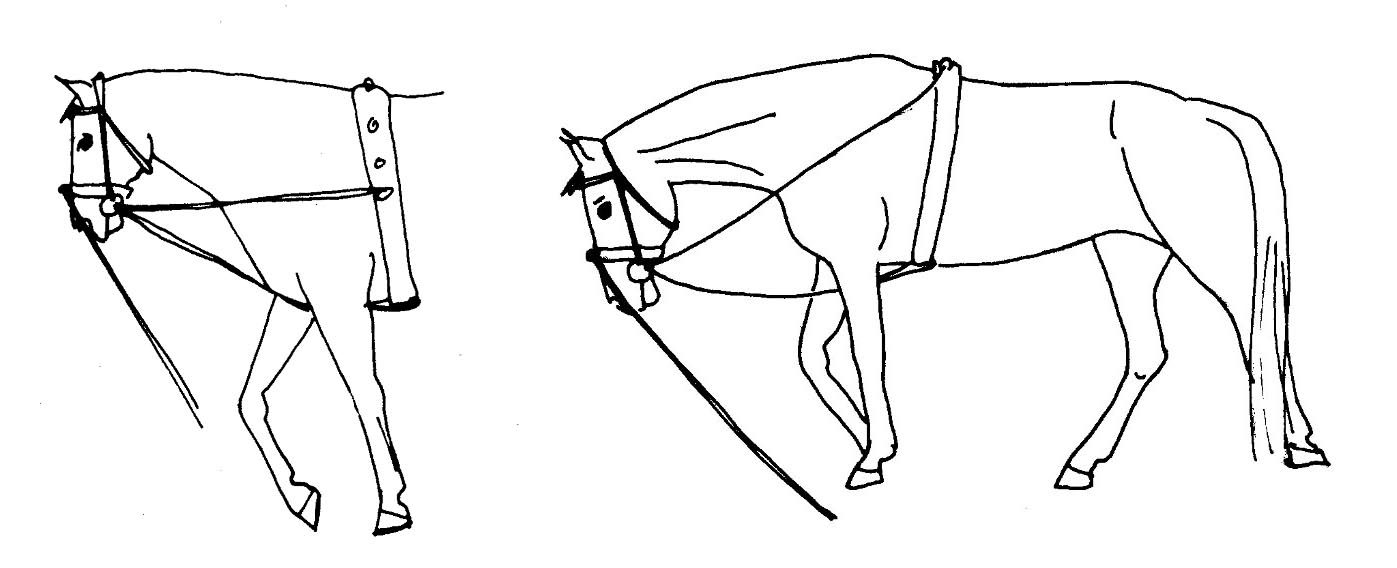
Auxiliary Reins:
|
Hilfszügel:
|
|
 The two left drawings show the correct way: horizontal! the drawing on the right is a NO! copied from “Une certaine idée du dressage, Odin à Saumur”, 1999 Philippe Karl
|
||
|
1. Der Weg in die Tiefe – Dehnhaltung:
|
|
 Left you see a natural relaxation posture. On the right the horse finds the way down with running reins. |
||
|
|
|
 Crossing legs on the small volte – see “From Leading to Liberty” and “Playing with Horses” |
||
|
|
|
 Stoßzügel – straight side-reins – are counter-effective in training. In vaulting competition they are required by the rules. |
||
|
|
|
|
||
| To be continued next time with an overview over auxiliary reins | Weiter gehts nächstes Mal mit einem Überblick über gängige Hilfszügel | |
Posted in Lungeing
Tagged Auxiliary reins for lunging horses, equestrian auxiliary reins, neck extension horses
No Comments
Work on the Lunge Line – Part 11 |
Arbeit an der Longe – Teil 11 |
|
Some practice on the rope:
|
Wir üben am Seil:
|
|
|
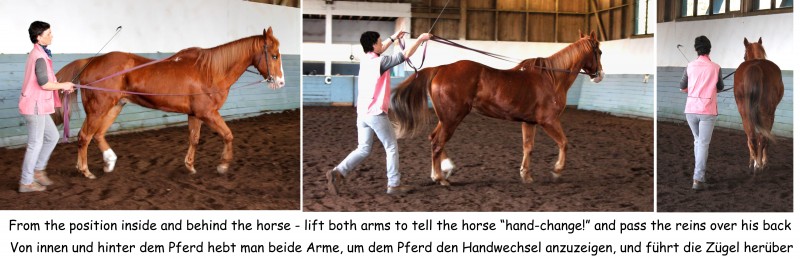
© smarthorses2013 – “The Hand-change” via body Language
|
||
|
|
|
|
© 2013 smarthorses.com – “Varying the Circle Size” via body language |
||
|
|
|
|
© 2013 smarthorses.com – “Varying the Circle Size Off-Line” via body language
|
||
To be continued in the next blog – auxiliary reins. |
Weiter gehts im nächsten Blog mit Hilfszügeln |
|
Work on the Lunge Line – Part 10 |
Arbeit an der Longe – Teil 10 |
|
|
|
|
 Read and view how it is done! |
||
|
|
|
|
© 2013 smarthorses.com “Moving the Circle on the Lunge Line” |
||
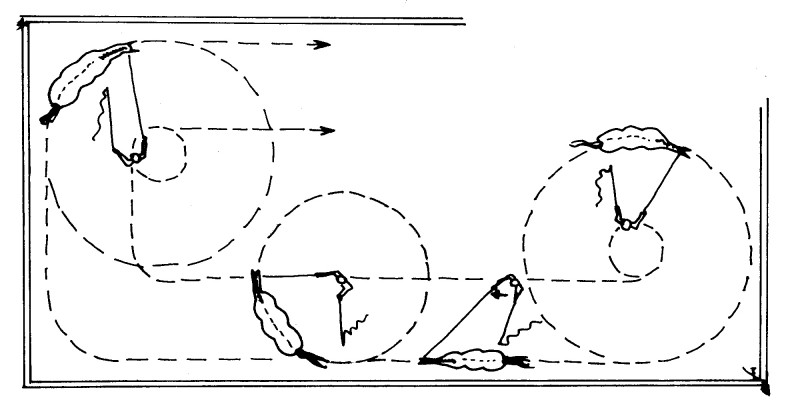
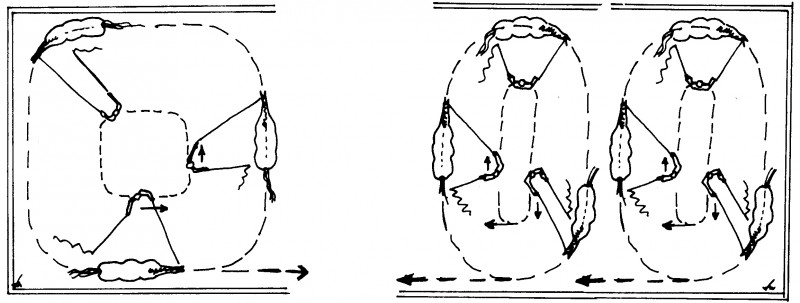
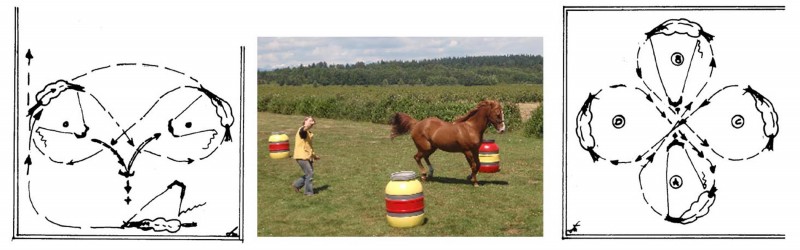
Game 36 Moving the circle (page 156):
|
Spiel 36 Zirkel Verschieben (Seite 156):
|
|
|
© 2013 smarthorses.com – “Moving the circle – free lunging”
|
||
To be continued. Meanwhile: To order the book “From Leading to Liberty” J.A. Allen 2012 go to: other possibilities for ordering in your country click on “books” To order the films: “Playing with Horses” Equestrian Vision go to: |
Fortsetzung folgt. Inzwischen: Buch Bestellung “From Leading to Liberty” J.A. Allen 2012 bei: für andere Bestellmöglichkeiten in Deutschland: Klick auf “books” Film Bestellung “Playing with Horses” Equestrian Vision bei: |
|
Working on the Lunge Line – Part 9 |
Arbeit an der Longe – Teil 9 |
|
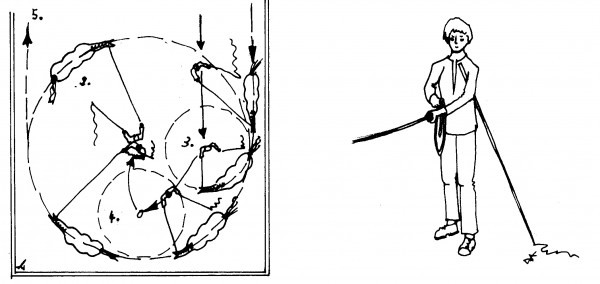
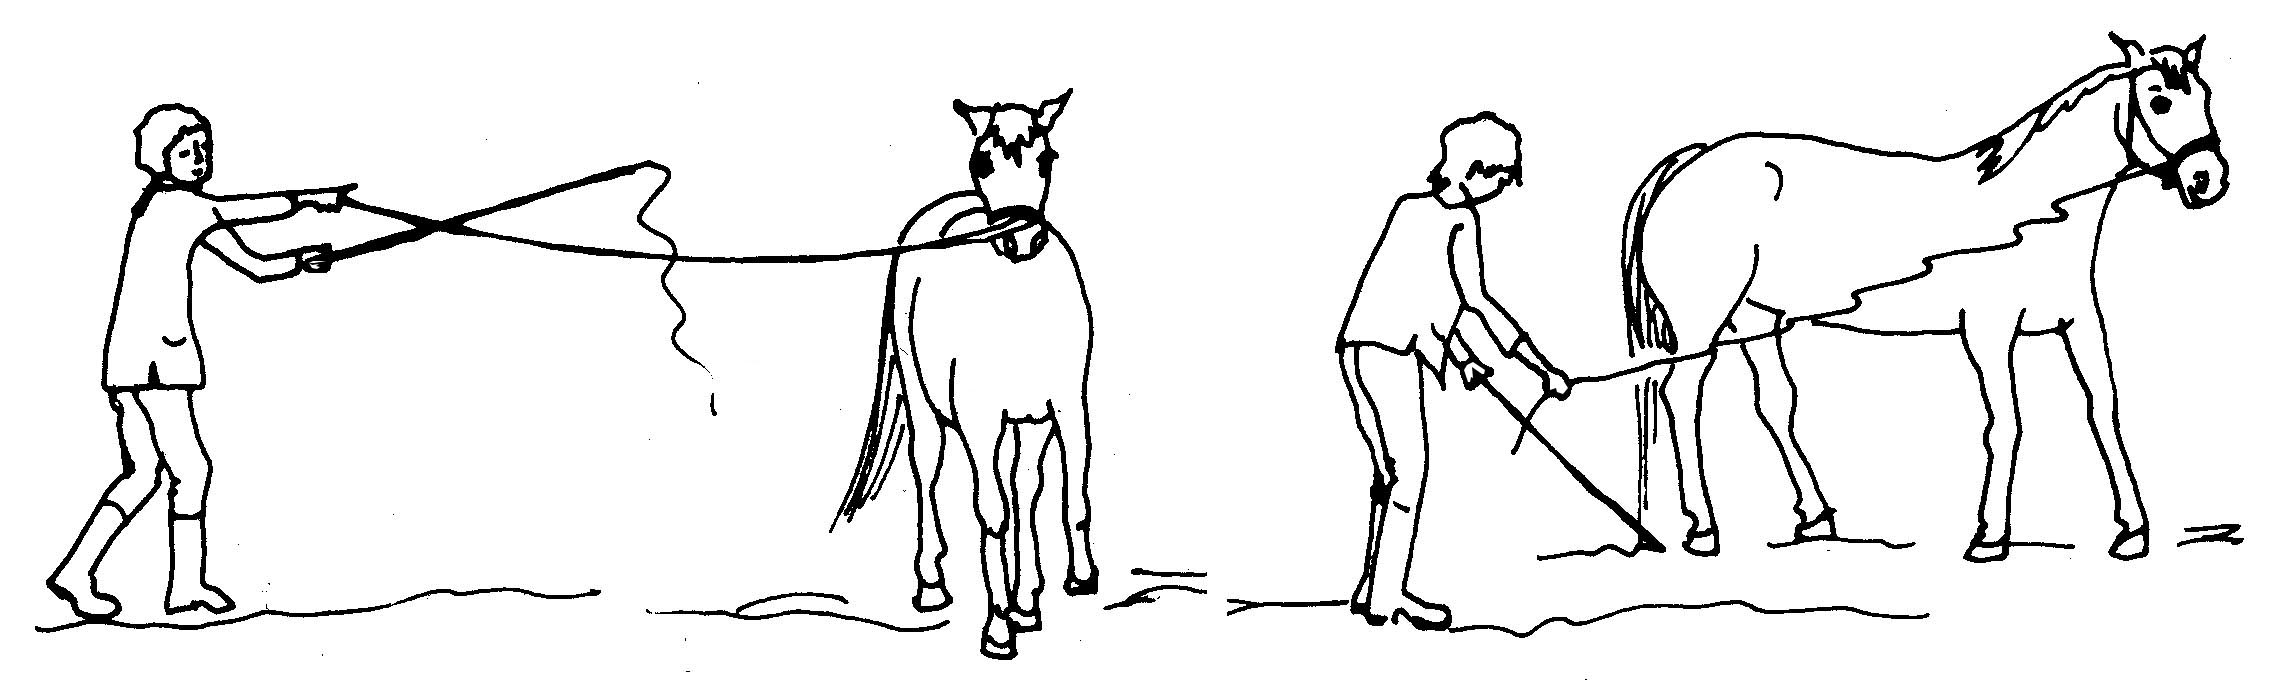
The lunge line:
|
Die Longe:
|
|
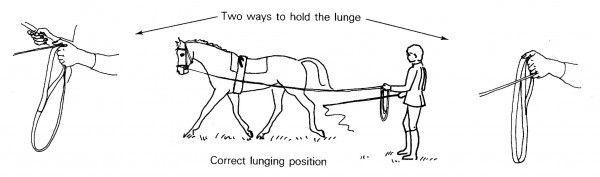 There are different ways to hold the lunge – choose what guarantees the softest contact! |
||
|
|
|
 Never in the hands of a beginner! |
||
|
|
|
 This attachment is ineffective and not good for the horse. |
||
|
|
|
 the only time when the lunge is in both hands – pick it up in orderly loops! |
||
Picking up and letting out of the lunge line:
Next time we discuss how to explain to the horse |
Aufnehmen und Auslassen der Longe:
Nächstes Mal fahren wir damit fort, wie man dem Pferd seine Aufgabe an der Longe erklärt und wie man sie während des Trainings handhabt. |
|
Working on the Lunge Line – Part 8 |
Arbeit an der Longe – Teil 8 |
|
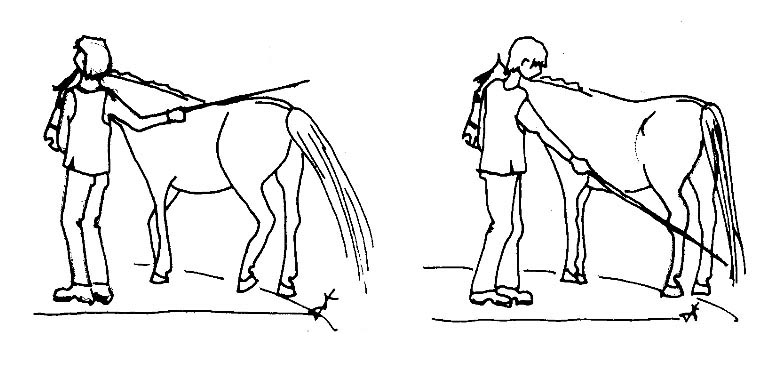
 The bit must NEVER touch any teeth !
Cavesson :
 We removed the nose band of the bridle. The nose band of the cavesson is passed under the straps of the bit.
 This cavesson has its own attachment for a bit
Next time we continue with the lunge line.
|
Die Trense:
Kappzaum:
Nächstes Mal geht es weiter mit der Longe. |
Working on the Lunge Line – Part 7 |
Arbeit an der Longe – Teil 7 |
|
Whip aids – continued:
|
Fortsetzung – Peitschenhilfen:
|
|
|
© smarthorses.com “free lunge with body language”
|
||
Film:
Resting the whip:
Note:
Read on next time about bridle and cavesson use! |
Film:
Ruhestellung der Peitsche:
Zu beachten:
Lesen Sie nächstes Mal weiter über Trense und Kappzaum! |
|
Work on the Lunge Line – Part 6 |
Arbeit an der Longe – Teil 6 |
|
The Lungeing Whip:
The role of the whip:
|
Die Longierpeitsche:
Die Rolle der Peitsche:
|
|
 A slightly raised whip is enough to make the horse step more actively |
||
Touching points for the whip:
 Aim with the tip of the stick toward the ball.
How to apply whip aids is to be continued in the next blog. |
Touchierpunkte für die Peitsche:
Im nächsten Blog geht es weiter mit der Anwendung korrekter Peitschenhilfen.
|
|
Work on the Lunge Line – Part 05 |
Arbeit an der Longe – Teil 05 |
|
|
|
|
|
© 2013 Smarthorses.com – Teach Stop |
||
Click on this picture to view the film
|
klicken Sie auf dieses Bild um den Film zu sehen
|
|
|
© smarthorses.com – Gaits |
||
|
|
|
|
© smarthorses.com 2013 – canter stop
|
||
Next Time we will talk about the role of the whip.
|
Weiter geht es nächstes Mal mit der Rolle der Peitsche!
|
|
Work on the lunge line – Part 4 |
Arbeit an der Longe – Teil 4 |
|
The book* refers to “From Leading to Liberty”
Body language:
|
Das Buch* bezieht sich immer auf “From Leading to Liberty”
Körpersprache:
|
|
 Left: person’s body says: let’s sleep! Right: she says: Attention! We’ll do something now! Links: die menschliche Körpersprache sagt: wir ruhen! Rechts sagt sie: aufgepaßt! Gleich passiert was! |
||
|
|
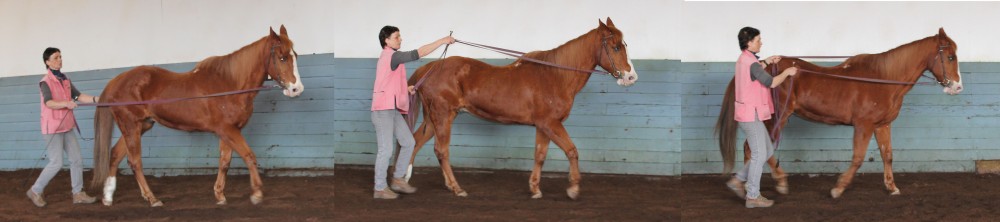
|
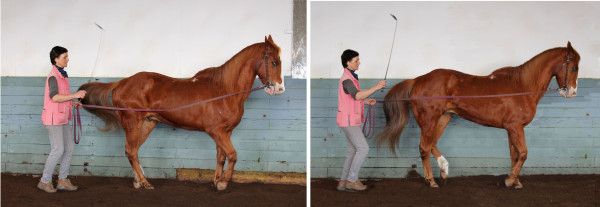
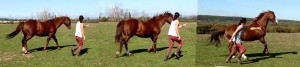 On the left: Leading position, your shoulders in front of his. Centre: Partner position with shoulders parallel to each other, I indicate the desired tempo with my body! Right: Driving position – I am in the back to make him faster. |
||
The position of the lunger:
|
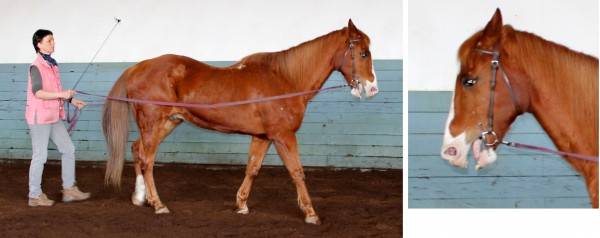
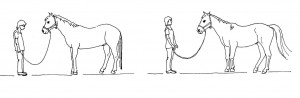
Die Position des Longenführers:
|
|
 Staring at his hip joint is a demand to yield – it makes him move it away – he turns to face you. This brings him in from the circle too! |
||
Aids are only aids when they are aiding the horse!
Nothing works without praise!
Next time we talk about the whip – what we use it for and what it is NOT there for!
|
Hilfen sind nur Hilfen, wenn sie helfen!
Nichts geht ohne Lob!
Nächstes Mal geht es um die Peitsche – was sie darf und was nicht!
|
|
Work on the lunge line – Part 3 |
Arbeit an der Longe – Teil 3 |
|
Voice commands – continued:
Clear:
It’s how you say it!
Clicking your tongue
So how to do it better?
Concise:
|
Stimmkommandos fortgesetzt:
Klar:
Der Tonfall macht die Musik!
Zungenschnalzen
Wie macht man es also besser?
Knapp:
|
|
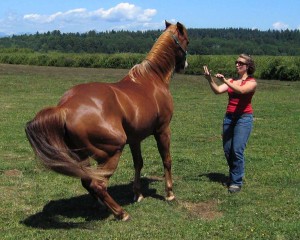 “HO!” means STOP ! – Always and promptly !! “HO!” heisst komplett anhalten – immer und promt! |
||
Consistent:
 “Stay!” means: don’t move, regardless of what happens around you. “Stay!” heisst: beweg dich nicht, egal was aussenherum passiert.
To be continued next time with body language!
|
Konsequent:
Weiter geht es nächstes Mal mit Körpersprache!
|
|
Work on the Lunge line – Part 2 |
Arbeiten an der Longe – Teil 2 |
|
How to start:
The laws of shaping always apply!
When results are not forthcoming it is the fault of the trainer!
* “From Leading to Liberty” by Jutta Wiemers J.A.Allen, 2011 |
Wie beginnen:
Die Gebote des Formens gelten immer!
Wenn sich kein Ergebnis einstellt, ist es die Schuld des Trainers!
|
|
 These horses are learning polite contact at the end of the ropes in a playful manner – I will NOT play tug-of-war with three horsepower! Diese Pferde lernen höflichen Kontakt am Seilende beim Spielen – ich werde mich mit drei Pferdestärken NICHT aufs Tauziehen einlassen! |
||
Where should you work:
Equipment:
Voice aids belong to your equipment arsenal!
Next time we elaborate how to make your voice aids effective!
|
Wo sollte man Longieren:
Ausrüstung:
Stimmkommandos gehören zur “Ausrüstung!”
Nächstes Mal besprechen wir wie man seine Stimmhilfen effektiv macht! |
|
Posted in Lungeing
Tagged laws of shaping, lunging equipment, lunging horses knowledgeably
No Comments
Work on the lunge line – Blog 01:Introduction:
|
Arbeit an der Longe – Blog 01:Einleitung:
|
|
 With preparatory games on the rope the horse understands his job to stay out on the circle
To be continued: The equipment
|
Fortsetzung folgt: die Ausrüstung |
Posted in Lungeing
Tagged equestrian lunging, horse lunging, Lunging according to HEM method
No Comments
Obituary on Peter |
Nachruf für Peterchen |
|
|
|
|
 Willing, reliable and fast! Peter was a joy to ride! |
||
|
|
|
 We canter in Sync – body language is clear, horse fully focussed! |
||
|
|
|
 To his last day Peter was willing to give his best |
||
|
|
|
 Peter honored me with his trust – curtseying on the bridge! |
||
|
|
|
 Peter in dandelion heaven – this was taken on his 32nd birthday |
||
|
|
|
Posted in Smart Horses
No Comments
How to H.E.M. – Help, Explain and Motivate your horse – Part 21 |
Helfen, Erklären und Motivieren – Teil 21 |
|
Motivate – last and most important!
|
Motivate – zu guter letzt und wichtig!
|
|
 Keep the motivation going with honest enthusiasm! Die Motivation muß mit Ihrer echten Begeisterung unterstützt werden! |
||
For a motivation-conclusion remind yourself of what would be de-motivating:
|
In der Zusammenfassung über Motivation rufen Sie sich in Erinnerung, was de-motivierend wäre:
|
|
 Czar knows that as a good playmate he has to stay parallel and next to the bike – and he always does! Czar weiß, daß er als guter Kumpel auf selber Höhe mit dem Rad bleiben soll – und er tut es immer! |
||
Above all else – have FUN playing!!
|
Vor allem aber – viel SPASS beim Spielen!!
|
|
 www.smarthorses.com |
||
Posted in H.E.M. = Help, Explain, Motivate
Tagged Fehler motivieren, motivation mistakes
No Comments
How to H.E.M. – Help, Explain and Motivate your horse – Part 20 |
Helfen, Erklären und Motivieren – Teil 20 |
|
|
|
|
 Keep all three playmates interested – or else they will drift away! Alle Spielkameraden müssen sich angesprochen fühlen – sonst driften sie davon! |
||
|
|
|
 Ultimate fun! Horse performs on voice command. Ein Hauptspaß! Das Pferd gehorcht auf Stimmhilfe. |
||
|
|
|
 Most difficult to perform in close proximity – very high motivation is needed! Eng beieinander sehr schwierig auszuführen – auch hier ist hohe Motivation nötig! |
||
| Read the conclusion next week in part 21! | Lesen Sie den Rest nächste Woche im Teil 21! | |
Posted in H.E.M. = Help, Explain, Motivate
Tagged clicker training, group games, Gruppenspiele, Klicker Training
No Comments
How to H.E.M. – Help, Explain and Motivate your horse – Part 19 |
Helfen, Erklären und Motivieren – Teil 19
|
|
|
|
|
 Calling a horse over a jump at liberty requires high motivation. Damit ein Pferd sich frei über einen Sprung rufen läßt braucht es hohe Motivation. |
||
|
|
|
 Beau’s face shows that he is confident and attentive. Beaus Gesicht zeigt, daß er aufmerksam und zuversichtlich ist. |
||
Read on in part 20 ! |
Lesen Sie weiter im Teil 20! |
|
How to H.E.M. – Help, Explain and Motivate your horse – Part 18 |
Helfen, Erklären und Motivieren – Teil 18
|
|
|
|
|
 His ears show he is fully concentrated in what is happening at the back. Seine Ohren zeigen, daß er voll nach hinten konzentriert ist. |
||
Continue in part 19 with the beginning of the third Chapter: How to motivate your horse!
|
Lesen Sie im nächsten Teil 19 – Anfang des dritten Kapitels: Wie man sein Pferd motiviert !
|
|
How to H.E.M. – Help, Explain and your horse – Part 17 |
Helfen, Erklären und Motivieren – Teil 17
|
|
We continue our “Tyre Game” example:
|
Wir fahren fort mit unserem “Reifenspiel” Beispiel:
|
|
 When the foot has landed correctly, the whip rests against the leg. Wenn der Huf korrekt gelandet ist, ruht die Gerte am Bein. |
||
|
|
|
 Lean the whip to tell him to keep the foot in the air while you give directional aids. Die Gerte bleibt ruhig am Bein als Zeichen, daß der Fuß schweben soll, bis ich die Richtungshilfe gegeben habe. |
||
|
|
|
 Calm face and interested ears show that Beau does not feel trapped, although his feet are caught on the rim of the tyres. Ruhiges Gesicht und interessierte Ohren zeigen, daß Beau sich nicht “gefangen” fühlt, obwohl er mit den Füßen am Rand des Reifens hängenblieb. |
||
|
|
|
 King has understood the concept of carefully groping for the tyre – he is concentrated and listens to my voice commands. King hat kapiert, daß er sanft den Reifen ertasten muß – er ist konzentriert und hört auf meine Stimmhilfen. |
||
to be continued : Read on in part 18 !
|
Weiter gehts im Teil 18 !
|
|
Posted in H.E.M. = Help, Explain, Motivate
Tagged helfen Touchierhilfen, help touching aids
No Comments
How to H.E.M. – Help, Explain and Motivate your horse – Part 16 |
Helfen, Erklären und Motivieren –Teil 16
|
|
|
|
|
 Framed between his friends he felt secure. Zwischen seinen Freunden eingerahmt fühlt er sich sicher. |
||
|
|
|
 King receives praise for the courage to explore. King wird gelobt für den Mut, das Ding wenigstens zu erkunden. |
||
|
|
|
 He follows the slight tugging – but the tongue is still indicating confusion. Er folgt dem Zupfen – aber die Zunge zeigt immer noch Unsicherheit an. |
||
To be continued with part 17! |
Fortsetzung folgt im Teil 17!
|
|
Posted in H.E.M. = Help, Explain, Motivate
Tagged helfen Emotion, helfen Verstand, help emotional, help mental
No Comments
How to H.E.M. – Help, Explain and Motivate your horse – Part 15 |
Helfen, Erklären und Motivieren – Teil 15 |
|
Help:Where explaining is more factual, help is more physical and psychological.
You must KNOW:
|
Helfen:Wo erklären mit den Tatsachen einer Situation zu tun hatte, ist helfen entweder körperlich oder psychologisch.
Sie müssen WISSEN:
|
|
 King says: “I’d rather die! I simply can’t !!” King sagt: “Lieber sterbe ich! Ich kann da einfach nicht rein!!” |
||
Continue in part 16! |
Lesen Sie weiter im Teil 16!
|
|
How to H.E.M. – Help, Explain and Motivate your horse – Part 14 |
Helfen, Erklären und Motivieren – Teil 14 |
|
2) Practise the individual elements of the game:
|
2) Üben Sie die Einzelelemente:
|
|
 |
||
|
|
|
 Give directional aids on the halter and with the whip so he doesn’t land on the tyre. Richtungsweisende Hilfe am Strick und mit der Gerte, so daß er nicht auf dem Gummi landet. |
||
|
|
|
 Clear body language tells the horse to stop after each step. Klare Körpersprache zeigt dem Pferd, daß es nach jedem Schritt stoppen soll. |
||
|
|
|
 To not feel trapped here takes excellent self-confidence, which all the prep-games provided. Sich hier nicht “gefangen” zu fühlen erfordert Selbstvertrauen, welches er in den Vorübungen entwickelt hat. |
||
Explain – Conclusion:
Read on in part 15: „Help“ your horse effectively so he develops the courage to try out all challenges !
|
Erklären – Zusammenfassung:
Bitte lesen Sie weiter im Teil 15: „Helfen“ Sie Ihrem Pferd effektiv, damit es den Mut entwickelt, alle Herausforderungen anzunehmen !
|
|
Posted in H.E.M. = Help, Explain, Motivate
Tagged dem Pferd erklären, Einzelteile üben, explain to horse, practise components
No Comments
How to H.E.M. – Help, Explain and Motivate your horse – Part 13 |
Helfen, Erklären und Motivieren – Teil 13 |
|
1) Analyse the problem:
|
1) Analysieren wir das Problem:
|
|
 Train synchronised slow stepping over a pole on touching aids |
||
|
|
|
 Beau is very confident and does not feel trapped |
||
| Whereas King has terrible difficulties to even put one foot into one tyre, Beau is so self-confident that he has no problem getting “entrapped” front and hind! | Wo King größte Schwierigkeiten hat auch nur einen Huf in einen Reifen zu stellen, ist Beau sehr erfahren und selbstbewußt und fühlt sich keineswegs in der Falle gefangen. | |
In the next part we continue with 2) Practising the individual components of a game ! |
In der nächsten Folge geht es um: 2) „Üben Sie die Einzelelemente“ eines Spiels |
|
How to H.E.M. – Help, Explain and Motivate your horse – Part 12 |
Helfen, Erklären und Motivieren – Teil 12 |
|
Whip and rope aids:
|
Gerten- und Seilhilfen:
|
|
 Peter follows my touching aid precisely – I can place his foot accurately |
||
|
|
|
 By tugging slightly on the halter you give the horse directional aids |
||
|
|
|
 Round your body and move backward to make the horse follow |
||
Continue in part 13: Analyse the problem in all its components!
|
Weiter gehts im nächsten Teil: Analysieren Sie das Problem in allen seinen Bestandteilen!
|
|
How to H.E.M. – Help, Explain and Motivate your horse – Part 11 |
H.E.M. –Helfen, Erklären und Motivieren – Teil 11 |
|
4) How does your particular horse learn – and how does he think along today versus yesterday?
5) What are your tools to explain the necessary steps to your horse?
The way we establish our body language is based on how the horses behave in the herd –
|
4) Wie lernt Ihr ganz bestimmtes Pferd – und wie denkt es heute verglichen mit gestern?
5) Was für Werkzeug braucht man, um seinem Pferd die nötigen Schritte zu erklären?
Wir gestalten unsere Körpersprache nach der Weise, wie sich die Pferde in der Herde untereinander verhalten –
|
|
|
We canter in Sync – body language is clear, horse fully focused! |
||
Voice commands:
continue in part 12: Whip and rope aids |
Stimmkommandos:
Weiter gehts im nächsten Teil mit Seil- und Touchierhilfen !
|
|
Posted in H.E.M. = Help, Explain, Motivate
Tagged body language, Körpersprache, Stimmkommandos, voice commands
No Comments
How to H.E.M – Help, Explain and Motivate your horse – Part 10 |
H.E.M. : Helfen, Erklären und Motivieren – Teil 10 |
|
3) When do you have to explain something to your horse?
|
3) Wann müssen Sie Ihrem Pferd etwas erklären?
|
|
 “Airplane” ears and tongue stuck out indicates a state of confusion |
||
|
|
|
 Sticking the tongue out is a sign of being at a loss |
||
In the next sequel: How does your horse learn? Read on in part 11 !
|
Im nächsten Teil: Wie lernt Ihr Pferd? Klicken Sie sich ein für Teil 11 ! |
|
How to H.E.M – Help, Explain and Motivate your horse – Part 9 |
H.E.M. – Helfen, Erklären und Motivieren – Teil 9 |
|
1) What does he see?
Pulling is not allowed!
|
1) Was sieht Ihr Pferd ?
Ziehen ist nicht erlaubt!
|
|
 He simply can’t come closer yet – don’t pull !!! |
||
2) What part of an exercise needs explanation?
|
2) Welcher Teil einer Übung braucht vielleicht Erklärung?
|
|
|
|
||
|
|
|
| Read on in part 10: When does your horse need an explanation? | Lesen Sie weiter im Teil 10: Wann braucht Ihr Pferd eine Erklärung? | |


How to H.E.M – Help, Explain and Motivate your horse – Part 8 |
Helfen, Erklären und Motivieren – Teil 8
|
|
Training with Positive Reinforcement:
|
Training mit Positiver Verstärkung:
|
|
 Teaching the horse good eating manners only takes 20 minutes |
||
|
|
|
 Your “good boy!” must come instantly, as soon as he gives a hint of trying to comply! Not only once the exercise is perfect! |
||
|
|
|
 While you are jumping, only the bridging signal can tell your horse how wonderful he is at that moment! And he knows: treat will follow… |
||
|
|
|
 Since the horse follows my feeding hand, I can lead him into – and hold him in! – positions, which are desirable for a healthy stretch. |
||
|
|
|
| Read on in part 9: „Explain“ to your horse in an effective way, what you want from him.
|
Im Teil 9 lernen wir, dem Pferd in effektiver Weise zu „erklären“, was wir von ihm wollen. | |
Posted in H.E.M. = Help, Explain, Motivate
Tagged behavioral science, positive reinforcement, positive Verstärkung, Verhaltenswissenschaft
No Comments
How to H.E.M – Help, Explain and Motivate your horse –Part 7 |
Helfen, Erklären und Motivieren –Teil 7
|
|
Shaping Law # 9:9) The Ninths Law states that you must go back to Kindergarden, if the horse’s behaviour (by which we mean his performance) deteriorates.
|
Gebot des Formens # 9:9) Das neunte Gebot besagt, daß man zurück in den Kindergarten muß, wenn die Leistung des Pferdes auf einmal schlechter wird.
|
|
 |
||
Shaping Law # 10:10) The Tenth Law is about the greatest temptation for which we all at times fall. It tells us to always end on a high note!
Note:
Which one is the high note?
|
Gebot des Formens # 10:10) Das zehnte Gebot warnt uns vor der größten Versuchung. Es sagt, daß wir immer nach einer Bestleistung aufhören müssen!
Ganz wichtig:
Welches ist die Bestleistung?
|
|
|
|
||
to be continued: What is positive re-inforcement – really? Read on in the next blog!
|
Weiter geht es: Was ist positive Verstärkung – wirklich? Lesen Sie weiter in der nächsten Folge! |
|

Posted in H.E.M. = Help, Explain, Motivate
Tagged behavioral science, Gebote des Formens, laws of shaping, Verhaltenswissenschaft
No Comments
Continued – all horses are lying upright…
Line Dance Blog 9:
|
Letztes Mal lagen alle Pferde aufrecht, hier geht es weiter!
Grand Finale ! |
|
21) 21st move:
|
21) Übung Einundzwanzig:
|
|
 a good proof of trust… |
||
22) 22nd move:
|
22) Übung Zweiundzwanzig:
|
|
 Shout “stay!”, so they stay put while you run! |
||
23) 23rd move:
|
23) Übung Dreiundzwanzig:
|
|
 |
||
Here the running pattern for the leader of horse B
24) 24th move:
|
Hier seht Ihr das Renn-Muster für Anführer von B
24) Übung Vierundzwanzig:
|
|
 All rear for the glorious end! |
||
| This is it ! You have really done it !! I sure hope the applause is deafening !!! Now send in your little film and collect your prize! | Echt cool seid Ihr – Ihr habt es geschafft !! Ich hoffe der Applaus zerfetzt Euch die Ohren !!! Jetzt schickt den Film ein und sammelt Euren Hauptgewinn ein! | |
How to H.E.M – Help, Explain and Motivate your horse – Part 6 |
Helfen, Erklären und Motivieren – Teil 6
|
|
Shaping Law # 7:7) The Seventh Law states: “When one shaping procedure is not eliciting progress, find another”
|
Gebot des Formens # 7:7) Das siebte Gebot besagt, daß man ein anderes Vorgehen finden muß, wenn die momentane Handlungsweise keinen Fortschritt bringt.
|
|
|
|
||
|
|
|
 Playing some games like the Waltz teaches the horse to tolerate swinging ropes |
||
Shaping Law # 8:8) The Eighths Law states: “Don’t interrupt a training session gratuitously; that constitutes a punishment.” (for the horse, the trainee)
|
Gebot des Formens # 8:8) Das achte Gebot besagt: Unterbrechen Sie niemals grundlos eine Trainingseinheit – das bedeutet (für das Pferd) eine Strafe!
|
|
 You can only demand the horse’s full attention, if you are willing to give the same! |
||
to be continued in part 7 with Laws 9 and 10 !
|
weiter geht’s mit den Geboten 9 und 10 im Teil 7 ! |
|

Posted in H.E.M. = Help, Explain, Motivate
Tagged behavioral science, Gebote des Formens, laws of shaping, Verhaltenswissenschaft
No Comments
Continued : after the roll-out!
Line Dance Blog 08:
|
Fortsetzung nach dem Ausrollen: | |||
18) Eighteenth move:
|
18) Übung Achtzehn:
|
|||
 |
||||
|
|
|||
 Preserve your “bubble” distance! |
||||
19) Nineteenth move:
|
19) Übung Neunzehn:
|
|||
 Establish a clean fan arrangement |
||||
20) Twentieth move:
|
20) Übung Zwanzig:
|
|||
 a good moment to stick in a treat! |
||||
To be continued for the glorious finale !!! |
letzte Fortsetzung zum gloriösen Finale !!! |
|||
|
|
||||
How to H.E.M – Help, Explain and Motivate your horse – Part 5 |
Helfen, Erklären und Motivieren – Teil 5
|
|
Shaping Law # 3:3) The Third Law states that “while you train, you must put the horse’s response onto a variable schedule of reinforcement.”
|
Gebot des Formens # 3:3) Das Dritte Gebot besagt, daß das geübte Verhalten des Pferdes bei variabler Belohnung sicher gezeigt werden muß, bevor Sie ein neues Detail hinzufügen oder die Kriterien erhöhen können.
|
|
 Praising regularly is counter-productive! Make it variable |
||
Shaping Law # 4:4) The Fourth Law states that you must temporarily relax the old standards of your demands when introducing a new criterion in your training.
|
Gebot des Formens # 4:4) Das Vierte Gebot besagt, daß man zeitweise den vorherigen Maßstab seiner Anforderungen lockern muss, wenn man ein neues Kriterium im Training einführt.
|
|
 Of course he can jump this height – but jumping so close to your belly is, for him, a completely different exercise! |
||
Shaping Laws # 5 and 6:5) The Fifth Law (“Stay ahead of your subject”) and 6) the Sixth Law (“Don’t change trainers in mid stream”) apply more to professional coaches, such as dolphin trainers in aquariums like Sea-World, who have very specific training schedules. For us “Players with Horses” they are less significant. to be continued… next time Law # 7 and # 8!
|
Gebote # 5 und 6:5) Das fünfte Gebot (“dem Lernenden immer einen Schritt voraus bleiben”) und das 6) sechste Gebot (“den Trainer nicht mitten in der Übung wechseln”) treffen mehr auf professionelle Trainer zu, wie zum Beispiel die der Delphine im Sea-World Aquarium, die ganz spezielle Trainingspläne haben. Für uns “Spieler mit Pferden” sind sie weniger bedeutend. Fortsetzung folgt mit dem siebten und achten Gebot !
|
|
Posted in H.E.M. = Help, Explain, Motivate
Tagged behavioral science, Gebote des Formens, laws of shaping, Verhaltenswissenschaft
No Comments
continued: after last time’s Kneel
Line Dance Blog 7:
|
Fortsetzung: nach dem Knien | |
16) Sixteenth move:
|
16) Übung Sechzehn:
|
|
 Attempt to keep them straight during the back-up! |
||
17) Seventeenth move: |
17) Übung Siebzehn: |
|
 move them bw by the tail – walk around the croup – roll them in – and out! |
||
|
|
|
 The horses must stay parked until you give the command to roll out |
||
|
|
|
 The horses should turn on the spot |
||
| Once you all perform this tight “spin” on the spot totally synchronized and end up facing straight West again, we will continue with the next blog! | Wenn das klappt und alle drei Pferde sich synchron im “Spin” drehen und wieder stracks auf einer geraden Linie nach Westen ankommen, machen wir mit den nächsten Übungen weiter! | |
How to H.E.M – Help, Explain and Motivate your horse – Part 4 |
H.E.M. = dem Pferd Helfen, Erklären und es Motivieren – Teil 4 |
|
2) Shaping Law # 2:The Second Law states that “you may always only train for one aspect of an exercise at the time.”
|
2) Das zweite Gebot:besagt, daß man immer nur einen Aspekt einer Übung an einem Zeitpunkt trainieren darf.
|
|
 Gentle touching aid: “foot!” |
||
|
|
|
 While learning the “Mountain Goat” I can place Peter’s foot precisely with my touching aid. |
||
| Learn about Law 3 to 6 in the next blog! | Lernen Sie das 3. bis 6. Gebot im nächsten HEM Blog! | |
Posted in H.E.M. = Help, Explain, Motivate
Tagged behavioral science, Gebot Formen, shaping laws, Verhaltenswissenschaft
No Comments
Continued:
Line Dance Blog # 6:
|
Fortsetzung: | |
|
|
|
 |
||
14) Fourteenth move:
|
14) Übung Vierzehn:
|
|
 Give a clear command for a simultaneous turn! |
||
|
|
|
 This is the moment to straighten the line and fix the distances! |
||
15) Fifteenth move:
|
15) Übung Fünfzehn:
|
|
 Perfect straight line and good distances! |
||
Continue as shown in the next blog, once this works well! Don‘t forget to praise a lot so that the horses stay motivated and enthused!
|
Weiter üben mit den nächsten Blog, wenn das hier klappt! Viel Loben nicht vergessen, damit die Pferde begeistert bleiben!
|
|
|
|
||

How to H.E.M – Help, Explain and Motivate your horse – Part 3 |
H.E.M. = dem Pferd Helfen, Erklären und es Motivieren – Teil 3 |
|
The ten laws of shaping:
Shaping Law # 1:1) The first Law states that the learning steps must be small enough so the horse has a real chance to attain praise.
|
Die zehn Gebote des Formens:
Gebot des Formens # 1:1) Das erste Gebot besagt, daß die Lernschritte klein genug sein müssen, damit das Pferd eine realistische Chance hat ein Lob zu verdienen.
|
|
 |
||
to be continued… Law # 2 in part 4! |
Lesen Sie weiter: das 2te Gebot im Teil 4! |
|
Posted in H.E.M. = Help, Explain, Motivate
Tagged behavioral science, Gebot des Formens, laws of shaping, Verhaltenswissenschaft
No Comments
Continued:
Line Dance Blog 05:
|
Fortsetzung: | |
9) Ninth move:
|
9) Übung Neun:
|
|
|
 Send them out with clear body language – all the same moment! |
||
10) Tenth move:
|
10) Übung Zehn:
|
|
 Perfect synchronicity during the handchanges is difficult! |
||
11) Eleventh move:
|
11) Übung Elf:
|
|
  |
||
12) Twelfth move:
|
12) Übung Zwölf:
|
|
 The hind quarters should not lag – keep the lines straight! |
||
13) Thirteenth move:
|
13) Übung Dreizehn:
|
|
 Beautiful straightness and perfect distances – great team! |
||
| To be continued next time! | Nächstes Mal gehts weiter ! | |

How to H.E.M – Help, Explain and Motivate your horse |
Helfen, Erklären und Motivieren |
|
|
|
|
 |
||
|
|
|
|
|
||
|
|
|
|
Willing, reliable and fast! Peter was a joy to ride! |
||
Learn to internalise these important laws! Read on in the next series!
|
Lernen Sie diese wichtigen zehn Gebote zu verinnerlichen – lesen Sie im nächsten Teil dieser Serie weiter!
|
|

Posted in H.E.M. = Help, Explain, Motivate
Tagged Beziehung, help explain motivate horse, Pferd helfen erklären motivieren, relationship
No Comments
Line Dance Blog 04:
|
Fortsetzung: | |
|
|
|
|
|
||
|
|
|
|
|
||
|
|
|
 |
||
|
|
|
|
||
|
|
|
|
|
||


H.E.M. Blog series: to begin soon |
Neue Serie H.E.M. Blog: beginnt bald
|
|
|
|
|
 He follows touching aids for direction – a tight rope act! |
||
My niche in the horse world is “Playing with Horses” –
|
Meine Nische in der Pferdewelt ist “Mit Pferden spielen” –
|
|
 Circling several horses Head-by-Head is a good test for your training skills! |
||
|
|
|
 Weaving through a row of cones, directed from behind on finger signs and voice aids only |
||
I hope you might be interested! This will alternate with the Line Dance contest to give you time to practise! |
Ich hoffe, Sie finden die Serie interessant! Wir wechseln dies mit dem Line Dance Wettbewerb ab, damit alle genug Zeit zum üben haben! |
|
Posted in H.E.M. = Help, Explain, Motivate
Tagged help explain motivate horses, Pferden helfen erklären motivieren
No Comments
Join the mailing list
Check your email and confirm the subscription
